Introduction: Laser Cut Foosball Cake Topper


Not being much of a baker or a cake decorator, I usually opt for a basic cake and then add 3D-printed or laser cut decorations. This year I decided to laser cut a functional foosball cake topper for an indoor soccer birthday party.
Step 1: Materials
1. Access to a laser cutter. I made mine at TechShop.
2. Acrylic sheet in various colors. I chose 1/8" (3mm) as a balance between strength, cost, and cutting speed.
3. Acrylic solvent adhesive.
4. Rods. I used 1/4" (6mm) acrylic rods.
5. Elastic Bands
6. Decorations. I used stick-on eyes and markers for the Minion players.
Step 2: Draw, Laser Cut, and Check Fit


I used CorelDraw (file attached) to lay out the various pieces. For a 13" x 9" cake (30cm x 20cm) I fit everything onto a sheet 24" x 18" (60cm x 45cm).
Laser Cutting Tips (especially for clear parts where mistakes cannot be covered):
1. Laser cut a test pattern out of scrap, or for a large layout, use cardboard.
2. Perform a dry run with the laser power off.
3. Depending on the power of the laser, multiple passes may yield better results.
Attachments

Step 3: Assemble


Remove paper backing, tape together, and use solvent adhesive to assemble. There are several Instructables on how to solvent bond acrylic.
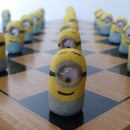
Step 4: Make the Players


I chose to laser cut Minion players and added a few more decorations afterwards.
Attachments
Step 5: Assemble the Foosball Table


I used elastic bands to secure the players to the rods and also to create bumpers and grips on the ends. Allowing the players to be attached and removed easily allowed each child to customize and take home a player after the party.
Step 6: Place on Cake


I used large rubber feet (with center holes) and cutoff straws to suspend the foosball table just above the cake.

Participated in the
Epilog Contest VII


