Introduction: Make Your Own MPU6050 Gyro Sensor
The MPU6050 is a very popular accelerometer gyroscope chip that has six axes sense with a 16-bit measurement resolution. This high accuracy in sense and the cheap cost make it very popular among the DIY community. Even many commercial products are equipped with the MPU6050. The combination of gyroscope and accelerometers is commonly referred to as an Inertial Measurement Unit or IMU.
IMU sensors are used in a wide variety of applications such as mobile phones, tablets, satellites, spacecraft, drones, UAVs, robotics, and many more. They are used for motion tracking, orientation and position detection, flight control, etc.
The MPU6050 module consists of an MPU6050 IMU chip from TDK InvenSense. It comes in a 24-pin QFN package with a dimension of 4mm x 4mm x 0.9mm. The module has a very low component count, including an AP2112K 3.3V regulator, I2C pull-up resistors, and bypass capacitors. There is also a power led which indicates the power status of the module.
The module also has two auxiliary pins which can be used to interface external IIC modules like a magnetometer, however, it is optional. Since the IIC address of the module is configurable more than one MPU6050 sensor can be interfaced to a Microcontroller using the AD0 pin. This module also has well documented and revised libraries available hence it’s very easy to use with famous platforms like Arduino. So, if you are looking for a sensor to control motion for your RC Car, Drone, Self-balancing Robot, Humanoid, Biped or something like that, then this sensor might be the right choice for you.
How Does MEMS Accelerometer Work?
MEMS accelerometers are used wherever there is a need to measure linear motion, either movement, shock, or vibration but without a fixed reference. They measure the linear acceleration of whatever they are attached to. All accelerometers work on the principle of a mass on a spring, when the thing they are attached to accelerates, then the mass wants to remain stationary due to its inertia and therefore the spring is stretched or compressed, creating a force which is detected and corresponds to the applied acceleration.
Supplies
In MEMS accelerometer, precise linear acceleration detection in two orthogonal axes is achieved by a pair of silicon MEMS detectors formed by spring ‘proof’ masses. Each mass provides the moving plate of a variable capacitance formed by an array of interlaced finger loke structures. When the sensor is subjected to a linear acceleration along its sensitive axis, the proof mass tends to resist motion due to its inertia, therefore the mass and its fingers become displaced concerning the fixed electrode fingers. The gas between the fingers provides a damping effect. This displacement induces a differential capacitance between the moving and fixed silicon fingers which is proportional to the applied acceleration. This change in capacitance is measured with a high-resolution ADC and then the acceleration is calculated from the rate of change in capacitance. In MPU6050 this is then converted into readable value and then it’s transferred to the I2C master device.
How Does MEMS Gyroscope Work?
The MEMS Gyroscope working is based on the Coriolis Effect. The Coriolis Effect states that when a mass moves in a particular direction with velocity and an external angular motion is applied to it, a force is generated and that causes a perpendicular displacement of the mass. The force that is generated is called the Coriolis Force and this phenomenon is known as the Coriolis Effect. The rate of displacement will be directly related to the angular motion applied.
The MEMS Gyroscope contains a set of four proof mass and is kept in a continuous oscillating movement. When an angular motion is applied, the Coriolis Effect causes a change in capacitance between the masses depending on the axis of the angular movement. This change in capacitance is sensed and then converted into a reading. Here is a small animation showing the movement of these proof masses on the application of an angular movement for different axis.
Step 1: Code
#include <Adafruit_MPU6050.h>
#include <Adafruit_Sensor.h>
#include <Wire.h>
Adafruit_MPU6050 mpu;
void setup(void) {
  Serial.begin(115200);
  // Try to initialize!
  if (!mpu.begin()) {
    Serial.println("Failed to find MPU6050 chip");
    while (1) {
      delay(10);
    }
  }
  Serial.println("MPU6050 Found!");
  // set accelerometer range to +-8G
  mpu.setAccelerometerRange(MPU6050_RANGE_8_G);
  // set gyro range to +- 500 deg/s
  mpu.setGyroRange(MPU6050_RANGE_500_DEG);
  // set filter bandwidth to 21 Hz
  mpu.setFilterBandwidth(MPU6050_BAND_21_HZ);
  delay(100);
}
void loop() {
  /* Get new sensor events with the readings */
  sensors_event_t a, g, temp;
  mpu.getEvent(&a, &g, &temp);
  /* Print out the readings */
  Serial.print("Acceleration X: ");
  Serial.print(a.acceleration.x);
  Serial.print(", Y: ");
  Serial.print(a.acceleration.y);
  Serial.print(", Z: ");
  Serial.print(a.acceleration.z);
  Serial.println(" m/s^2");
  Serial.print("Rotation X: ");
  Serial.print(g.gyro.x);
  Serial.print(", Y: ");
  Serial.print(g.gyro.y);
  Serial.print(", Z: ");
  Serial.print(g.gyro.z);
  Serial.println(" rad/s");
  Serial.print("Temperature: ");
  Serial.print(temp.temperature);
  Serial.println(" degC");
  Serial.println("");
  delay(1000);
}
Code Explanation
In the starting, we have included the Adafruit MPU6050 library, Adafruit Sensor library, and the wire library, which are necessary to communicate with the MPU6050 and get the reading. Then we have created a new instance called mpu which will be used to get the readings from the MPU6050 IMU.
#include <Adafruit_MPU6050.h>
#include <Adafruit_Sensor.h>
#include <Wire.h>
Adafruit_MPU6050 mpu;
In the setup function, we have initialized the serial communication and the MPU6050 IMU. Then the accelerometer range, gyroscope range, and filter bandwidth parameters are set. The range parameters will affect the accuracy of the reading. So, if needed these can be changed as per the library values. The setFilterBandwidth parameter will change the low pass filter bandwidth.
void setup(void) {
  Serial.begin(115200);
  // Initializethe MPU6050 IMU
  if (!mpu.begin()) {
    Serial.println("Failed to find MPU6050 chip");
    while (1) {
      delay(10);
    }
  }
  Serial.println("MPU6050 Found!");
  // set accelerometer range to +-8G
  mpu.setAccelerometerRange(MPU6050_RANGE_8_G);
  // set gyro range to +- 500 deg/s
  mpu.setGyroRange(MPU6050_RANGE_500_DEG);
  // set filter bandwidth to 21 Hz
  mpu.setFilterBandwidth(MPU6050_BAND_21_HZ);
  delay(100);
}
In the loop function, the values are read from the MPU6050 with the help of Adafruit library and then printed to the serial monitor. This will repeat every second.
void loop() {
  /* Get new sensor events with the readings */
  sensors_event_t a, g, temp;
  mpu.getEvent(&a, &g, &temp);
  /* Print out the readings */
  Serial.print("Acceleration X: ");
  Serial.print(a.acceleration.x);
  Serial.print(", Y: ");
  Serial.print(a.acceleration.y);
  Serial.print(", Z: ");
  Serial.print(a.acceleration.z);
  Serial.println(" m/s^2");
  Serial.print("Rotation X: ");
  Serial.print(g.gyro.x);
  Serial.print(", Y: ");
  Serial.print(g.gyro.y);
  Serial.print(", Z: ");
  Serial.print(g.gyro.z);
  Serial.println(" rad/s");
  Serial.print("Temperature: ");
  Serial.print(temp.temperature);
  Serial.println(" degC");
  Serial.println("");
  delay(1000);
}
Step 2: Ordering PCB From JLCPCB
This project contains PCB and which was made with the help of JLCPCB
JLCPCB has upgraded the via-in-pad process of all 6-20 layer PCBs for free and provides free ENIG to make PCB products more stable and reliable. It is worth mentioning that due to large-scale production capabilities, JLCPCB is able to reduce the cost, allowing everyone to truly enjoy the benefits of the JLCPCB advanced fabrication. Here at JLCPCB, you can also get 1-8 layer PCBs at only $2
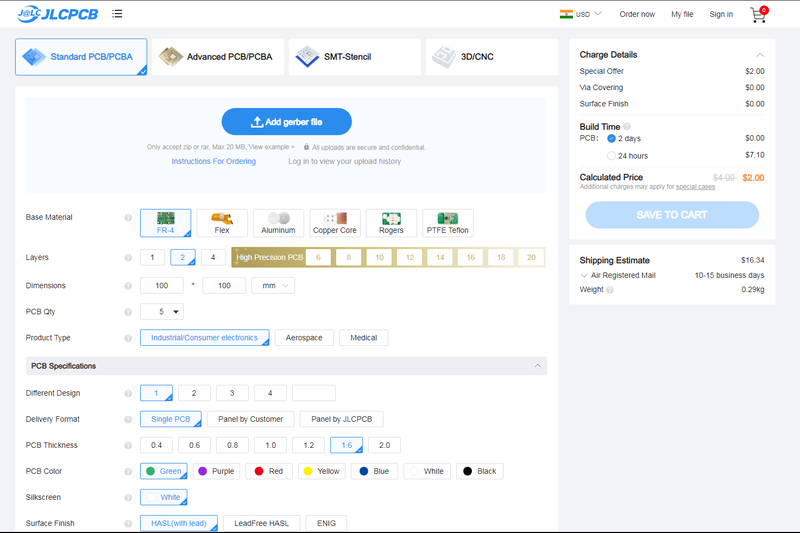
Go to JLCPCB website and create a free account.
Register and Login using Google Account is also possible.
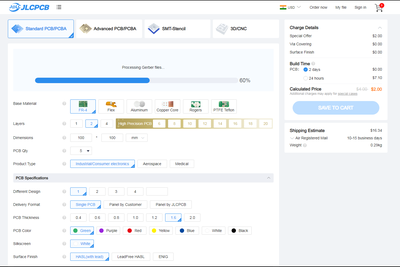
Step 2 – Upload Gerber File
Once you have successfully created an account, Click on “Quote Now” and upload your Gerber File.

Gerber File contains information about your PCB such as PCB layout information, Layer information, spacing information, tracks to name a few.
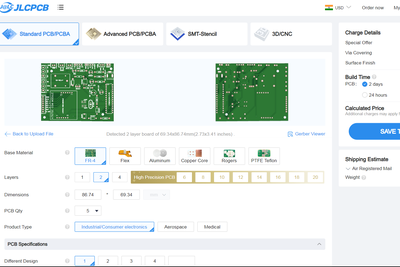
Step 3 – Preview the File
Once the Gerber file is uploaded, it will show you a preview of your circuit board.
Make sure this is the PCB Layout of the board you want.
Step 4 – Choose Necessary PCB Options

Below the PCB preview, you will see so many options such as PCB Quantity, Texture, Thickness, Color etc. Choose all that are necessary for you
Step 3:
The MPU-6050 is the world’s first and only 6-axis motion tracking devices designed for the low power, low cost, and high performance requirements of smartphones, tablets and wearable sensors.
Experimental Procedures
Step 1: Connect the circuit
Step 2:Add library
Open Arduino IDE, then click Sketch -> Include Library -> Add ZIP Library, and select MPU6050.zip to include.
After including successfully, you can see the example in File -> Examples -> MPU6050 as shown.
Step 3: Get Drift Compensation Values
The MPU6050 sensor’s reading (raw data) is transformed in space attitude angle. To get more stable and accurate reading, we should set the drift compensation first. The drift differs for different sensors (also affected by environments), thus it’s necessary to configure it before using every time.

Download mpu6050_calibration in folder examples, select the board type and COM. Open the serial monitor after program uploading, set the baud rate to 115200, and place the MPU6050 horizontally, do not move to avoid any vibration disturbance. Then press any key and click enter. So here you can see the compensation values are 1721, -1885, 1368, 38, -25, and 18, corresponding to six parameters including acceleration (AcceX, AcceY, and AcceZ) and gyroscope (GyroX, GyroY, and GyroZ).
Step 4: Reading Real-time Data
Then upload the program, press any key and click Enter in the serial monitor. Move the MPU6050 and observe the real-time data (as shown in figure below).
what is mpu6050 :
The MPU-6050 is the world’s first and only 6-axis motion tracking devices designed for the low power, low cost, and high performance requirements of smartphones, tablets and wearable sensors.

MPU6050 is a Micro Electro-mechanical system (MEMS), it consists of three-axis accelerometer and three-axis gyroscope. It helps us to measure velocity, orientation, acceleration, displacement and other motion like features.
MPU6050 consists of Digital Motion Processor (DMP), which has property to solve complex calculations.
Step 4:
Now my point of this story is what's the minimum components i can use to get data from the MPU?
- SCL _ Pullup resistor
- SDA _ ( pullup resistor really needed if I use only MPU6050 in the I2C ?)
- GND _ why we need so much caps on the GND pins ?
- VCC _ (Only 1 VDD connected? )
and last question which i searched and didn't found.
Is there a bigger version of MPU6050? cause there is no out pins at all and I don't have a heat gun station yet.
MotionProcessing Internal Digital Motion Processing™ (DMP™) engine supports 3D MotionProcessing and gesture recognition algorithms The MPU-60X0 collects gyroscope and accelerometer data while synchronizing data sampling at a user defined rate. The total dataset obtained by the MPU-60X0 includes 3-Axis gyroscope data, 3- Axis accelerometer data, and temperature data. The MPU’s calculated output to the system processor can also include heading data from a digital 3-axis third party magnetometer. The FIFO buffers the complete data set, reducing timing requirements on the system processor by allowing the processor burst read the FIFO data. After burst reading the FIFO data, the system processor can save power by entering a low-power sleep mode while the MPU collects more data. Programmable interrupt supports features such as gesture recognition, panning, zooming, scrolling, tap detection, and shake detection Digitally-programmable low-pass filters Low-power pedometer functionality allows the host processor to sleep while the DMP maintains the step count.
Auxiliary I 2C Serial Interface The MPU-60X0 has an auxiliary I 2C bus for communicating to an off-chip 3-Axis digital output magnetometer or other sensors. This bus has two operating modes: I 2C Master Mode: The MPU-60X0 acts as a master to any external sensors connected to the auxiliary I 2C bus Pass-Through Mode: The MPU-60X0 directly connects the primary and auxiliary I 2C buses together, allowing the system processor to directly communicate with any external sensors. Auxiliary I 2C Bus Modes of Operation: I 2C Master Mode: Allows the MPU-60X0 to directly access the data registers of external digital sensors, such as a magnetometer. In this mode, the MPU-60X0 directly obtains data from auxiliary sensors, allowing the on-chip DMP to generate sensor fusion data without intervention from the system applications processor. For example, In I2C Master mode, the MPU-60X0 can be configured to perform burst reads, returning the following data from a magnetometer: X magnetometer data (2 bytes) Y magnetometer data (2 bytes) Z magnetometer data (2 bytes)
The self-test response is defined as follows: Self-test response = Sensor output with self-test enabled – Sensor output without self-test enabled The self-test response for each accelerometer axis is defined in the accelerometer specification table (Section 6.2), while that for each gyroscope axis is defined in the gyroscope specification table (Section 6.1). When the value of the self-test response is within the min/max limits of the product specification, the part has passed self test. When the self-test response exceeds the min/max values, the part is deemed to have failed self-test. Code for operating self test code is included within the MotionApps software provided by InvenSense.
Step 5:
3-Axis Gyroscope
A gyroscope measures angular rotation by using the Coriolis Effect. When the gyroscope rotates around the X, Y, or Z-axis, the Coriolis effect creates a vibration that the MEMS detects.
However, the MEMS gyroscope is quite different from the traditional design because it contains a proof mass with four parts. These parts are always in a continuous oscillating movement, moving in and out simultaneously in a horizontal plane. By doing so, they react to the Coriolis effect, which the MEMS detects.
The module then amplifies, demodulates, and filters the detected signal to produce a voltage proportional to the angular velocity.
A 16-bit ADC scans each axis then digitizes the voltage signals to give the angular velocity in degrees per second.
The springs allow the structure to move freely and deflect when acceleration occurs on one axis. This movement creates an imbalance in the differential capacitor, which causes a change in capacitance proportional to the acceleration. The capacitance forms the sensor output, which the 16-bit ADC digitizes into a g unit (gravity).
The module continuously measures 1 g on the Z-axis on a flat surface due to gravity, but the X and Y axes measure 0g.
Alternative for MPU6050
The alternatives you can use in place of the MPU6050 include the following:
- ADXL335 (3-axis accelerometer)
- ADXL345 (3-axis accelerometer)
- MPU9250 (9-axis IMU)
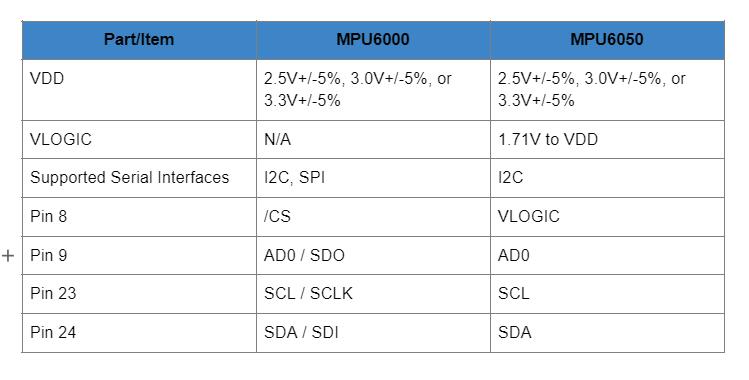
MPU6050 vs. MPU6000
Even though the two are identical, they have some differences, such as in the supported serial interfaces and VLOGIC reference pins. The following table summarizes all these differences.
Interfacing MPU6050 with Arduino
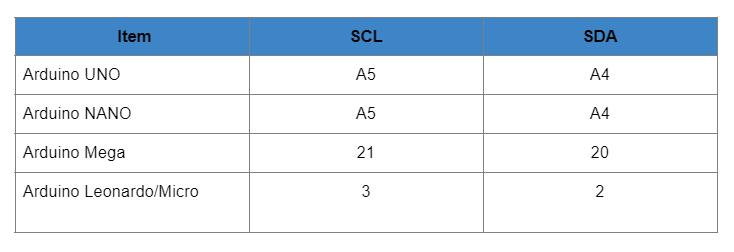
As stated earlier, the MPU6050 module comes with a 3.3V regulator mounted on the same board, and you can use it with the 5V Arduino logic microcontroller. Wiring it with Arduino is quite simple, and you should begin by linking the 5V Arduino output to the Vcc pin while the ground pin goes to GND.
Data Reading
Once everything is up and running, you must set the serial monitor to a baud rate of 115200. The module sends a lot of data, so this high rate is necessary to display the data on the screen.
Arduino code will give you a clear understanding of how to read angular acceleration, linear acceleration, and temperature from the module. As you get data about these three parameters, try to move the module to see how the readings change.
Arduino code
Once you understand what's going on, it will give you a base to experiment on other more practical projects.
In addition to reading the data, you should consider plotting it to visualize the module's sensor outputs better as you move it.
Graphs make things easier to understand, and Arduino features a Serial Plotter tool to help visualize the data while troubleshooting the code. But for the plotter to work correctly, remember to set its baud rate to 115200.
Arduino captures the readings every ten milliseconds, then plots a continuous 2D line graph.
Step 6:
Measuring Temperature
The MPU6050 includes an embedded temperature sensor that can measure temperatures from -40 to 85°C with a ±1°C accuracy.
Note that this temperature measurement is of the silicon die itself, not the ambient temperature. These measurements are typically used to compensate for accelerometer and gyroscope calibration or to detect temperature changes rather than measuring absolute temperatures.
The I2C Interface
The module communicates with the Arduino via the I2C interface. It supports two different I2C addresses: 0x68HEX and 0x69HEX. This allows two MPU6050s to be used on the same bus or to avoid address conflicts with other devices on the bus.
The ADO pin determines the I2C address of the module. This pin is pulled down with a 4.7K resistor. Therefore, when you leave the ADO pin unconnected, the default I2C address is 0x68HEX; when you connect it to 3.3V, the line is pulled HIGH, and the I2C address becomes 0x69
Arduino Example Code
Here is a simple program that reads the linear acceleration, angular rotation, and temperature from the MPU6050 module and prints them on the serial monitor.
#include <Adafruit_MPU6050.h>
#include <Adafruit_Sensor.h>
#include <Wire.h>

Adafruit_MPU6050 mpu;

void setup(void) {
	Serial.begin(115200);

	// Try to initialize!
	if (!mpu.begin()) {
		Serial.println("Failed to find MPU6050 chip");
		while (1) {
		  delay(10);
		}
	}
	Serial.println("MPU6050 Found!");

	// set accelerometer range to +-8G
	mpu.setAccelerometerRange(MPU6050_RANGE_8_G);

	// set gyro range to +- 500 deg/s
	mpu.setGyroRange(MPU6050_RANGE_500_DEG);

	// set filter bandwidth to 21 Hz
	mpu.setFilterBandwidth(MPU6050_BAND_21_HZ);

	delay(100);
}

void loop() {
	/* Get new sensor events with the readings */
	sensors_event_t a, g, temp;
	mpu.getEvent(&a, &g, &temp);

	/* Print out the values */
	Serial.print("Acceleration X: ");
	Serial.print(a.acceleration.x);
	Serial.print(", Y: ");
	Serial.print(a.acceleration.y);
	Serial.print(", Z: ");
	Serial.print(a.acceleration.z);
	Serial.println(" m/s^2");

	Serial.print("Rotation X: ");
	Serial.print(g.gyro.x);
	Serial.print(", Y: ");
	Serial.print(g.gyro.y);
	Serial.print(", Z: ");
	Serial.print(g.gyro.z);
	Serial.println(" rad/s");

	Serial.print("Temperature: ");
	Serial.print(temp.temperature);
	Serial.println(" degC");

	Serial.println("");
	delay(500);
}
Make sure you set the baud rate to “115200” in the serial port monitor. Because the MPU6050 returns an excessive amount of data, this higher speed is required to display it.
There will be a lot of information displayed, such as linear acceleration, angular rotation, and temperature. Move your sensor around and observe how the data changes.
Code Explanation:
At the beginning of the sketch, all the necessary libraries are included. As previously stated, the Adafruit_MPU6050 library implements the hardware functions of the MPU6050, while the Adafruit_Sensor library implements the unified sensor abstraction layer. Wire.h, which allows us to communicate with I2C devices, is also included.
#include <Adafruit_MPU6050.h>
#include <Adafruit_Sensor.h>
#include <Wire.h>
Next, an instance of the Adafruit_MPU6050 class is created in order to access its associated methods.
Adafruit_MPU6050 mpu;
In the setup section of the code, we first initialize the serial communication with the PC and call the begin() function. The begin() function initializes the I2C interface and verifies that the chip ID is correct. It then soft-resets the chip and waits for the sensor to calibrate after wake-up.
Serial.begin(115200);

// Try to initialize!
if (!mpu.begin()) {
	Serial.println("Failed to find MPU6050 chip");
	while (1) {
	  delay(10);
	}
}
The following three functions are then used to configure the measurement range of the MPU6050.
setAccelerometerRange(mpu6050_accel_range_t)
The setAccelerometerRange() function sets the accelerometer measurement range. This function accepts the following values:
- MPU6050_RANGE_2_G – for ±2g range (default)
- MPU6050_RANGE_4_G – for ±4g range
- MPU6050_RANGE_8_G – for ±8g range
- MPU6050_RANGE_16_G – for ±16g range
Keep in mind that the smaller the range, the more sensitive the accelerometer readings will be.
setGyroRange(mpu6050_gyro_range_t)
The setGyroRange() function sets the gyroscope measurement range. This function accepts the following values:
- MPU6050_RANGE_250_DEG – for 250 degrees-per-second range (default)
- MPU6050_RANGE_500_DEG – for 500 degrees-per-second range
- MPU6050_RANGE_1000_DEG – for 1000 degrees-per-second range
- MPU6050_RANGE_2000_DEG – for 2000 degrees-per-second range
Remember that a smaller degrees-per-second range leads to a more sensitive output.
setFilterBandwidth(mpu6050_bandwidth_t)
The setFilterBandwidth() function sets the bandwidth of the Digital Low-Pass Filter. This function accepts the following values:
- MPU6050_BAND_260_HZ – for 260 Hz bandwidth (According to the documentation, this disables the filter)
- MPU6050_BAND_184_HZ – for 184 Hz bandwidth
- MPU6050_BAND_94_HZ – for 94 Hz bandwidth
- MPU6050_BAND_44_HZ – for 44 Hz bandwidth
- MPU6050_BAND_21_HZ – for 21 Hz bandwidth
- MPU6050_BAND_10_HZ – for 10 Hz bandwidth
- MPU6050_BAND_5_HZ – for 5 Hz bandwidth
The bandwidth selection allows you to alter the low-pass filter’s cutoff frequency, allowing you to smooth out the signal by removing high-frequency noise.
In this example, we set the accelerometer range to ±8G, the gyro range to ±500°/s, and the filter bandwidth to 21 Hz.
mpu.setAccelerometerRange(MPU6050_RANGE_8_G);
mpu.setGyroRange(MPU6050_RANGE_500_DEG);
mpu.setFilterBandwidth(MPU6050_BAND_21_HZ);
The measurement range is the maximum acceleration or angular velocity that your MPU6050 can read. Think about what you are measuring and set limits based on that. Do you need to measure the rotational speed of a record player (which is extremely slow) or a spinning wheel (which can be extremely fast)?
In the loop section of the code, we create three objects of type sensors_event_t to hold our results. sensors_event_t is simply a user-defined datatype (structures in C) that stores a variety of sensor data such as acceleration, gyro, temperature, light, pressure, and many others.
sensors_event_t a, g, temp;
The function getEvent() is then called. This function reads a new set of values from the sensor (a sensor “event”), converts them to the correct SI units and scale, and then assigns the results to our mpu object.
mpu.getEvent(&a, &g, &temp);
Finally, the values are displayed on the serial monitor.
Serial.print("Acceleration X: ");
Serial.print(a.acceleration.x);
Serial.print(", Y: ");
Serial.print(a.acceleration.y);
Serial.print(", Z: ");
Serial.print(a.acceleration.z);
Serial.println(" m/s^2");

Serial.print("Rotation X: ");
Serial.print(g.gyro.x);
Serial.print(", Y: ");
Serial.print(g.gyro.y);
Serial.print(", Z: ");
Serial.print(g.gyro.z);
Serial.println(" rad/s");

Serial.print("Temperature: ");
Serial.print(temp.temperature);
Serial.println(" degC");
Arduino Example Code – Plotting MPU6050 data
Simply looking at the raw data from the MPU6050 will not help. Use a Serial Plotter if you really want to see how your MPU6050 reacts when you move it around.
The Arduino IDE includes a useful tool called the serial plotter. It can provide real-time visualizations of variables. This is extremely useful for visualizing data, debugging code, and visualizing variables as waveforms.
Let’s give it a shot with the updated code below. Compile and upload the program below, then navigate to Tools > Serial Plotter (Ctrl+Shift+L). The code uses a baud rate of 115200; ensure that the serial plotter is also set to 115200.
#include <Adafruit_MPU6050.h>
#include <Adafruit_Sensor.h>
#include <Wire.h>

Adafruit_MPU6050 mpu;

void setup(void) {
	Serial.begin(115200);

	// Try to initialize!
	if (!mpu.begin()) {
		Serial.println("Failed to find MPU6050 chip");
		while (1) {
		  delay(10);
		}
	}

	// set accelerometer range to +-8G
	mpu.setAccelerometerRange(MPU6050_RANGE_8_G);

	// set gyro range to +- 500 deg/s
	mpu.setGyroRange(MPU6050_RANGE_500_DEG);

	// set filter bandwidth to 21 Hz
	mpu.setFilterBandwidth(MPU6050_BAND_21_HZ);

	delay(100);
}

void loop() {
	/* Get new sensor events with the readings */
	sensors_event_t a, g, temp;
	mpu.getEvent(&a, &g, &temp);

	/* Print out the values */
	Serial.print(a.acceleration.x);
	Serial.print(",");
	Serial.print(a.acceleration.y);
	Serial.print(",");
	Serial.print(a.acceleration.z);
	Serial.print(", ");
	Serial.print(g.gyro.x);
	Serial.print(",");
	Serial.print(g.gyro.y);
	Serial.print(",");
	Serial.print(g.gyro.z);
	Serial.println("");

	delay(10);
}
When you move the module up and down the Z axis, you should see something like this.
Code Explanation:
You’ll notice that the majority of this sketch is identical to the previous one, with the exception of:
- Temperature readings are not printed.
- All other readings are printed in such a way that they form a comma-separated list of values.
- The readings are taken every 10 milliseconds.
Step 7:
If you prefer to make the changes yourself, running clang-format without the -i flag will print out a formatted version of the file. You can save this to a file and diff it against the original to see the changes.
Note that the formatting output by clang-format is what the automated formatting checker will expect. Any diffs from this formatting will result in a failed build until they are addressed. Using the -i flag is highly recommended.
Library Installation
Setting up the MPU6050 module to begin capturing the device’s raw data output is fairly simple. Manipulating the data into something meaningful, on the other hand, is more difficult, but there are some libraries at our disposal.
To install the library, navigate to Sketch > Include Library > Manage Libraries… Wait for the Library Manager to download the library index and update the list of installed libraries.
Filter your search by entering ‘mpu6050’. Look for the Adafruit MPU6050 Library by Adafruit. Click on that entry and then choose Install.
The Adafruit MPU6050 library makes use of the Adafruit Unified Sensor Driver and Adafruit Bus IO Library internally. So, search the library manager for Adafruit Unified Sensor and BusIO and install them as well


