Introduction: Make a Tie Fighter for Darth Vader!
So, first thing is first... This is not a Tie Fighter! This is a Tie Advanced. I am in the minority by knowing this. If we educate enough people we may become the majority! Pass it on!
That out of the way. My wife was going to throw out a 40x60 inch sheet of foam board, and asked if I wanted it. I also had a son dressing up as Darth Vader, and an e-mail from Guardian Bikes saying they had a Halloween contest coming up for dressing up your bike. The nexus of those three points is building a totally sweet costume accessory for your child and a free bike in the mail (should you be lucky enough to beat me next year - this may become a tradition).
Follow along if you want to know how to build one yourself!
Supplies
*Costs are estimates only. I had most of the materials on hand for this build*
- 1x 40x60 inch foam board ($10)
- 1x 1kg of gray 3d-printer filament ($20)
- 1x Roll of real metallic duct tape ($8)
- 1x Can black spray paint (if you find black foam board you might not need this) ($7)
- 1x Can gray spray paint ($7)
- 2x Acryllic paints (darker gray and black) ($2 ea.)
- 1x Dowel (1 in. 3 feet long) ($5)
- 1x Cardboard box (~20x16x7 minimum dimensions) ($FREE)
- 1x Clear acrylic sheet (~12x12 (1/8 inch)) ($10)
- 1x Pack of hot glue sticks ($6)
- 1x Elmers glue bottle (~16 oz.) ($5)
- 1x Bag of Flour (5 lb. bag will be plenty) ($3)
- 1x Sunday paper ($uhhh, what?)
- 15x sheets of printer paper ($.10)
- 6x 1.5 inch wood screws ($.20)
- 2x 3x30mm bolts w/ washers and nuts ($.10)
- 3x 3x55mm bolts w/ washers and nuts ($.20)
- 1x Arduino Uno ($15)
- 2x Arcade pushbuttons (red/green, 12x24 mm) ($2)
- 1x Spool of 22 guage solid core wire ($4)
- 6x LEDs (4 red, 2 green - or 6 RGBs (they were brighter than my green ones) ($1)
- 1x 220 ohm resistors ($.20)
- 2x 100 ohm resistors ($.10)
- 2x 10k ohm resistors ($.10)
- Solder ($2)
- 1x 9v battery clip ($.50)
- 1x 9v batter ($1)
- 1x Roll gaffers tape ($9)
- Waaay too much time on hand (or choose not to sleep like me)
Step 1: Develop Your Plan
I wanted to get a rough idea of where I was going before I started, which meant holding up the poster board, and a dowel next to the bike while my son balanced it until I was comfortable with how big I needed to make things. I then grabbed a screenshot from the internet with multiple views to the Tie Advanced, and scaled it to match 1mm to 1inch in Fusion 360. From there I decided to set the length of the wing to the exact width of my foam board (40 in.) This put the height of each wing section at exactly 10 inches high, which is what I needed to hear since 6 of them used my full length of foam board (60 in.)
I also found that my width would end up at 36 inches, and decided to slightly scale up my cockpit section as 8 inches just seemed way too small of a window, and got the angles right. You can follow along with my whole build in the attached file. I've included it mostly so you could make tweaks if you find they're necessary. If you do remix it, please make it known on my Thingiverse: https://www.thingiverse.com/thing:5106144
Attachments
Step 2: Fire Up the Printer
Printing will probably take a couple days on a slower printer like mine, which is why I recommend starting this first. I used grey PLA, and painted some green PLA, but I'd do it all with gray filament if I had it. If not rattle can away. Each piece use your best judgement for infill/orientation/supports/etc. There's a lot that I would change, but all the pieces worked, so I just used them as is.
You'll need the following:
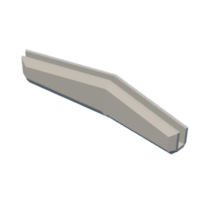
- 4x Bracket 7 (These hold the shape of the wings) (The side that is flat on the open edges goes on the angled section of the wing)
- 4x Bracket 8 (These are the mirror image of 7) (The side that is canted down on the open edge goes on the strait part of wing)
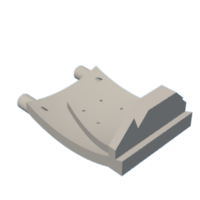
- 1x Bracket 14 (Attaches unit to bike) (Could be reworked as the angles weren't quite right, but it worked)
- 1x Bracket 15 (Other side of 14) (The bolt holes weren't big enough for tools to fit in, and the nut side could fit the nut to make life easier)
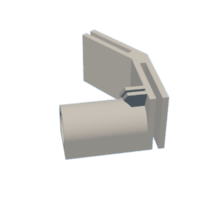
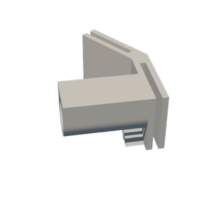
- 1x Bracket 16 (Attaches wings to dowel) (Could be reworked to remove the slot for the body since I didn't use it)
- 1x Bracket 17 (Other side of 16) (Could be reworked to have cambered edges like parts 27 and 28)
- 1x Bracket 18 (This is for the window)
- 1x Bracket 21 (This supports the cockpit, and attaches it to the bike - I would remove 2 holes, and make the laser holes smaller)
- 1x Bracket 22 (This is for the buttons) (Remove 2 holes to match 21)
- 2x Bracket 23 (These form the shape of the body)
- 2x Bracket 24 (These form the shape of the body) (no need for mounting holes - they weren't used)
- 1x Bracket 27 (optional) (I put these on in case I wanted to have it be wearable instead of attached to the bike)
- 1x Bracket 28 (optional) (Other side of 27)
Attachments
 Tie Advanced Brackets v22.stl
 Tie Advanced Brackets v21.stl
 Tie Advanced Brackets v18.stl
 Tie Advanced Brackets v17.stl
 Tie Advanced Brackets v16.stl
 Tie Advanced Brackets v15.stl
 Tie Advanced Brackets v14.stl
 Tie Advanced Brackets v8.stl
 Tie Advanced Brackets v7.stl
 Tie Advanced Brackets v28.stl
 Tie Advanced Brackets v27.stl
 Tie Advanced Brackets v23.stl
 Tie Advanced Brackets v24.stl
Step 3: Start the Cockpit
I paper mache'd the cockpit. What I decided worked best (not pictured) was to start and end with a layer of white printer paper and Elmer's glue (about 1:1 with cold water). I then alternated a cold flour recipe (1 cup flour 1.2ish cups cold water. The recipie was 1:1, but it seemed to work better a little runnier) and an Elmer's layer using the newspaper until I had 15 layers total. I did only 2 layers at a time, and let them dry 12 hours in-between layer sets. There are plenty of guides that can help you more with paper mache if you're not familiar.
The biggest things are alternate your layers for extra strength, and make sure it's super dry between coats. Dip the paper in your mix on both sides, and use your fingers to clean most of it back off and distribute it evenly across the paper. I used a 15 inch bouncing ball covered with saran wrap for the cockpit. If you use a different ball you may need to change the cockpit support and window to match. I only did a little more than half a sphere, and ended up cutting a lot back out. Anyway you slice it this has a lot of days of work each morning/night too.
Step 4: Cut the Foam for the Wings
As I mentioned before if you make 40 in. long wings 10 inches tall you'll use all your foam board from the giant sheet they sell at the craft store. Cut 6 sections. Set 2 aside, then cut the other 4. I went with 22.5 degrees rake on mine. I started the wings prior to doing the digital layout, so it should have been a steeper angle with different angles front and back. Se la vie. Then cut notches out of the center and bottom wing sections for your attachment point (brackets 16 and 17). I did these at 14.5 inches from the front of the wing. I think it may have been a little better to do them a little further back once the build was complete - maybe 15.5 or 16 inches, but it worked pretty well as is. If you want to use straps to hand carry the Tie Advanced cut the notches for these (brackets 27 and 28) at this time too. I did mine about a foot from the back.
Step 5: Spray Paint the Wings
Since the wings are the only place that uses black there's no point in waiting on this one. You will, however need to do the inside of both wings with a grey. I used a higher quality paint/primer and it looked great with just 1 coat. I was pleasantly surprised.
Step 6: Tape the Wings
This was a surprisingly time consuming step. I started by doing the outer edge of the entire completed wing. Just lay down a layer of tape, and fold it over the edge so it's even on both sides. Then I used some glue to put all the brackets on (start with the ones on the interior of the wings). (Brackets 16 and 17 with 27 and 28 optional) I then secured the wing with tape between each section of those brackets. One piece of tape down each ridge inside and outside. The external brackets for the bottom 2 sections (brackets 7 and 8) I glued on last.
Then I positioned the brackets for the top two sections of the wings (brackets 7 and 8 again). I then put the tape starting from the end and went towards the bracket where I would put the vertical band so I didn't have to have everything perfect since I could cover up my mistakes with the vertical band. I then glued all the endcaps on each wing, and proceeded to put the vertical tape bands on.
I've included my worst section - you can see it's all pretty bad up close, but from viewing distance when complete it still looks pretty great. I tried really hard to minimize creases (really hard with this kind of tape). It was most reminiscent of putting large vinyl stickers on cars (without the water to move it around). If you look up videos on how to do this it may help. Ultimately I decided the best strategy was to start from the middle where the creases were with it folded in the direction it would end up going, then slowly a millimeter at a time in long strokes push just a little bit down at a time working towards the edge of the tape. This was the time consuming part keeping it looking good.
Congratulations! Half of your final pieces are done!
Step 7: Attach the Dowel to the Bike Frame
Start by securing the brackets (14 and 15) to the bike. Make sure all cables/components are clear when doing this install. I used the M3 bolts here (2x 30mm & 3x 55mm) with washers and nuts on each side. Mine had hex on the bolt side, and I couldn't get the tool in my cutout for the nut side. I ended up using some narrow needle nose plyers to hold the nut while I tightened the bolt. in a star pattern tighten each bolt/nut until they are all secure. One got a little loose, so some locktite (blue) might help here, or using locking nuts.
Once the bracket is in place you can just slide the dowel in and center it. DEFINATELY pre-drill your plastic/wood. I also countersunk my screws. I angled my holes slightly away from the frame just in case here.
While you're here you can test fit and pre-drill the wings. Make sure they're level or have a slightly forward rake (mine canted back slightly with use). Initially I went from the top down like the frame attachment. I would go from the back in now. The body got in the way of the wing mounting point so I needed to use a shorty screwdriver. This could be avoided by drilling from the back. Also, my layer lines for those pieces would prefer to be drilled from the back (I cracked one going from the top - not bad, but still...)
I also want to mention that I made this based on Guardian Bikes 20" small frame. These are a great bike for kids - they've engineered them from the ground up to be better for kids. They're lighter, with a lower center of gravity, longer wheelbase, easy step-over, and have a totally awesome braking system that prevents kids from doing an endo. The back brake is what applies force to the front brake so they'll never clamp too tight on the front (there is no front brake handle). Check them out - if nothing else for their contests.
Step 8: Prepare the Window
I traced the window pieces directly onto the protective coating of the 1/8 in. acrylic sheet. Then cut them out leaving enough space to mount the pieces outside the line, and cut them at an angle so that I could mount each piece. I used my Dremel with the wood cutting blade attached for this job. It creates quite the mess, so be prepared to clean up.
I then mounted my window pieces with super glue. DON'T use super glue! The superglue basically is a liquid that makes an acrylic when it solidifies. The problem with it is that the vapors react with contaminants already on the acrylic to create a terrible haze. I can't tell you what glue to use (epoxy would probably work best - hot glue probably easiest), but don't use super glue!
If you don't listen to me you can google half a dozen things to try to fix your mistake. The one I found works the best is to scratch the top layer off completely with a strait edge razor, then buff out any remaining residue with a very fine polish. Toothpaste actually worked pretty well for me, but a headlight restore kit would probably be best for this job. Just use different glue in the first place and avoid this problem. You've been warned!
Step 9: Prep the Cockpit
First slip the support (Bracket 21) onto your cockpit. I did this while my cockpit was still slightly wet. This let the cockpit form to the support, but also caused the outer layers to shed off. I would probably still do this while wet since the fit might not be perfect, but I would probably put some wax paper over the edge to protect it. I just cut the damage off while still wet without issue.
I then traced the outside of the cockpit window (Bracket 18) (Apex goes up/down not the flat edge - consider your mounting bracket when making the final placement), and the body attachment points (Bracket 24) onto the hull of the cockpit. I went strait back from bracket 24 thinking it would help the structure (probably wouldn't). It was enough clearance, but you could angle it for more handlebar room. I did a test fit to make sure I had clearances in the right spot.
I then made all 3 cuts with the wood cutting blade on my Dremel tool. I left room to mount the cockpit face by cutting a few mm inside the line. It went pretty smoothly. You might consider cleaning up the back edge of the cockpit too. I then sanded down the cockpit flat with a coarse grit sandpaper on a random orbit sander so I had a flush surface to mount to.
Once you've got things squared away go ahead and dry mount the cockpit section by sliding it onto the bikes front bracket mounting point. It's a tight fit, and may require a small amount of sanding. Mine didn't, but I did a little later on to make this process easier.
Step 10: Form the Body
This was what I considered the hardest part of the build. If anybody knows a better way to do this let me know. This was basically guess check and revise over 2 nights of work. Ultimately here's the easiest way I found to do this:
Take your box. Mine just happened to have flaps that were 7 inches wide, which is what I used. Take the long flaps (4 of them) and cut 20x7 inch rectangles. Cut an angled cut 1 inch in from the end down to the corner of the 7 inch side on each of these. These will make your angle back from the cockpit to the wing so it can mount flush. Set those aside.
Cut your flat forward face on the smaller flaps. This is the triangle section (it isn't 100% accurate with the real Tie Advanced, but gives us more clearance for the handlebars, and was more simple to build than the real thing). I did this by placing bracket 24 flat on the cardboard with one edge flush with the bottom. I then placed a strait edge flush with the top of bracket 24 and slid the bracket/strait edge until it reached the corner Cut ~2 inches beyond bracket 24 to get the triangle piece.
Now hot glue bracket 24 with each side flush top/bottom. Next glue your large pieces to the other part of the bracket with the angle you cut oriented correctly for the wing mount angle. Partially hot glue the seams for extra strength and to secure them. Place bracket 23 at the end of this structure and glue it in place. Hot glue the rest of the seams on the back side of both body pieces.
Next hold the body pieces in place, and pencil approximate curves for the top/bottom flaps then trim and repeat until the end of the body is about the same distance away as the end of the dowel. Once you feel like you're getting close slide the wing on the dowel and see how much more you need to trim off. Continue repeating until your wing fits on securely with the body also pressed firmly against the wing. Do this for both sides. I left extra length on the part of bracket 24 to glue inside the cockpit.
Finally, apply a liberal amount of glue to 'weld' these parts into their correct position. I placed some glue above/below the end of the body on the wing section to act as a support and keep it in place while riding. This probably isn't necessary, but I placed wax paper over the body while applying the glue to the wing so it remained unattached separate structural bodies. Basically you have 4 structures now - the wings, the dowel, and the cockpit/body. Whew! we're getting close!
Step 11: Paint the Cockpit
I actually used the remnants of a glittery silver and put a little of the slate gray from the inside of the wing sections to make this, but use whatever you've got. You could if you're super dedicated wire things in place prior to paint so you could cover the wires/tape with paint too, but I didn't myself. Also, a pro might sand everything smooth. It doesn't look great, but from viewing distance you can hardly tell. Pretty easy step here.
Step 12: Prepare Your Lights and Buttons
I have used a pull up configuration (google it for full details), but basically if you solder your 5v connection to one side of the push button (yellow - should be red or white typically, but I chose to use my lesser used colors for this build), and on the other side have your data line (green) then also have a way for the power to travel to ground through your 10k ohm resistor (blue wire goes to ground - should be black, but again I use that color a lot and didn't care on this build).
For the LED's I ran the reds through the 220 ohm resistor, and ran each green through their own 100 ohm resistor. This is probably a little more than typical, but I wanted the greens bright, and they weren't burning out.
You'll have to pair down multiple wires to get them to all fit into 1 pin for red, and the limited number of grounds.
Also, you may have to use a better gauged wire on your battery clip to get it to connect to the Arduino securely. I used solid core 22 gauge wire throughout. You'll need long runs for your 2 top cockpit lights, and medium runs for your lower cockpit lights, buttons, and green laser LEDs.
I just taped everything into place using gaffers tape, and got glued the LEDs in their resting locations. The buttons clip into their stands. I hot glued the battery into place, and actually had the Arduino just free floating. The button mast screws in with 2 screws from the bottom.
Step 13: Upload Your Code and Wire in the Arduino
I used an Arduino because I liked 5V for my LEDs better than 3, and it has better output power. I used an Arduino Uno with the Red button in pin 2, the green button in pin 3, the Red LEDs in pin 13, the left green LED in pin 11, and the right green LED in pin 12. The battery goes red side to Vin, and the black side to ground. Make sure your LEDs are wired correctly so current can flow through them (determined usually by pin length).
I've provided my code. It's basically the blink tutorial mixed with the debounce tutorial if you want to learn more about the details of how it works Arduino has a great reference. I have the green buttons so they'll constantly alternate as long as it's held, and the red as a toggle on/off. I think there's a bug where the green LED's freeze up. I just reset it every time this happened. It's intermittent and I haven't troubleshot it.
Attachments
Step 14: Final Assembly and Final Touches
Now you can finally attach everything to your bike and glue the front windscreen on. Paint on some detail work for realism, and my favorite (since the actual lasers I bought were too high power) drop in some glue sticks to act as your lasers! It's basically 4 standalone components for easy build/storage.
Step 15: I'll Deal With the Rebel Scum Myself!
You did it! Did you get it done by Halloween? I was painting with only 2 hours until trick or treating myself. I hope to get a full video put out soon, but until then - thanks for following along!

Second Prize in the
Halloween Contest


