Introduction: Mini Space Shuttle With Rocket and Launch Site


NASA's space shuttle started from April 12, 1981 and goes on for 30 years in their missions. For more information, click here.
I will not describe my Space Shuttle Rocket Project (inspired by NASA) in detail. This project uses a software called Autodesk Tinkercad.
If you want to comprehend this project and this CAD file by yourselves more clearly, click here.
If the color is not right with the context, it is because changing the color before it is completed is not really useful yet if your design is not correct. I recommend that you put all the pieces together before changing the color. I will tell you the color at the end of some steps.
Supplies
Step 1: Starting to Create New Design
First of all, create new design. The new design has a random name. Click the name on the top left to rename it.

Step 2: Designing the Rocket External Tank
Start making the Rocket by making the External Tank with the size of 12.5 mm of diameter and 68.46 mm tall.

Next, make the Rocket's Nose Cone by using the Tangent Ogive shape using the all filters of shape generators on the right sidebar. Rotate it 90° to the right. Make its diameter 12.5 mm and its height 13.69 mm.

Lastly, put the External Tank cylinder and nose cone together.

Step 3: Making Solid Rocket Booster (SRB)
Start making the Solid Rocket Booster (SRB) by constructing the cylinder with a diameter of 12.5 mm and a height of 44.5 mm. Create the nose of the SRB by making a cone with a diameter of 12.5 mm and a height of 13.69 mm.

Also, create the rocket stand. Begin by making 6 elongated spheres (1 solid sphere and 5 hole spheres) with longer diameters of 13.69 mm, shorter diameters of 12.5 mm, and heights of 6.28 mm. Arrange them like in the graph shown above. Group them and copy that group into 4 sets. Put the SRB cylinder, the nose cone, and the rocket stand together. Duplicate the rocket into 2 SRB rockets.
Step 4: Assembling the Entire Rocket
Assemble the Entire Rocket by simply installing 2 Solid Rocket Boosters to the left and right of the Rocket External Tank as shown below. Make the color white.

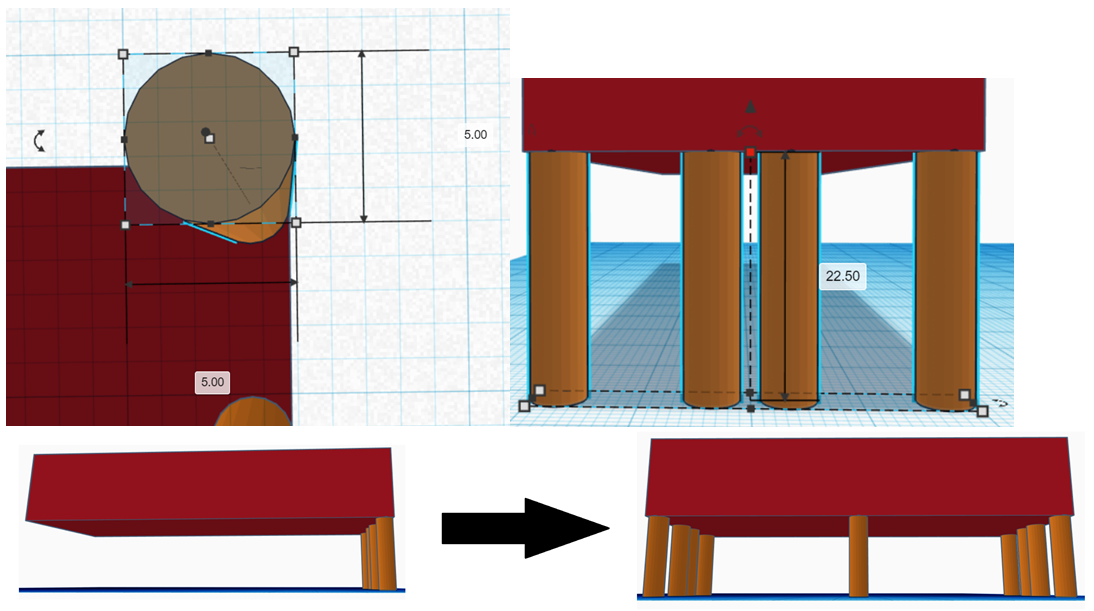
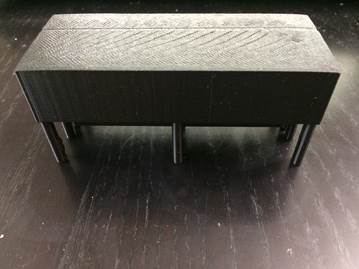
Step 5: Start Creating the Launch Pad
As you can see on the graph, make the pole of the rocket launch pad into 5 mm by 5 mm by 22.5 mm. Duplicate those poles into 12 pieces. Place them like in the graph.
(Note: You can duplicate those poles into 4 pieces first and then select those 4 pieces and then duplicate those sets of poles into 3 sets or 12 pieces in total).
Step 6: The Launch Pad Monitor Controller
The Launch Pad needs a small monitor controller below to monitor and control the launching of the rocket. Start making it with a new cube and put it under the top cube. Make it 98 mm by 24 mm by 9 mm.

Because the Launch Pad controller is 9 mm tall in this design, I recommend you to make the 2 middle poles right under the controller into 13.5 mm, although this is optional. (Obtain the height of the middle poles by subtracting the original poles heights by the controller heights, which is 22.5 mm – 9 mm = 13.5 mm.) If the heights of the 2 middle poles are not lowered, it will be ridiculous because the people in the controller cannot walk here and there due to the poles. It is actually up to you to lower this or not.

Now, change all of the colors into black as shown below.

Step 7: Creating Rocket Elevator
First, in order to make the rocket elevator, you should make the building block for each rocket elevator pole. Start by making a solid cube having a size of 15 mm on each side.

Then, because you need to make the frame 3 mm thick on each of 3 sides, you should make 3 combinations of 3 hole cubes with size as per following:
Length (mm) | Width (mm) | Height (mm) |
10 | 15 | 15 |
15 | 10 | 15 |
15 | 15 | 10 |
After that, group all the four cubes (1 solid cube and 3 hole cubes).
The result is shown in the picture below.

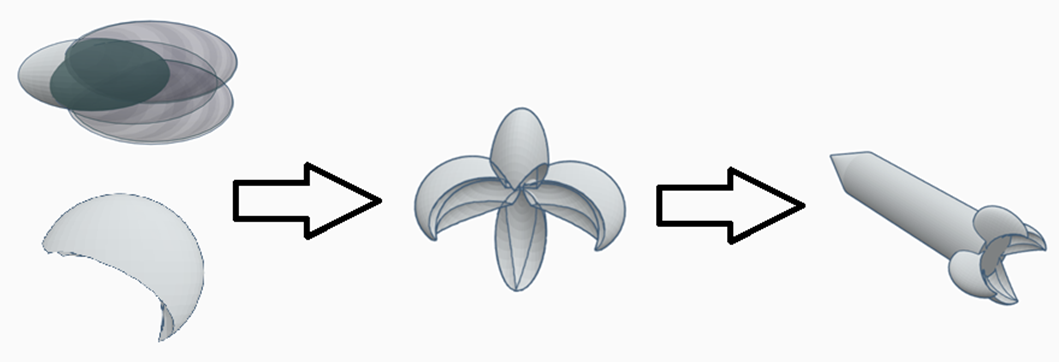
1. Create the Text Shape Shown above with the Text Content the Letter "V".


2. Duplicate the text shape and rotate 180° or flip it with the Mirror Option on the Top Right.
3. Select both shapes and turn it to 90°.
The result and the flowchart is shown below.

Group those two Vs if you prefer. Then, copy them into 4 sets that has 2 Vs in each set. Rotate and/or move them into the figure shown below.
Put those arranged Vs into the cube on the left.
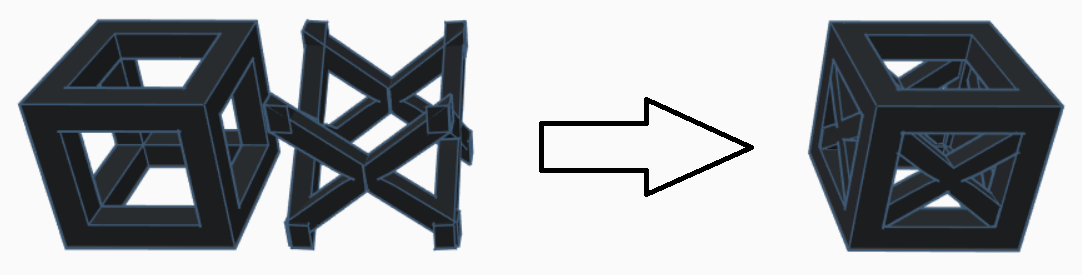

You must group this building block with Xs. Copy it into 7 blocks, and stack it into an elevator tower. Group this entire elevator tower, and change the color into black.
The result is shown below.

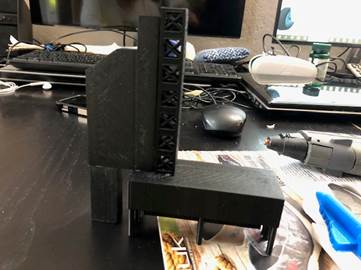
Step 8: Elevator Together With Control Tower
Put the elevator tower together with the Control Tower building blocks so that the elevator becomes part of the entire Control Tower blocks. Align it with one of the Control Tower blocks. Group all those 4 Control Tower building blocks. Make the color of the Control Tower black.

Step 9: Assemble the Space Shuttle Rocket Launch Site
Assemble the Rocket, Space Shuttle, the Control Tower, and the Launch Pad into one set called the Space Shuttle Rocket Launch Site as shown below.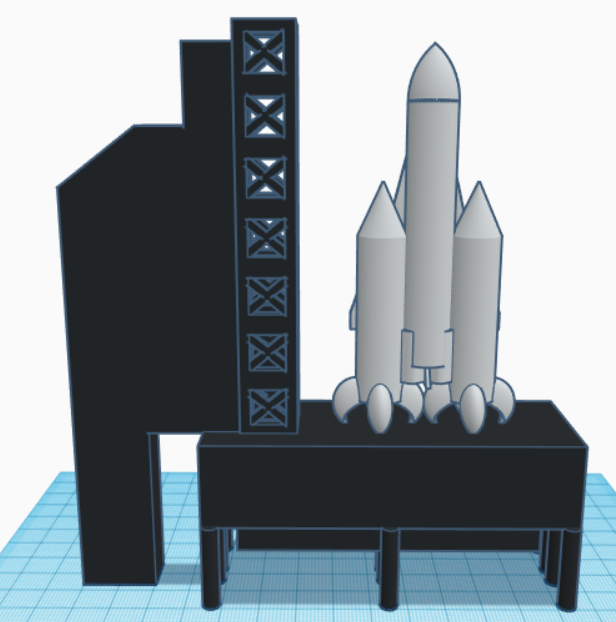
Step 10: Print and Glue Them All One Part by One Part


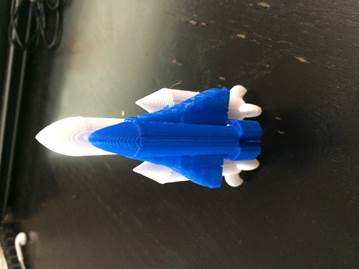
Glue the blue space shuttle and white rocket together, like shown in the picture.


Glue the Rocket Control Tower, including the Elevator, and the Launch Pad.


Put the rocket onto the Launch Pad.


Step 11: Final Miniature Space Shuttle Rocket


Here is the result. I hope you enjoy making it. Please share it with me if you make it. Thank you for reading my Instructable.

Participated in the
Tiny Speed Challenge


