Introduction: Nature Splattered Fabric (with Inkodye)


More by the author:


About: this is the official instructables profile for the Transistor. If Supersoftdrink ends up typing all the instructables for the hackerspace, it's because all the other members are too lazy. If you're a member …
Lumi has revolutionized DIY screen printing with its light reactive pigments, Inkodye. Our hackerspace received a generous kit and had a lot of fun experimenting with the dyes.
I didn't have much time to do the prints I wanted at the actual hackerspace, since I was answering questions about how to use the stuff and helping people edit their photos so we could print the negatives onto the transparency film, but there was extra dye for me to use later. I'd also ordered some blue to go along with the red and orange that Lumi had sent, in order to make sure people could experiment with all three colors.
My first project, once I'd done some small samples to test the properties of the ink on different fabrics, was a leaf themed splattered design. I wanted one on silk and one on linen. Both pieces of fabric were from articles of thrift store clothing. The silk will be hemmed and used as a play scarf/handkerchief for my kids. The linen will become the side of a tote. My mom is threatening some kind of revolt if she doesn't get the linen tote made from the print.
Inkodye works well on natural fibers. I used some extra techniques after the inkodye, and those are different for protein based fibers (like silk and wool) than for cellulose based fibers (like linen or cotton).
Step 1: Gather Your Mats


You'll need Inkodye supplies, whether you're using protein or cellulose based fabric. The second two lists are for the additional accents - one for each type of fiber.
You will need:
Linen/Hemp/Cotton (cellulose based) OR Silk/Wool/Other Animal Hair cloth
Inkodye
Inkodye detergent
Spray Bottle
Water
Leaves or other flat, opaque things found outside in your neighborhood (unless your neighborhood is the type in which one can mostly find used prophylactics - in the which case, you'll probably just want to print out some leaf shapes on Lumi transparencies instead)
Glass or Clear Plastic for holding leaves flat
Durable, Flat Surface on which to lay the fabric while it can soak up the light source
Sunlight or strong UV lamp
something somewhat opaque to cover the spray bottle (I wrapped it in spare fabric) - you don't want the ink to be exposed before you even apply it to the fabric
Optional Accents:
cotton/linen/hemp based fabric - deColourant Plus (whatever color you like), paint brush(es)
silk/wool based fabric - acid dye, citric acid, another spray bottle if you haven't cleaned the Inkodye from your first spray bottle
Step 2: Spray, Arrange, Squish


This is where I had wished I'd had a smaller spray bottle. I added 2 ounces of Inkodye and 2 ounces of water to the spray bottle. If I'd had a smaller bottle, I probably would've done just 1 ounce of each... but I needed this much liquid in order to spray easily for this size of bottle.
Make sure you quickly wrap something around the spray bottle in order to block any light from entering through the plastic and exposing the dye.
Lay the fabric evenly on the flat surface. If you're quick with the leaves, you can do this in the sunlight instead of arranging things inside and then carrying everything outside (which would be more of a pain).
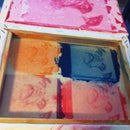
Spray the dye over the fabric, wherever you want. The dye is a lighter color before it reacts to UV light, but it's still quite visible on fabric. Quickly arrange the leaves over the sprayed dye, then place the glass on top of them, flattening them.
I didn't worry about trying to sponge off excess dye from the fabric for these because I was going for a splotchy look. I didn't spray enough to make dye pool on the fabric either, though... that would've been wasteful. Covering an area was enough.
Make sure you quickly wrap something around the spray bottle in order to block any light from entering through the plastic and exposing the dye.
Lay the fabric evenly on the flat surface. If you're quick with the leaves, you can do this in the sunlight instead of arranging things inside and then carrying everything outside (which would be more of a pain).
Spray the dye over the fabric, wherever you want. The dye is a lighter color before it reacts to UV light, but it's still quite visible on fabric. Quickly arrange the leaves over the sprayed dye, then place the glass on top of them, flattening them.
I didn't worry about trying to sponge off excess dye from the fabric for these because I was going for a splotchy look. I didn't spray enough to make dye pool on the fabric either, though... that would've been wasteful. Covering an area was enough.
Step 3: Quick, Wash Like Heck!


I tried this in the morning on a relatively sunny day. The dye took less than 10 minutes for full exposure. I'll explain an easy way to tell if exposure is complete in our next Inkodye instructable.
I removed the glass and picked up the wet fabric, letting the leaves fall off as I carried it to a sink to wash it. The inkodye detergent recommends 3 capfuls for a load of laundry - it's really concentrated. I used less than a capful in a sink of water. The instructions say to agitate, and they're not kidding.
Rub the fabric with your hands, concentrating on the areas of unexposed dye. The orange and red dye seem to wash out more easily than the blue. I've noticed other people's Lumi projects, and have seen a lot more of them with some partially exposed blue dye in the "white" areas. I suspect this happens when the blue dye isn't thoroughly washed out.
It turns out I wasn't thorough enough when washing out the blue dye from the linen; you'll see what I mean in later steps.
Step 4: Repeat If Desired... or Just Let It Dry


I tried adding some extra leaves to the linen with the deColourant Plus, but I wasn't fond of the look. I decided it needed some blue inkodye. Adding blue also darkened some of the print, which would make the deColourant more visible.
I didn't use any blue inkodye on the silk, opting for another technique.
Dry the fabric and arrange it flat on the surface again, then spray it with another color of diluted inkodye. Arrange leaves in different places, overlapping some of the white areas, then squish with glass again. Wait, wash, and dry as before.
Step 5: Enhance the Design


Cotton/Linen/Hemp fabrics:
Use a paintbrush and paint dots, swirls, or whatever else you'd like over the dyed fabric. You can also paint a leaf and press it against the fabric. Let it dry fully.
Silk/Wool fabrics:
Heat up a small amount of water to boiling. Add a generous scoop of dye to the water. Add a teaspoon or more of citric acid. This method works for protein based fibers because acid dyes can bond to protein fibers very quickly. It'll bind more quickly if the dye is concentrated, the mixture is very hot, and has lots of acid in it. The water will still bleed into the silk. Hopefully the dye will have bound itself to the fibers it first touched before the rest of the liquid bleeds into the fibers you don't want colored.
Pour the hot mixture into a spray bottle. Arrange some leaves on the silk, and spray the hot dye over them. Have paper towels on hand. If dye drips off the leaves, it'll be wet enough to bleed big splotches into the silk, blurring the leaf design.
The acid dye sprayed over the leaves won't have lines as detailed as those with the inkodye, but I like the different techniques together on one piece of fabric. The spots from the sprayed acid dye will be more muted and blended than the splotches from sprayed inkodye.
Step 6: Heat Set and Finish


Cotton/Linen/Hemp fabric:
Once the deColourant is fully dry, iron the fabric. This should take awhile. Let it get really hot. The bleaching agents take a bit of time to work. The box suggests using steam to get a stronger effect, and it worked well for my project. You'll know you're getting close when you're able to see the pale shapes on the other side of the fabric where you had applied the paste. You can let the fabric sit for a day or two before washing out the deColourant if you want to make sure it removed enough inkodye where you applied it.
I set the fabric out in the sun, figuring that would help the bleaching agents work. This is when I realized I hadn't fully washed out the blue inkodye. After I took the girls for a walk, I came back to find blue splotches inside the maple leaf shapes. Whoops.
Oh, well. Once you're pleased with the lightness of the deColourant areas, you can wash the fabric. I did this in the sink again because I'm impatient, but you can throw it in the washing machine at this point. After it's washed, the areas of deColourant shouldn't feel any different from the unpainted parts of the fabric.
Silk/Wool fabric:
Iron the wet silk. Heat will help the dye permanently bond to the protein fibers and prevent any further spreading of the dye. Once you've ironed the silk dry, you'll probably notice some water spots between where the silk had and hadn't been sprayed. This is okay. Now it's time to give the silk another acid bath.
Heat up some water and add a spoonful of citric acid. No, you don't have to be exact... just grab a spoon from your silverware drawer.
Dunk the silk fabric in the hot acid water. Some of the dye may seep into the water, especially if you used blue shades. Those tend to take a bit more to bond to protein fibers than red or yellows, for some reason. This should make sure there's no extra dye hanging out in the fibers that hasn't been permanently bonded to them. Swirl the silk in the hot acid water with a spoon (don't burn your fingers!) for a couple seconds, then pull it out and rinse it in cool water. Let it air dry, or iron it if you're eager to see how it looks unwrinkled.
We're grateful to Instructables and to Lumi for providing the opportunity to play with some neat tools at our hackerspace. Stay tuned for another instructable with tips and techniques we discovered while experimenting with Inkodye!

Second Prize in the
Print & Dye Contest


