Introduction: New Laptop Wont Work With Older Router?

We have an older Verizon FIOS router - It does 802.11b and 802.11g - which works just fine. Recently we purchased a new Acer Laptop (E15 series) which will run all aspects of the 802.11 speeds (b/g/n/ac possibly a). While setting up the laptop we would enter the SSID (router's name) and the current access password for the router, and each time it would come back and say it couldn't connect.
Step 1: Making a Faster Laptop Work With a Slower Router (Windows 10)
There was no error message (Windows 10 - no surprise) that would explain why it couldn't connect. We verified the password was correct, tried again, still won't connect. I knew the router was fine, as we have many other devices connected, so was the laptop's wireless interface defective? It was brand new. I didn't think the interface was bad in that it was able to successfully scan all the SSID of the routers on our street, and one of them was our router. That left Windows 10 possibly having a bad driver for the wifi interface for that laptop, OR was there a tweak that needed to be done to one of the settings? Long story short - for whatever reason, we had to tell the laptop to only use 802.11 speeds b or g with our router. This instructable will show the steps we went about to change the laptop's wifi interface to only use the slower speeds. Of course, if we were to use it with a router that was capable of faster speeds - we would need to reset the laptop again to use those speeds, and then reset it back once we wanted to hookup to the home router. Of course, I could buy a new cable/FIOS router but why spend the >$100.00US when I did not have to - when even though the router could transmit faster to the laptop, if our internet speed wasn't that fast it wouldn't matter anyway!
Step 2: Locate Your Wireless Interface Device

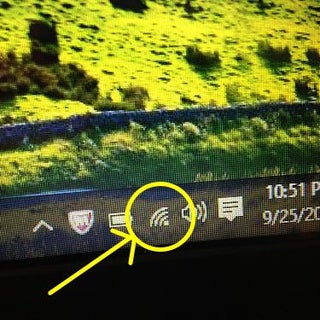
First, you will need to find the icon for the wireless interface on the laptop. Usually, it's located at the bottom right of the desktop screen. Below is a closeup of the wireless icon.

You will need to Right-Click on this icon - doing so will give you two choices: then left-click (normal click) on the "Open Network and Sharing Center" Line. If you can't find your wireless icon - then click on the bottom left of the screen where "Search Windows" box is and type in "Network and Sharing Center" - give it a few seconds and it will come up - now click on that to go to the Network and Sharing Center.

Once the Network and Sharing Center Screen opens up - Find and click on the link for "Change adapter settings".

Step 3: Load the Properties Settings of Your Wireless Interface
When the Network Connections screen opens, you will need to find your wireless interface. In our case it was easy - it said "wifi".

Once you locate it, you will need to right-click the icon -

and then left-click (normal click) the "Properties" Option.
Step 4: Configure the Hardware Properties
Once the Properties window opens, you will need to click on the Configure button to the right near the top of the box.

When the Configuration window opens, you will need to Click on the "Advanced" tab.

Step 5: Modify the Interface's Speed Parameter (Wireless Mode)
Look for an option called "Wireless Mode" -

Click on that option.

BEFORE YOU GO ANY FURTHER. Write down the current option that is selected in the "Value" box on the right side of the window in case you still can't connect with any of the speed settings, reset the interface back to what it was - as the speed setting was the not the problem preventing you from connecting. (Sorry).
Now you can go about this two ways.
Method #1 - Slowest to Fastest
You start with the slowest setting (top of list) - Select this setting (see below on how to keep the selection). If you can connect, then follow these steps to come back to here, and select the next faster speed until you can't connect, then select the previous setting as the speed setting you want.
Method #2 - Fastest to Slowest
You start with the fastest setting (bottom of list) -Select this setting (see below on how to keep the selection). If you can't connect, then follow these steps to come back to here, and select the next slower speed until you can connect - this is the speed setting you want.
Now to keep the speed setting you selected, Click on the "OK" button at the bottom of the Configuration window box.

Once this window closes, then you will need to click the "OK" button at the bottom of the interface window box

That's it - Now try to connect to the router again - If it connects - depending on the method you chose you may not have anything else to do.
Good luck. Hope this helps.


