Introduction: OAREE - 3D Printed - Obstacle Avoiding Robot for Engineering Education (OAREE) With Arduino


OAREE (Obstacle Avoiding Robot forEngineering Education)
Design: The goal of this instructable was to design an OAR (Obstacle Avoiding Robot) robot that was simple/compact, 3D printable, easy to assemble, uses continuous rotation servos for movement, and has as few purchased parts as possible. I believe that I've succeeded in creating this awesome robot and have named it OAREE (Obstacle Avoiding Robot for Engineering Education). This robot will sense obstacles, stop, look left and right, then turn in the unobstructed direction and continue forward.
Background: The internet has numerous obstacle avoiding robots, but most are bulky, hard to assemble, and expensive. Many of these robots have Arduino code supplied, but it was difficult to find a well thought out, working example. I also wanted to use continuous rotation servos for the wheels (instead of DC motors), which had not been done yet. So, I set off on a mission to develop a compact, inventive OAR robot to share with the world.
Further Development: This robot can be further developed for better pinging accuracy, adding IR sensors for line following capability, LCD screen to display obstacle distance, and much more.
Supplies
- 1x Arduino Uno - https://www.amazon.com/dp/B01AR7YJ3O/ref=cm_sw_em_...
- 1x V5 Sensor Shield - https://www.amazon.com/dp/B01FDH8SM6/ref=cm_sw_em_...
- 1x 4xAA Battery Holder with On/Of Switch - https://www.amazon.com/dp/B01DEYV00W/ref=cm_sw_em_...
- 1x SG90 Servo - https://www.amazon.com/dp/B07KVJ84FS/ref=cm_sw_em_...
- 2x Continuous Rotation Servos - https://www.amazon.com/dp/B075SG75KV/ref=cm_sw_em_...
- 1x 9V Battery Power Cable for Arduino (OPTIONAL) - https://www.amazon.com/dp/B072PTY1WM/ref=cm_sw_em_...
- 1x HC-SR04 Ultrasonic Sensor - https://www.amazon.com/dp/B0819LW21Z/ref=cm_sw_em_...
- 4x Female-Female Jumper Wires - https://www.amazon.com/RGBZONE-120pcs-Multicolored...
- 2x Rubber Bands
- 1x 9V Battery (OPTIONAL)
- 4x AA Batteries
- 4x Small Screws (4 x 1/2 or anything similar)
- Phillips Screw Driver
- Glue for securing rubber bands to wheels
Step 1: 3D Print: Body, Wheels, Marble Caster, 6mm Bolt/nut, and Ultrasonic Sensor Mount


There are 5 parts to 3D print.
- Body
- Wheels
- Marble Caster
- 6mm Bolt/Nut (optional, a metal nut/bolt can be substituted)
- Ultrasonic Sensor Mount
All the required .STL files are included in this instructable as well as the Sketchup files. 40% infill recommended.


Step 2: Program the Arduino

Send Code to Arduino UNO: Using the Arduino IDE, send the code (in the attached file) to your Arduino module. You will need to download and include the servo.h and newping.h libraries with this sketch.
The code is thoroughly commented, so you can see what each command does. You can easily change the Ultrasonic Sensor distance to a larger or smaller value if desired. This is an initial code and is meant to be expanded upon and used for further project development.
// OBSTACLE AVOIDING ROBOT<br>// JeffersonDrumm@gmail.com, cff161@mocs.utc.edu, University of TN at Chattanooga, Electrical Engineering, FALL 2019
        // Materials Required:
              // 1) Arduiino UNO, 2) Servo Sensor Shield v5.0, 3)HCSR04 Ulrasonic Sensor, 4)FS90 Servo (for Ultrasonic Sensor)
              // 5&6) 2x CONTINUOUS ROTATION SERVOS for the wheels
              // 7) 16mm Marble for rear castor pivot, 8&9) 2 rubberbands for wheels
              // 10-15) 1x (4xAA) Battery holder with on/off switch, 16&17) 9V battery with connector to power Arduino UNO
        // 3D PRINT:
              // 18) ROBOT Body, 19&20) 2x Wheels, 21) Marble Caster, 22) Ultrasonic Sensor Mount, and 6mm Screw (see attached files)
//---------------------------------------------------------------------------------------------------------------------------------
#include <Servo.h>                                                  // Include Servo Library
#include <NewPing.h>                                                // Include Newping Library
//---------------------------------------------------------------------------------------------------------------------------------
#define TRIGGER_PIN 12                                              // US trigger to pin 12 on Arduino
#define ECHO_PIN 13                                                 // US Echo to pin 13 on Arduino
#define MAX_DISTANCE 250                                            // Distance to ping (max is 250)
int distance = 100;
//---------------------------------------------------------------------------------------------------------------------------------
Servo US_Servo;                                                     // Ultrasonic Sensor Servo
Servo Left_Servo;                                                   // Left Wheel Servo
Servo Right_Servo;                                                  // Right Wheel Servo
NewPing sonar(TRIGGER_PIN, ECHO_PIN, MAX_DISTANCE);                 // NewPing setup of pins and maximum distance.
//---------------------------------------------------------------------------------------------------------------------------------
void setup()                                                        // INPUT/OUTPUTS, WHERE to ATTACH, SET INITIAL POSITIION/MOVEMENT
{
  pinMode(12, OUTPUT);                                              // Trigger pin set as output
  pinMode(13, INPUT);                                               // Echo pin set as input

  US_Servo.attach(11);                                              // US Servo set to pin 11
  US_Servo.write(90);                                               // US SERVO LOOKS FORWARD</newping.h></servo.h></p><p>  Left_Servo.attach(9);                                             // Left wheel servo to pin 9
  Left_Servo.write(90);                                             // LEFT WHEEL SERVO set to STOP</p><p>  Right_Servo.attach(10);                                           // Right Wheel servo set to pin 10
  Right_Servo.write(90);                                            // RIGHT WHEEL SERVO set to STOP

  delay(2000);                                                      // Wait for 2 seconds
  distance = readPing();                                            // Get Ping Distance at straight forward position
  delay(100);                                                       // Wait for 100 ms
  moveForward();                                                    // ROBOT MOVES FORWARD
}
//---------------------------------------------------------------------------------------------------------------------------------
void loop()
{
  int distanceRight = 0;                                            // Initiate US distance to right at 0
  int distanceLeft = 0;                                             // Initiate US distance to left at 0
 //US_Servo.write(90);                                              // Center US servo
 //delay(50);
 // US_Servo.write(70);                                             // Look Slightly Right
 // delay(250);
 // US_Servo.write(110);                                            // Look Slightly Left
 // delay(250);
 // US_Servo.write(90);                                             // Look Center</p><p>  if (distance <= 20)                                               // Robot is MOVES FORWARD
  {
    moveStop();                                                     // Robot STOPS at distance <= 20 cm
    delay(300);
    moveBackward();                                                 // Robot MOVES BACKWARD for .4s
    delay(400);
    moveStop();                                                     // Robot STOPS
    delay(300);                                                     // Robot WAITS for .3s then cycles US left/right
    distanceRight = lookRight();                                    // US LOOKS LEFT
    delay(300);
    distanceLeft = lookLeft();                                      // US LOOKS RIGHT
    delay(300);

if (distanceRight >= distanceLeft)                                  // Decide which direction to turn
    {
      turnRight();                                                  // Right side has greatest distance, ROBOT TURNS RIGHT for 0.3s
      delay(500);                                                   // This Delay determines turn length
      moveStop();                                                   // Robot STOPS
    }
    else
    {
      turnLeft();                                                   // Left side greatest distance, ROBOT TURNS LEFT for 0.3s
      delay(500);                                                   // This Delay determines turn length
      moveStop();                                                   // Robot STOPS
    }
    }
  else
  {
    moveForward();                                                  // Robot MOVES FORWARD
  }

    distance = readPing();                                          // US READS NEW PING for the new direction of travel
}
//---------------------------------------------------------------------------------------------------------------------------------
int lookRight()                                                     // Ultrasonic Sensor LOOK RIGHT FUNCTION
{
  US_Servo.write(30);                                               // US servo MOVES RIGHT to angle
  delay(500);
  int distance = readPing();                                        // Set ping value for right
  delay(100);
  US_Servo.write(90);                                               // US servo MOVES TO CENTER
  return distance;                                                  // Distance is set
}
//---------------------------------------------------------------------------------------------------------------------------------
int lookLeft()                                                      // Ultrasonic Sensor LOOK LEFT FUNCTION
{
  US_Servo.write(150);                                              // US servo MOVES LEFT to angle
  delay(500);
  int distance = readPing();                                        // Set ping value for left
  delay(100);
  US_Servo.write(90);                                               // US servo MOVES TO CENTER
  return distance;                                                  // Distance is set
}
//---------------------------------------------------------------------------------------------------------------------------------
int readPing()                                                      // Read Ping Function for Ultrasonic Sensor.
{
  delay(100);                                                       // 100ms between pings (min ping time = 0.29ms)
  int cm = sonar.ping_cm();                                         // PING distance is gathered and set in cm
  if (cm==0)
  {
    cm=250;
  }
  return cm;
}
//---------------------------------------------------------------------------------------------------------------------------------
void moveStop()                                                     // ROBOT STOP
{
  Left_Servo.write(90);                                                 // LeftServo 180 forward, 0 reverse
  Right_Servo.write(90);                                                // RightServo 0 forward, 180 reverse
}
//---------------------------------------------------------------------------------------------------------------------------------
void moveForward()                                                  // ROBOT FORWARD
{
  Left_Servo.write(180);                                                // LeftServo 180 forward, 0 reverse
  Right_Servo.write(0);                                                 // RightServo 0 forward, 180 reverse
}
//---------------------------------------------------------------------------------------------------------------------------------
void moveBackward()                                                 // ROBOT BACKWARD
{
  Left_Servo.write(0);                                                  // LeftServo 180 forward, 0 reverse
  Right_Servo.write(180);                                               // RightServo 0 forward, 180 reverse
}
//---------------------------------------------------------------------------------------------------------------------------------
void turnRight()                                                    // ROBOT RIGHT
{
  Left_Servo.write(180);                                                // LeftServo 180 forward, 0 reverse
  Right_Servo.write(90);                                                // RightServo 0 forward, 180 reverse
}
//---------------------------------------------------------------------------------------------------------------------------------
void turnLeft()                                                     // ROBOT LEFT
{
  Left_Servo.write(90);                                                 // LeftServo 180 forward, 0 reverse
  Right_Servo.write(0);                                                 // RightServo 0 forward, 180 reverse
}
//---------------------------------------------------------------------------------------------------------------------------------</p>
Step 3: Assemble the Robot


Now its time to put your robot together. The steps are listed below.
1) Attach Round Servo Disc and Rubber Bands to Wheels: All servos come with plastic mounting hardware and screws. Find the round discs, and screw them into the two holes on the flat side of the wheels. The rubber bands fit around the wheel to provide grip. You may want to add a little glue to keep the rubber bands in place.
2) Marble Caster Attachment: Use two small screws to attach the marble caster to the two triangles at the rear. The marble caster is a simple replacement for a rear wheel and provides a rear pivot point.
3) Insert Servos into Slots (no screws needed): Place the FS90 Servo (for the Ultrasonic Sensor) into the front slot of the body. The two continuous rotation servos slide in to the left and right slots. The slots are designed for a tight fit, so that no screws are required to hold the servos in place. Make sure the servo wires run through the grooves in the slots so that they are facing toward the back of the body.
4) 9V Battery Placement (OPTIONAL): Place 9V battery + Arduino power connector behind the front servo.
5) Ultrasonic Sensor Mount Assembly: Use two small screws to attach one of the included white plastic servo attachments to the bottom of the Ultrasonic Sensor mount plate. Next, use the 3D printed 6mm bolt/nut (or substitute a metal bolt/nut) to attach the Ultrasonic Sensor case to the mount plate. Finally, place the sensor in the case with the pins facing upward and snap in the back of the case.
6) 4x AA Battery Case: Place the AA battery case into the large rectangular area, with the on/off switch facing towards the rear.
7) Arduino Uno + V5 Sensor Shield: Attach the shield to the Arduino and place onto the mounts above the battery case. The power connector should face to the left.
Your robot is Built! What's left? Programming the Arduino and Connecting Jumper Wires: Servos, Ultrasonic Sensor, and Power Supply.
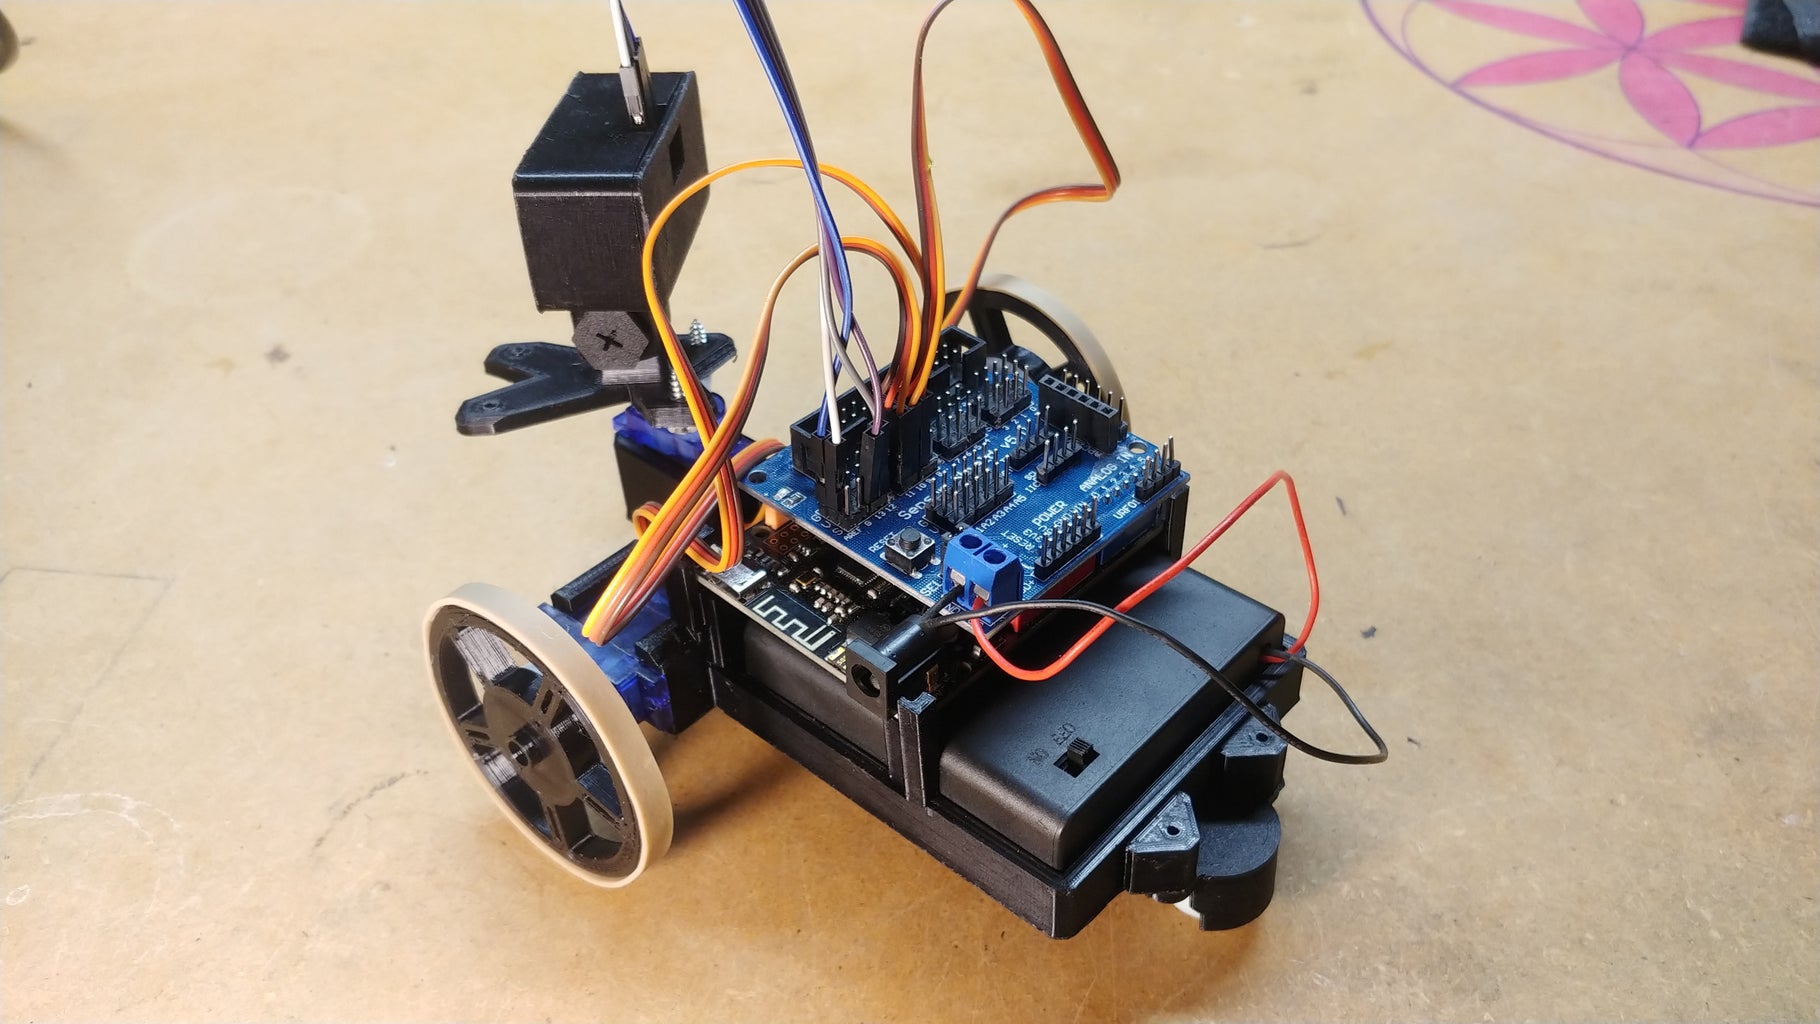
Step 4: Attach Sensor Wires

Connect Servo wires to V5 Shield:
- Left Continuous Rotation Servo attaches to PIN 9
- Right Continuous Rotation Servo attaches to PIN 10
- Front FS90 Servo attaches to PIN 11
Connect Ultrasonic Sensor Pins (via 4x Female to Female Jumper Wires) to V5 Shield:
- Trigger to PIN 12
- Echo to PIN 13
- VCC to any of the pins marked with 'V'
- Ground to any of the pins marked with 'G'
Connect the AA Battery Case to the V5 Shield:
- Attach the positive, red wire to the VCC connector
- Attach the negative, black wire to the Ground connect
---------------------------------------------------------------------------------------------------------
Step 5: Finished!!! Connect 9V Arduino Power Supply, Turn on Battery Pack, and Start Avoiding Obstacles With OAREE


Finished!!!
1) Connect the 9V Arduino power supply (Optional)
2) Turn on battery pack
3) Start Avoiding Obstacles with OAREE!!!
I'm sure you'll become fond of your new friend, OAREE, after watching it sense an obstacle, back up, and change direction. OAREE works best with large objects that the Ultrasonic Sensor can ping off of (like walls). It has a hard time pinging small objects like chair legs due to their small surface area and corners. Please share, develop further, and let me know of any needed adjustments or errors. This has been a great learning experience and I hope you have as much fun making this project as I did!

Runner Up in the
Robotics Contest


