Introduction: Open Your Door With a Special Knock Using Arduino, Android Phone and 1Sheeld


Now you won't use the key anymore, with this simple project you and every member in your family can open your door without key and also you won't go each time to the door to open it, you can open it from any place, all you want is your Android Smart Phone, Arduino Uno and 1Sheeld.
Basically, this Projects illustrate how to use the MIC in your Android Smart Phone as a recorded to the Arduino to Set your favorite door knock and use it each time to enter your home and simply you can change it when ever you want by 1 button.
Step 1: Components


1- Arduino Uno (25$)
2- 1Sheeld (60$)
3- Relay (1.8 $)
4- And Gate (2.3$)
5- Actuator Door Lock (15$)
6- 2222 transistor ($1.7)
7- Android Smart Phone/ Tablet.
Step 2: Hardware Implementation

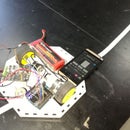
Connect your component together as shown in the schematic
1-connect 1Sheeld with Arduino
2-connect AND gate with 1sheeld like in attached picture
3-connect transistor with AND gate
4-connect relay with transistor
For more security, We use AND gate. Since, any one can use the Push button shield in the application and try all the pins to open the door. So, we have to let the output from more than 1 Pin in the Arduino and then collect them all using AND gate.
Step 3: Mobile Application


Basically, All you have to do here is to download 1Sheeld application from play store. This Application gets rid of a hell of a headache for developing the Android Application. download the App and 1Sheeld library
Using MIC shield and Keypad shield ,you will capable of doing this project
Step 4: Arduino Sketch

now, download Arduino IDE and burn this code
// Basically the code hear and save the knock and compare it to any other knock to open the door

#include <OneSheeld.h>
int pin1 = 9;
int pin2 = 10;
int pin3 = 11;
int pin4 = 12;
int led4 = 13;
int counter = 0;
int sec = 0;
int hear[20] = {};
int saved[20] = {};
int flagc = 0;
int flags = 0;
int flagf = 0;
int i = 0;
int ii = 0;

void setup()
{
  OneSheeld.begin();
  pinMode(pin1,OUTPUT);
  pinMode(pin2,OUTPUT);
  pinMode(pin3,OUTPUT);
  pinMode(pin4,OUTPUT);
  pinMode(led4,OUTPUT);
}
void loop()
{
  if (Keypad.isRowPressed(0) && Keypad.isColumnPressed(3))
  {
    set();
  }
  else if (Keypad.isRowPressed(1) && Keypad.isColumnPressed(3))
  {
    record();
  }
  else if (Keypad.isRowPressed(2) && Keypad.isColumnPressed(3))
  {
    check();
  }
  else {
    flagf = 0;
    digitalWrite(pin1,LOW);
    digitalWrite(pin2,LOW);
    digitalWrite(pin3,LOW);
    digitalWrite(pin4,LOW);
    digitalWrite(led4,LOW);
  }
}

void clc ()
{
  counter = 0;
  for (int i=0; i<=20;i++)
  {
    hear[i] = 0;
    saved[i] = 0;
  }
  i = 0;
  ii = 0;
  digitalWrite(led4,LOW);
}

void set()
{
  if (flagf == 0)
  {
  clc();
  }
  if(Mic.getValue() > 80 && flags == 0)
  {
    digitalWrite(led4,HIGH);
    saved[ii] = millis() - sec;
    sec= millis();
    ii++;
    flags = 1;
  }
  if (Mic.getValue() < 80)
  {
    digitalWrite(led4,LOW);
    flags = 0;
  }
  flagf = 1;
}

void record ()
{

  if(Mic.getValue() > 80 && flagc == 0)
  {
    digitalWrite(led4,HIGH);
    hear[i] = millis() - sec;
    sec= millis();
    i++;
    flagc = 1;
  }
  if (Mic.getValue() < 80)
  {
    digitalWrite(led4,LOW);
    flagc = 0;
  }
}

void check ()
{ if (i == ii)
  {
    for (int j=1;j<=i;j++)
    {
      int x = hear[j];
      int y =saved[j];
      if (x+400 >= y && x-400 <=y )
      {
        counter++;
      }
    }
    if (counter == i)
    {
      digitalWrite(pin1,HIGH);
      digitalWrite(pin2,HIGH);
      digitalWrite(pin3,HIGH);
      digitalWrite(pin4,HIGH);
    }
  }
  counter = 0;
  for (int i=0; i<=20;i++)
  {
    hear[i] = 0;
  }
  i = 0;
}
Step 5: Test and Have Fun
Now test
1- Press on A Button on Keypad shield to record your special knock
2- Press on B Button when you want to open your door " now it record your knock "
3- Final Press on C Button to open your door "note c button compare between your record one and your knock when you open the door "


