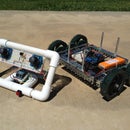
Introduction: PVC Transport Cart
The high school that I teach at is currently going through a complete rebuild. The existing campus is being torn down and a new one is being erected in the exact same space. Temporary portables have been used to displace teachers making the campus a vast sprawling mash of old and new. Fences separate sections of the campus that cause distances to increase ten fold. In order to navigate this space the engineering department needed a method of transportation that was more interesting than walking and hauling. This project attempts to solve this transport issue in a fun way while exploring the uses and limitations of PVC as a structural material.
I've used PVC in other projects including an Xbee remote control and I am impressed with its versatility, cost effectiveness and relative ease of prototyping quickly. The vision for the present project took over six months to really take shape in my mind before I began to prototype. In robotics the tank drive is used frequently for small scale drive systems so with the not-so powerful 24V motors on hand could we build a transport to carry 200lbs on a PVC frame?
Here's the build starting with the material list.
2 24V Motors @$38 each at PartsforScooters.com
2 12Volt 7.2 Ah batteries @$24 from Part for Scooters
2 Chain drive E100 wheels @ $27 each at Parts for Scooters
2 4" swivel wheels @ $6 Harbor Freight
2 3" swivel wheels @ $6 Harbor Freight
1 Sabertooth RC motor controller (the wrong RC version was order so we improvised) @$70
RC transmitter and receiver (old low budget transmitter laying around)
1 inch PVC (its pretty cheap at a few dollars for 10ft)
various 1 inch T connectors, 90 degree connectors, cross connectors which can add up in price.
3/4" plywood & chains for drives
Step 1: The Main Drive Axle & Frame
Several designs were drawn and built to arrive at the final version for the project and I am sure it could still be improved. Early versions were built with so many connectors that the cart became too bulky and heavy (pics of these earlier prototypes are included at the end of the project). The final version allows it to be driven into our classroom and into our elevator while still being able to carry a reasonable load. Although 1" PVC was used throughout to provide strength and stability 3/4" may have been sufficient. Most cuts were made using an inexpensive hand miter saw and box available at Harbor Freight.
The main axle consists of the metal axle from the wheel being sent through a 3/4" plug which was drilled to allow the metal axle from the wheel to pass through. A bolt was attached to the plug before it was inserted into a threaded 3/4" reducer that slides right into a T connector on one side and an elbow on the other, as shown in the above picture. A 1" cross connector connects the two wheel assemblies making a complete stable axle. Two inch pieces of 1" PVC typically work well to join connectors without leaving a gap. This main axle was glued using the typical purple primer and then clear PVC cement.
The main frame consists of two sides built intentionally to be able to be disconnected from the main axle to give the project some versatility in case someone wanted to build an alternative front end or back end.
The standing area back end is shown above with several of the dimensions listed. The center connection is approximately 10" and had a mistake in it so there is an extra in-line connector that fixed a problem. This end went together pretty rough when we went to the permanent gluing stage so be sure to check your shape before gluing and use our numbers loosely.
The 3/4" wood was attached with 1" connectors found in the electrical department of Home Depot. The swivel wheels were added under the plywood and provided much of the strength to the cart allowing me to put my entire 195 lbs on the cart. Make sure the swivel wheels have clearance as they spin and don't make contact with the PVC. The edges of the plywood were routered to give them a cleaner finish. The red front end plywood sheet was a complex cut using a variety of tools including a drill with a hole saw bit, a band saw and a Dremel to clean up the corners.
The front end was done similarly with the dimensions as shown. The front and back plywood pieces were painted with a Tempura paint which was all that I had available from the art department but gave it a cool look. I coated it with several coats of clear Varathane Spar Urethane to protect it. The 3" swivel wheels seemed to fit better on the front end giving the whole cart a slight downward slope.
Step 2: The Sabertooth Drive System
The drive system consists of two motors mounted on the front 3/4" plywood with a chain connecting them to the drive wheels. Instead of drilling holes for the motor mounts, slots were routered into the plywood about an inch in length to allow the motors to be pulled away from the wheels to tighten the chain. The slots were cut with a 3/8" router bit and have worked quite well but were a bit tricky to cut. It is handy to have an extra person available to pull the motors back while the nuts and bots are tightened to get the chain just right.
Two 12V batteries are connected in series giving the system a 24V power supply and wired directly into the Sabertooth motor controller (a switch will be added in the driving area to make the powering task a bit easier). Each motor is also wired directly into the Sabertooth motor controller. Although we had originally intended to order the 2x12A Motor Driver we ended up with the RC version which does not allow wired potentiometer control. So our control system is entirely wireless and allows us to pull the RC transmitter off of the cart and drive it like James Bond. From the above pictures the tether going from one 12V battery to the other is shown with the RC receiver connected to the PVC riser which receives the signal from above.
The RC controller is attached to the handlebar with a 3D printed custom holder that fit the PVC pipe on the first try (thanks Vanessa). This holder just needs a built in space for the battery pack. The final version without a truck bed is shown above with the dimensions for the risers and bed support. A video demonstrates that the cart is functional and actually quite fun to drive.
I know that I have omitted details that may be of interest so feel free to ask any questions that come to mind. Hopefully someone enjoys reading about our build and gets something out of it. I'd love to hear about it. On the final page I have included some earlier prototyping pictures to capture the engineering iterations that went into this project.
Step 3: Here Are Some Early Prototyping Pictures

Participated in the
Unusual Uses Challenge

Participated in the
PVC Challenge


