

Introduction: Part 2: Eclipse Mars 2 (Android Virtual Device Manager)


In developing an Android Application, It is good to have what we called "EMULATOR" which is design to visualized the actual design and run-time program. Android Virtual Device Manager (AVD Manager) is integrated to Eclipse to serve the purpose.
Follow the steps and have fun!
Please do follow my account for more Instructables :)
Step 1: Customize the Perspective


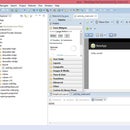
Sometimes in Eclipse IDE, by default, We don't usually see the "easy launch icon" of AVD Manager, but on the image given it is already setup. Now, I'll guide you to customized your perspective by adding the AVD Manager Icon.
Window> Perspective > Customize Perspective
As you have seen, check all the boxes.
Afterwards click the AVD Icon, to go forward to the next steps.
Step 2: Android Virtual Device | Device Definition


As you have observed, we already have existing AVD devices with its configuration (Target Name, Platform, API Level and CPU/ABI). I hope you remember our previous tutorial, Part 1, where it shows the configuration of the project because it must match the AVD we will be using.
So now try to look the tab for Device Definition. You will see the color green Icons that is already made by the user like us, then the color blue Icons, which has its own device definition. I have nothing to add about to elaborate more this because it is what it is "device definition."
Click the "Create Device."
Step 3: Create New Device

If you are familiar with the exact specification of the device you wanted to use, and you can't find it in the device definition, then I suggest you, use "Create New Device."
then after assigning the values of specifications, click "Create Device."
Step 4: Clone Device


By clicking and using existing device definition, click "Clone Device" which means we will use existing specification given. Ideally, I suggest you, rename the Device for you to remember the device you edited, then afterward, you will already see the cloned device on the device definitions.
Now, select the cloned device then click the "Create AVD."
Step 5: Create New Android Virtual Device


We will now try to reconfigure the device we will be using for the AVD. Observe the changes I've done in the images. I choose ARM for the CPU because Intel sometimes demands its HAXM installer that will use much more of your CPU usage for the emulation. I don't discourage you use that, it could be faster. But for those who experienced trouble running the emulator may be this is one of the reason.
Check for your PC capacity in terms of RAM. If you do have 2G RAM then definitely decreased the memory option to 512 RAM or else, your loading will take too long, or worst, HANG.
And last, never forget to check the Use Host GPU for running the emulation option.
Step 6: Launch AVD


Go to Android Virtual Device, select the AVD Name then click Start.
Tab, Android Virtual Device > Select AVD Name > click START
I suggest use "scale display to real size," so you could see the actual real size of the emulation.
Enjoy, Have fun!


