Introduction: Pegboard Fabric
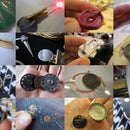
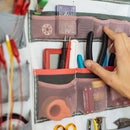
Take your workspace with you wherever you go. This fabric version of the traditional hardwood pegboard is a re-configurable textile material that can be sewn with thick strong thread to create wearable and portable storage opportunities for all kinds of tools. Hopefully this system will make it easier for us to take our practices out into the "wild" to explore making in new environments.
And, now is a perfect time for makers to become mobile with our practices. CNC tools, computers and electronic parts are becoming smaller, more compact and portable. Laptops liberated programmers from working in stationary setups. As makers of physical artifacts, lets aim for a similar freedom of mobility. Hacker spaces, FabLabs and Co-working spaces offer temporary work spaces all over the world.
What is Pegboard?
A common way of storing and organizing tools in a workshop is to install vertically hanging pegboard. This is usually a perforated hardboard that comes with per-drilled evenly spaced holes. Metal fastenings such as hooks and rods can be inserted into these holes to hold tools. Read more:
>> https://en.wikipedia.org/wiki/Perforated_hardboar...
Related Work
Many of the examples in this Instructable are part of a project called "A Wearable Studio Practice".
Project page >> http://www.plusea.at/?p=5385
Photo album >> https://www.flickr.com/photos/plusea/albums/721576...
This Instructable
This Instructable aims to introduce the Pegboard Fabric concept by showing how to make your own, and describing some examples of how it can be sewing together and combined with numerous other materials to create a huge variety of designs. This work is an ongoing process of designing and building my own mobile studio and I would love to receive input, feedback and ideas for this work.
Step 1: Materials and Tools
MATERIALS
There are many materials used in this project and I will try to list them all bellow. But as a general description, materials that don't fray and maintain their shape when cut, perforated and sewn work wonderfully.
- vinyl coated tarp
- fake leather
- leather
- kapton film
- neoprene
- felt
- velcro
- zippers
- plastics
- elastics
- powermesh
- thick cotton thread or other sturdy sewing materials
CUTTING TOOLS
There are different methods for making holes depending on the materials you are working with, as well as the tools you have access to. Here is a list of all the different kinds of tools I can think of that would be useful.
- hole punches and hammer on cutting mat or sacrificial material
- handheld hole punch (can't enter far into the material from the edge)
- vinylcutter
- lasercutter
- waterjet cutter
- cnc mill
- stamp press
- industrial methods?
OTHER TOOLS
- permanent markers
- non-permanent markers
- textile pens
- cutting mat
- cutter knife
- metal ruler
- round-nose sewing needle with large hole
- make yourself a stencil (see next step)
Step 2: Mark Holes
This project involves making lots of holes! If you are making these by hand, you'll find it extremely useful to have a hole grid stencil. I chose to create my grid as a 1cm x 1cm grid, and mostly make 2mm diameter holes. To make my stencil I created a cut file in Illustrator (see attached SVG) and vinylcut it out of a thick kapton film (just because it was the only sturdy material I had at hand). I can then draw a line over a row of holes and the maker will leave dots only where the holes are.
You can of course also use a ruler to mark out the distance between your holes directly on the material.
Attachments
Step 3: Make Holes
BY HAND
For almost all of my holes I used a hole cutter with a rubber hammer (so that it was not so loud) and a sacrificial cutting mat underneath.
For some holes along the edges of material I could also use a handheld hole maker, but this gets strenuous on your hand muscles after some time.
There is something meditative about making so many holes, and you should
enjoy the process and not see it simply as a means to an end.
BY MACHINE
So far I've only used a vinylcutter to cut the hole stencil. But I hope to experiment with more machine hole making processes in the near future.
Step 4: Sew Holes
The system so far uses a thick cotton thread to assemble the pegboard fabric into various pockets, pouches and holders. Other materials like velcro, elastic, zippers, tape, plastics, metals and wood and can be perforated and combined to make endless options.
To sew things together using this stitching method I begin sewing at one point, sew all the way to one end and then sew over the first round of sewing but alternate the stitches so that the finished result looks like a continuous line of thread on both sides (as opposed to a dashed line). For many purposes a single pass of sewing will work just fine. The benefits of doubling help make the seam more sturdy, and also have a different visual effect.
Step 5: Example: Pegboard Fabric Pockets and Pouches
Sew the corners and perforate the edges to make simple pockets and pouches. These examples are made from fake leather and vinyl coated tarp. See attached SVG file.
Attachments
Step 6: Example: Pegboard Fabric Tool Organizer
Perforated strips of neoprene are stitched to create loops for holding long skinny tools.
Step 7: Example: Pegboard Fabric Photo Album
Even sew photos.
Step 8: Example: Pegboard Fabric Backpack
The previous examples were all part of a backpack tool organizer. The backpack doesn't work so well as a backpack, but opened up and hung it works great for tools.
Step 9: Example: Pegboard Fabric Pencil Holder
A short piece of perforated material sewn in a loop makes for a pencil or pen holder. Neoprene and felt work best as they have smooth surfaces and are slightly stretchy.
Step 10: Example: Pegboard Fabric Velcro Patch
Perforate velcro and sew it on to create a patch of velcro.
Step 11: Example: Pegboard Fabric Pincushion
Create a pincushion by sandwiching a pillow between a perforated ring. The holes in the ring match the 1cm grid of holes.
Step 12: Example: Pegboard Fabric Camera Mount
This is a first attempt at trying to make a vest-mounted camera holder that would allow me to take photos of my work as I'm making it. A sheet of stiff plastic with holes punched along the sides is used to keep the pouch rigid.
Step 13: Example: Pegboard Fabric Solder Surface
Want to be able to solder on your knee? This construction of neoprene and kapton film allows you to do it. The thermal insulating properties of the neoprene and the heat-resistant properties of the kapton combined to protect your body from the temperatures and the neoprene from the hot tip of the soldering iron.
Step 14: Example: Pegboard Fabric Tool Vest
The last few examples were all part of my attempt to strap my tools and work surfaces to my body in order to make my practice even more mobile and have tools with me in convenient and unusual moments.
Step 15: Example: Pegboard Wristband With Magnet
This last example is of a wristband made of pegboard fabric so that many of the elements I just described could be attached to your wrist. This particular example shows a magnet enveloped in some vinyl coated tarp sewn to the wristband turning it into a great tool for storing pins or other light-weight magnetic things.

Participated in the
Hack Your Day Contest

Participated in the
Full Spectrum Laser Contest 2016


