Introduction: Perfume/deodorant Fueled Ballistic Missile Launcher


I really love rockets and gliders and I have always experimented with gliders. I have made several rockets made of papers, pet bottles, etc when I was little hence to advance my skill I decided to build an Arduino controlled rocket launcher.
In this Instructables I am going to show you how to build a ballistic missile launcher which can also be turned into a rocket launcher just by changing the missile to a rocket..
Note: This instructable uses high dc voltage source which can cause serious injuries, be alert be aware while attempting to build one. Use safety goggle safety equipment.
Step 1: Supplies

Materials
- PVC pipes
- PVC elbows
- Hot glue sticks
- Ply Wood 4mm thick
- Pet bottle
- Perfume/Deodorant
Tools
- Hot glue gun
- Soldering iron
- Hacksaw
- Pipe cutter
- Drill machine
- Mallet
- Ruler
- Pen/Pencil
Electronics
- Arduino uno x1
- 16x2 LCD display with i2c module x1
- Buzzer x1
- Push buttons x1
- 10k ohm resistor x1
- High-Voltage Generator x1
- Connecting wires
- Relay module x1
- Li-ion battery x2
- Li-ion battery holder x2
- Mini breadboard x1
- Screw terminal connector x2
- Veroboard
Step 2: The Base


Cut the pipe according to the dimensions provided in the picture on the supplies step. Connect 2 elbows on both ends of 50 cm long pipe. Repeat this step to other 50 cm long pipe.Now, connect the T to 25 cm long pipes as shown, repeat this step for other two 25 cm pipes.Assemble all the pieces to form a nice rectangle. While connecting the pieces make sure the rectangle formed is properly leveled, sometimes edge of the rectangle tends to rise up this will have a bad effect when you are connecting the center pieces. The pieces tightly fits into one another hence do not require glue for sticking and this might be helpful if you want to reuse the pipes. Use mallet to secure the fits.
If you find difficulties attaching the pipes into the connectors file down the edge of the pipe
Step 3: Missile Stand


Drill a 10 mm hole at a distance of 80 mm from one end of the 500mm long pipe and attach a T connector on the other end. Attach two 250 mm pipe to the base as shown for connecting the missile stand. Now, we will have to cut the excess pipe from the two base 250 mm long pipes since it will not felicitate the missile stand. Mark the excess pvc pipe and then cut it using a pipe cutter. Attach the missile stand to the base.
Step 4: Missiles
There are different types of Pet bottle available in the market. Check for thick yet light in weight bottle.You can experiment with different shapes of bottle too.
Now coming to the size of the bottle 1/2 litre water bottle works fine and uses less fuel. The smaller and lighter the bottle the better it flies far.
Apply hot glue to the base of the bottle to make it nose heavy,this will also help the missile fly straight without twisting.
Step 5: Ignition Mechanism


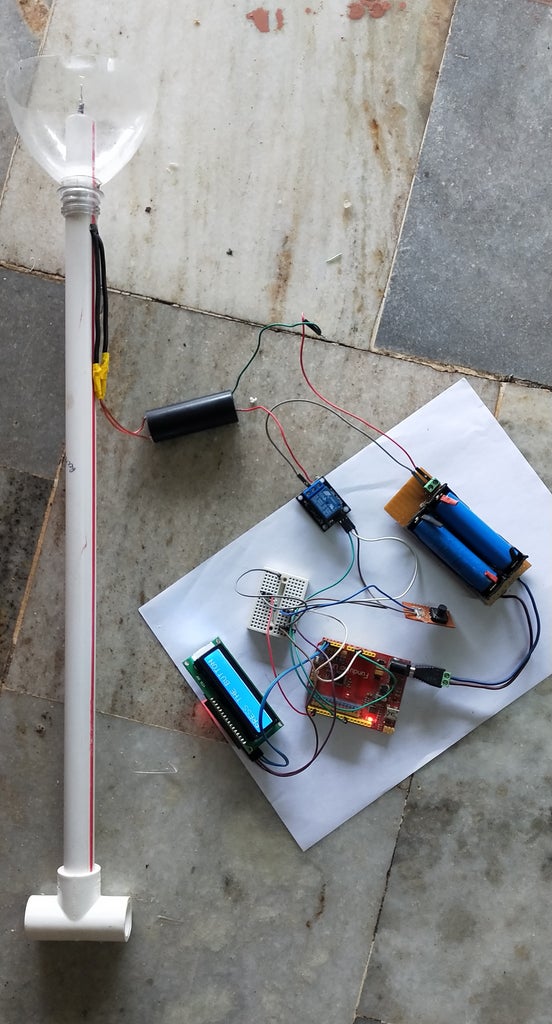
Insert the two wires in the drilled hole on the missile stand and pull out from the open end of the pipe.These wires have to be soldered to the two wires of the voltage booster module where sparks are generated. The voltage booster is glued on the missile holder using hot glue. The other two wires of voltage booster are soldered and connected to the screw terminal connectors which is glued on the missile stand. Crumble a small piece of paper small enough to fit into the pipe where the sparks wire are i.e at the open end of the missile holder. Fill this end with hot glue. Cut a piece of large Pet bottle which looks like a funnel and insert it into the missile stand.
Step 6: Schematics Diagram and Code

The schematic diagram is self explanatory but to define it in few words, a battery source is used to power arduino . The same battery is used to supply voltage and current to the voltage booster. The relay is triggered with the pin connected to arduino digital pin no 10. one end of buzzer is connected to digital pin 13 and other pin to common voltage rail in breadboard. A push button is used for triggering of the relay withs its one terminal connected to digital pin 2 and other terminal connected to common ground.
Attachments

Step 7: Battery Pack


I drilled holes on the veroboard to connect the Li-ion battery holders since the pins were not the same size of the holes on veroboard. Connect 2 Li-ion battery serially on a veroboard. Connect male jack to the output of the battery pack.Now, since the voltage booster works from 3 to 6 volts two 3.7 volts connected serially might damage the booster hence I made a separate connection using one battery adapter from the same bttery pack and soldered it to screw connectors.
Step 8: Fueling

For 1/2 litre bottle squeeze 8-9 times and make sure every time you squeeze most of the inner part get wet. Cover the pet bottle with fingers and shake well. Quickly attach the bottle to the missile holder Do not wait too longer after squeezing the fuel to launch the alcohol bottle rocket. The longer you wait the more alcohol will de-atomize and collect in the bottom of the bottle, resulting in less performance.
Step 9: Testing Without Arduino

Once the glue in the missile stick is dried you can check whether the sparks are coming or not using a Li-ion battery.
Step 10: Testing With Arduino
If the test without arduino is successful connect the module and all the equipment and test it using the battery pack.
Step 11: Control Box


I drew a template for a wooden box to place all the electronics which we will be interacting when we launch the missile such as button,LCD,buzzer.A simple wooden box was made using the self drawn template. But before making the wooden box I first cu out the front side of the box using hacksaw and placed all the components to check how the components be affecting the sides of the box, such as we need a hole on the side of the box to power the Arduino and a second hole to compile code into the Arduino if required. once every thing is proper and perfect i started gluing the electronics to the front side of the box and then attaching all the sides of the boxes.
Now ,Once all the sides were glued except for the back side.I started stacking all the components on over another inside the box. To avoid accidents I glued a stiff cardboard on an equipment before stacking the other equipment.
I glued relay to the inner side of the back piece of the box and battery pack to the outer side of the back piece.
Step 12: Assembly


Now when every thing is working properly assemble the misssile stand in the middle of the base by removing one of the corners and then once again joining it.
Step 13: Launching
Once the fuel is filled and missile is installed to the launcher press the button to start the timer of 5 seconds and at every one second we hear a beep sound made by the buzzer
(note: Due to heavy rain I was not able to experiment it outside ,soon i will be providing the photos and video too maybe.)

Participated in the
Make It Fly Speed Challenge


