Introduction: Portable Wireless Charger


I made a portable wireless charger with a kick stand so you can stand your phone up on your desk. The idea behind this project is that it is compatible with most new phones so if you're friend doesn't have the same phone as you, you can still lend them some power. For this project you will need:
Materials:
- Wood
- Wireless charge pad
- Portable power bank
- Hot-glue or wood glue
- Magnet
- Washer
- Small Hinge
Tools:
- Band Saw
- Scroll Saw
- Hot-glue gun
- File
- Sandpaper
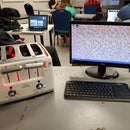
Step 1: Choosing the Hardware

To start this project I went to the store and bought a cheap $7 wireless charge pad. It is not quick charge enabled, but if you want to upgrade to one that shouldn't be a problem. I have an old power bank laying around that I use from time to time. It is a 13,000 mAh Crave travel pro power bank. It has 2 USB outputs on it, so only one of them will be taken by the charge pad enabling you to still be able to plug in a cord. Make sure the USB outputs are compatible with your charge pad. If you want to add quick charging you will need to a get a power bank with the specific quick charge output. You can find a newer version of the power bank I used at: https://www.amazon.com/Crave-Travel-Pro-13000mAh-Ultra-High/dp/B00JSFYWFW.
Step 2: Making the Enclosure


For my enclosure, I was planning on using a very thin plywood sheet. However, I left it in my car and it warped making it unusable for the cuts I am going to make. I found some scrap and ended up with enough dark wood to make the back and sides and a piece of light wood for the front where the charge pad will sit. The front and back are the same dimensions. About 4 inches wide and 7 inches long. This makes sure that it is long enough to combination large phones and there is also enough room for the charge pad.
Step 3: Making Room for the Chargpad


The next thing I did was cut a hole for my charge pad. Mine was about 3.5 inches in diameter. I cut a hole using the scroll saw by first drilling a small hole and then using the saw to cut a circle out of the middle. I sanded out this hole until I got the charge pad to friction fit in place. I also had to sand out a little groove in the back to make room for the cord plugged into the pad. This way the pad could fit far enough out to still touch and charge the phone. To place the hole in the right place I just used my phone for reference and it was slightly higher than the middle of the front board.
Step 4: Adding Support and the Sides


I made small about 1 inch as surfaces to glue the top, bottom, and sides to. I made these by taking a small square of scrap wood and cutting them in half to make triangles in the band saw. I then hot glued the power bank in place on the inside. I then put the sides on by hot gluing them to the small triangles. For the right side, I had to drill a small hole in the top of it in order to make the power button accessible. For the top, I cut out a grove to expose the USB ports as well as the charging port on top of the power bank. I then plugged the power bank cable into the top and bunched the cord up on the inside.
Step 5: Making the Back and Hinge


For the back, I made a small cut out for the indicator on the power bank. This way you can tell how much battery is left. I decided to make this on the back to not ruin the aesthetic of the front and the power button was on the right side for it to be mounted in this position. I then added a kickstand by using a small hinge I found at home depot. The hinge is screwed into the back of the project and the material that hinges. I made the hinged piece out of the dark wood material so that it would blend in with the back. I also added little triangles of this material to the top and bottom right corners so that when it sits on a desk it will remain flat. Inside the back of the case is a small ceramic magnet and on the hinge is a washer so that the hinge clicks into place.
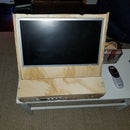
Step 6: Set It Up and Enjoy
I unfortunately do not have any pictures of it set up, but I am really happy with the way it works. I added a small piece of material at the bottom by hot gluing it to the front to hold your phone up when the kickstand is engaged. Someone also suggested that I get a right angle micro USB plug for the charge pad so that there isn't a large cord sticking out of the top. If you wanted to, you could put the whole thing together using wood glue, I just used hot glue due to the time constraints I had.


