Introduction: Print-In-Place Bearing
The following information is a single lesson in a larger Tinkercad project. Check out this and more projects on Tinkercad.
This is a step-by-step tutorial for using Tinkercad to model a print-in-place bearing assembly. What is print-in-place? In this case, the inner race, the outer race and the bearings are modeled to be 3D printed in place. In other words, after it is printed and popped off the build platform, no further assembly is required.
Things to remember:
When designing something on paper or in the digital world, drawn objects don’t require “tolerance” to fit together. However, when designing an object that you want to make “in the real world” one must think about the “gap” that is needed to make things fit. When designing for 3D printing, remember that if 2 separate objects are printed too close to each other, they will become fused together. Different printers, as well as different printing technologies, require a different amount of space between objects so as not to become fused. A general guideline with FDM printers (Fused Deposition Manufacturing, like Printrbot or Makerbot) is to allow .2mm between objects.
- Continue to the next step.
Step 1: Set the Snap Grid
The following information is a single lesson in a larger Tinkercad project. Check out this and more projects on Tinkercad.
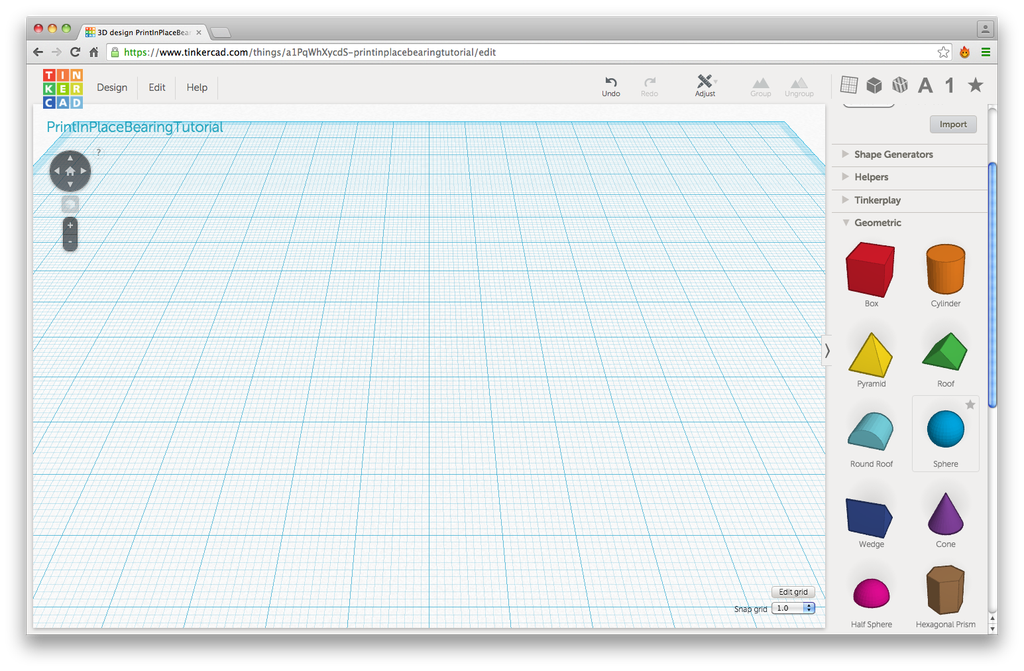
Be sure that Snap Grid (located below “Edit Grid”) is set to 1.0
- Be sure that Snap Grid (located below “Edit Grid”) is set to 1.0
Step 2: Create the First Ball Bearing
The following information is a single lesson in a larger Tinkercad project. Check out this and more projects on Tinkercad.
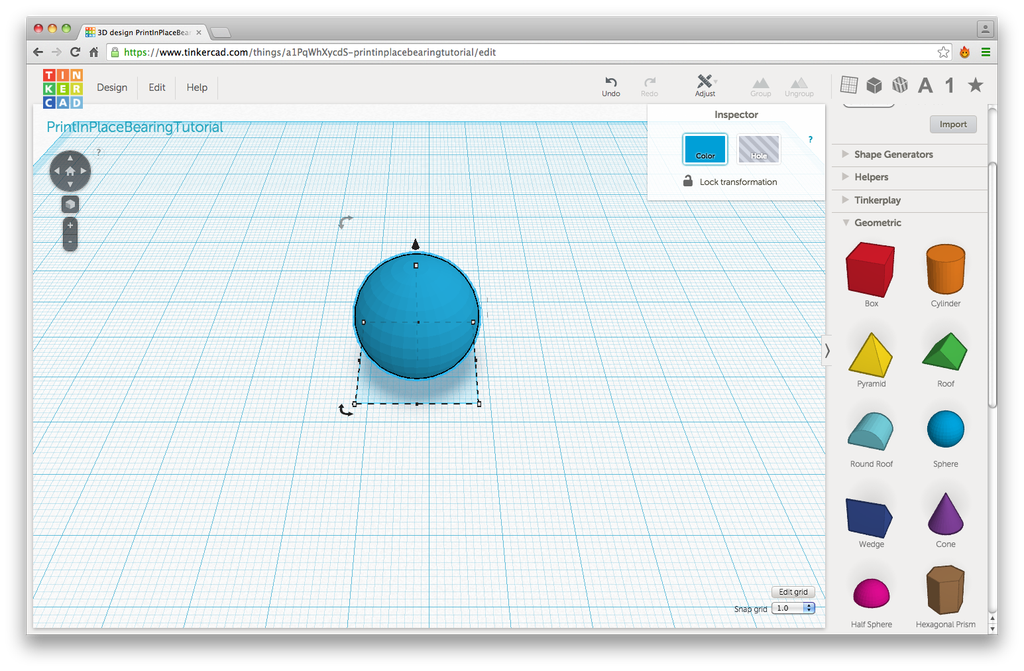
- Use the Mouse to go to right side of Tinkercad interface, click on “>Geometric” then left click on “Sphere” and drag it to the Workplane.
- Once the sphere is on the Workplane, make sure it is selected. If it is selected, then you will see a square around it called a bounding box.
The bounding box is comprised of the white-box corner control handles, black-box side control handles and the black elevation control cone, as well as the rotation controls.
If it is not selected, then simply left click on the sphere and it will be selected.
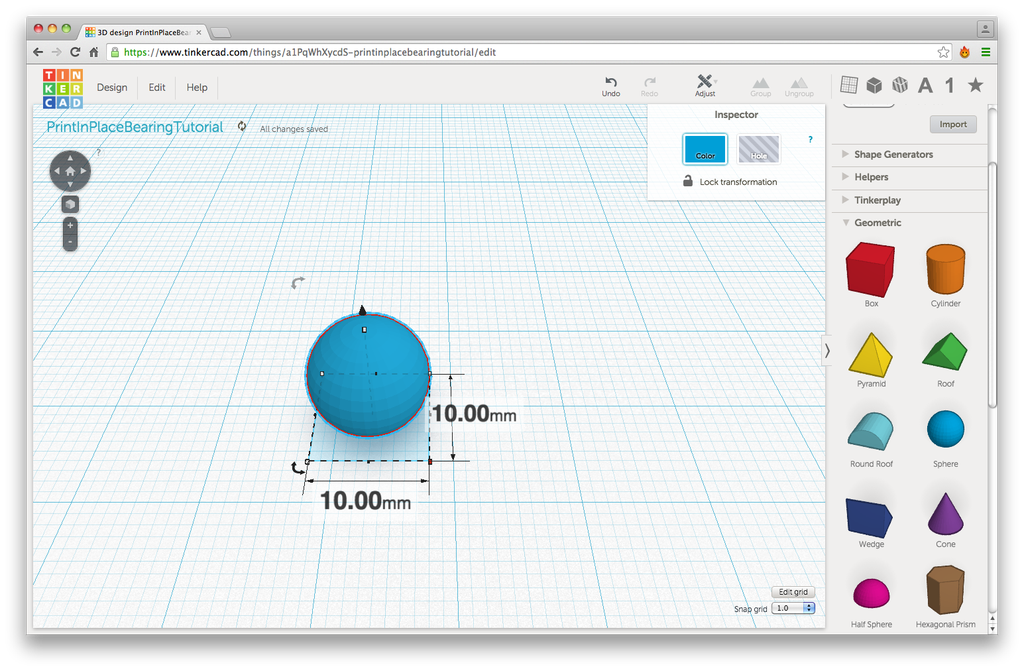
- Using the Shift key and Left Mouse button, click and drag one of the white-box control handles. This will scale the sphere equally in all directions.
Scale the sphere down to 10.00mm. We have just made the first ball for our bearing!
Step 3: Create the Circle of Ball Bearings
The following information is a single lesson in a larger Tinkercad project. Check out this and more projects on Tinkercad.
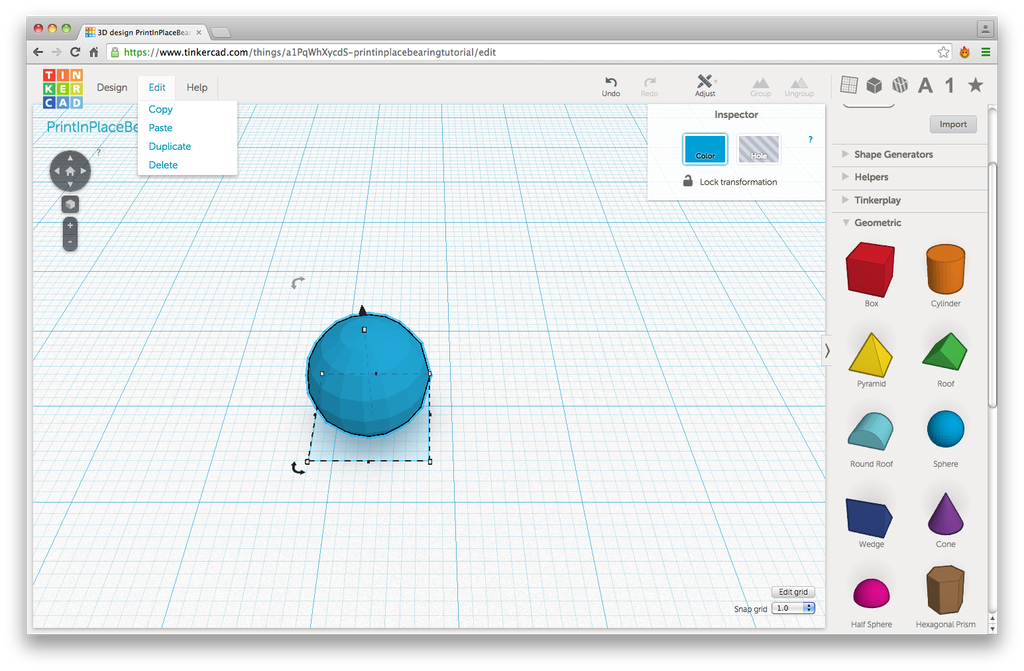
- While the sphere is selected, click on “Edit” in the upper left area of the Tinkercad interface. Click on “Duplicate”. This will create a duplicate of the sphere in the exact position as the first.
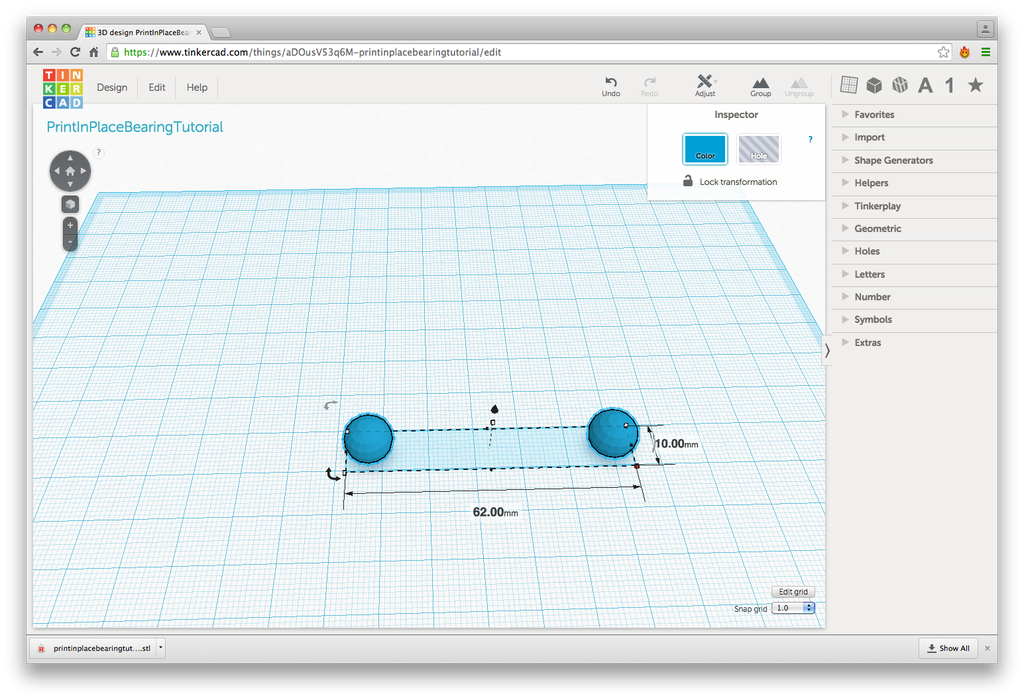
- Move the duplicate (which should still be selected) 52mm to the right on the X axis. Since our grid is set to 1.0, we could use the right arrow on the keyboard and press it 52 times. This will move the duplicate sphere exactly 52mm to the right.
Now some math... (Skip to the next step if you don’t care WHY we moved the sphere to the right by 52mm) Our bearing assembly is going to have sixteen 10mm balls arranged in a circular pattern and we know that we need at least .2mm between each ball.
The circumference of this circle can be calculated by using this equation: Circumference = 16 x 10mm + 16 x .2mm (or more simply Circumference = 16 x 10.2)
The circumference equals 163.2mm and if we divide that by PI, we arrive at a diameter of 51.94mm. In this case, rounding up to a 52mm diameter is appropriate as it increases that gap between each ball from .2mm to .21mm
- Verify that the spheres are 52mm apart. This can be done by selecting both spheres. If one sphere is already selected, then using the Shift key and Left Mouse button, click on the unselected sphere.
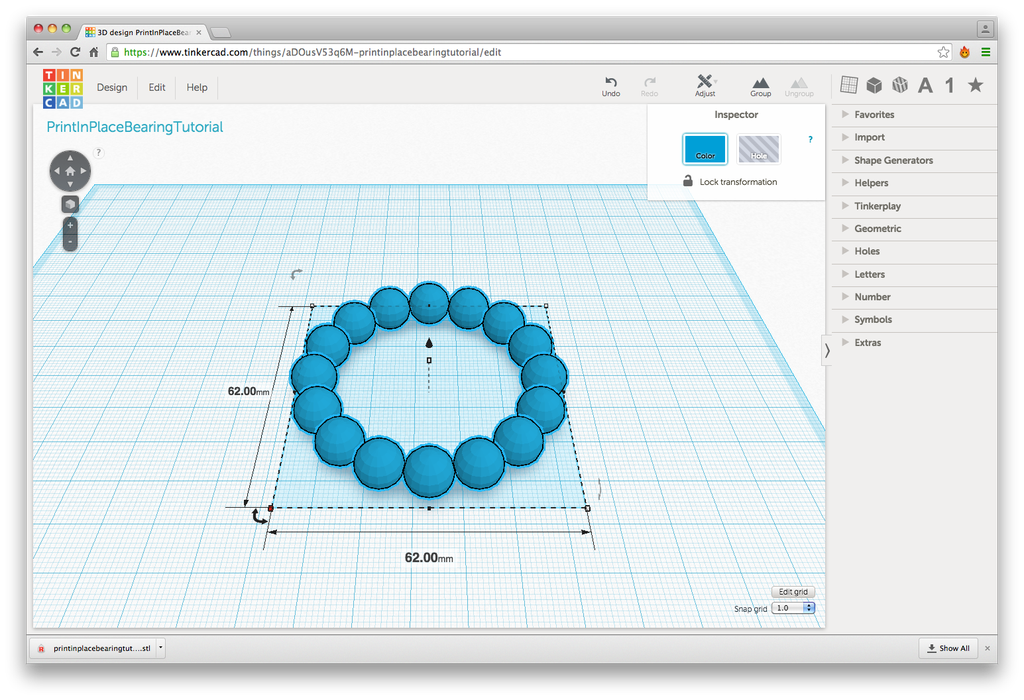
The bounding box will now be seen to extend around both spheres. Simply hover the cursor over one the corner white-box control handles and the dimensions will now be displayed. Hopefully, you will see 10.00mm x 62.00mm.
If so, great. Skip to the next step.
If not, then we’ll need to adjust. Make a mental note of the dimension you saw and figure out how much more or less you need to move the sphere. If you saw, for example 10.00mm x 59.00mm, then you know you would need to move one the the spheres 3mm to achieve the dimension of 62.00mm. Deselect one of the spheres by using the Shift key and Left Mouse button to click on the sphere you wish to deselect.
This should leave the one of the spheres selected. Now use the arrow on the keyboard left or right the desired number of times until you get a dimension of 10.00mm x 62.00mm.
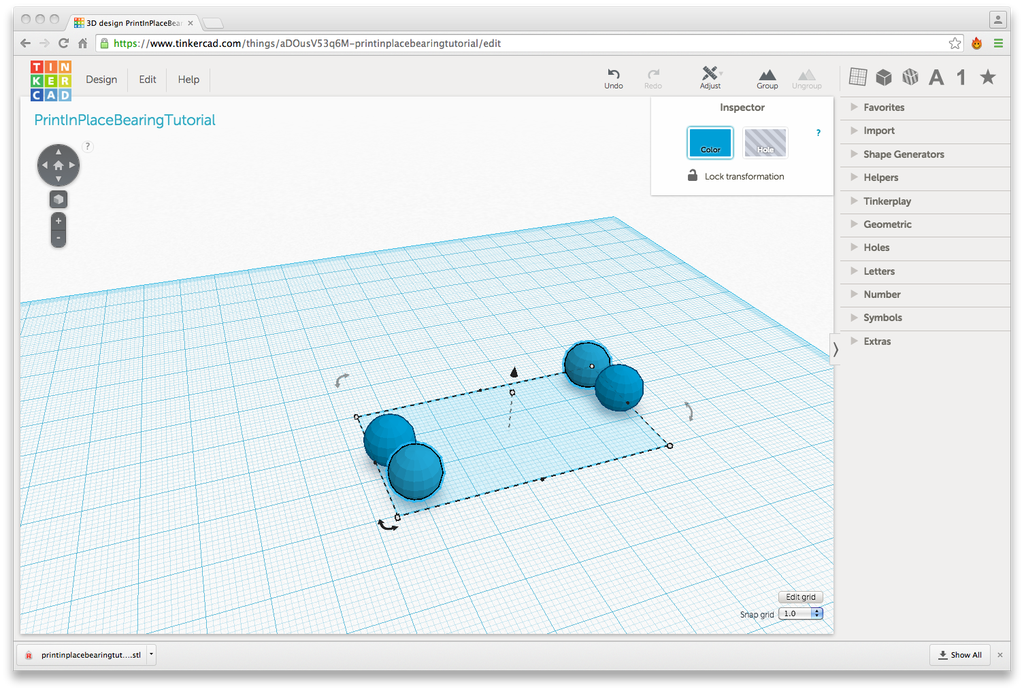
- Select both spheres. While spheres are selected, click on “Edit” and “Duplicate”. This will make a duplicate of both spheres.
Now locate the black rotation handle. It looks like a curved set of arrows and allows you to rotate the selected object(s) in the same plane as the workplane.
When your mouse is on the the rotation handle, it will turn red. Using the Left Mouse, drag the rotation handle until the duplicated balls have turned 22.5 degrees.
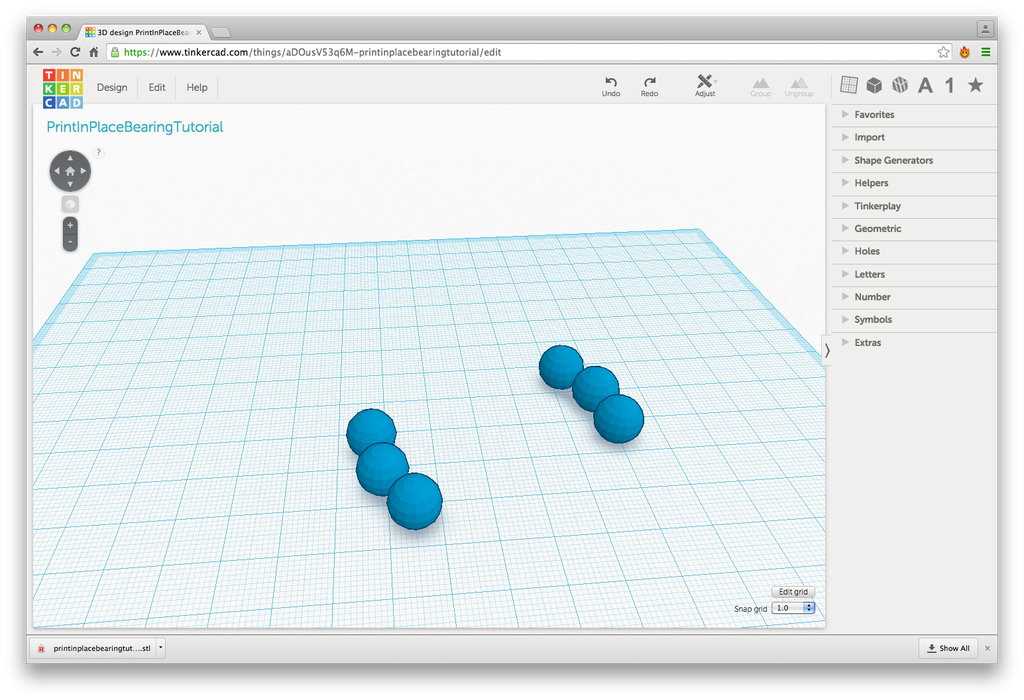
- Click on “Edit” and “Duplicate” again. This will create another set of spheres, however, it should include that rotation.
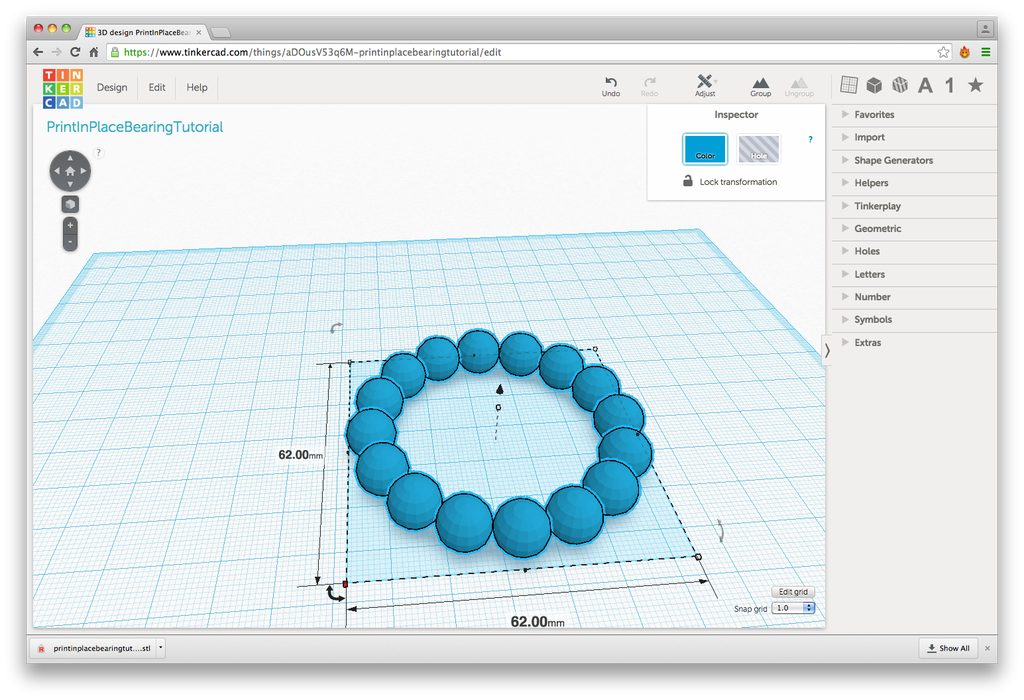
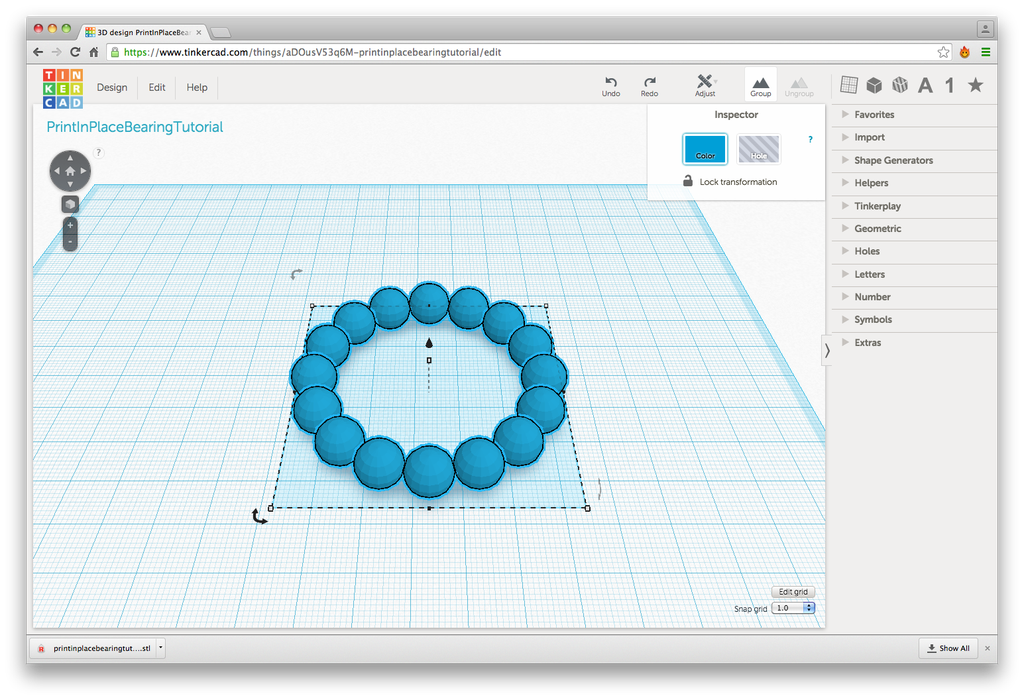
- Continue to click on “Edit” and “Duplicate” until there is a complete circle of balls.
- Verify that the group has the correct dimensions of 62.00mm x 62.00mm x 10.00mm.
On a PC, pressing Control and A will select all objects. On a Mac, Command and A does the same.
With all objects selected, hover the cursor over the white-box corner controls to see the X and Y dimensions. Then, hover the cursor over the white-box depth control to see the Z dimension.
- With all objects selected, click on “Group” on the upper part of the Tinkercad interface. Congratulations! You now have 16 balls for our assembly!
Step 4: Make a Reference Cylinder
The following information is a single lesson in a larger Tinkercad project. Check out this and more projects on Tinkercad.
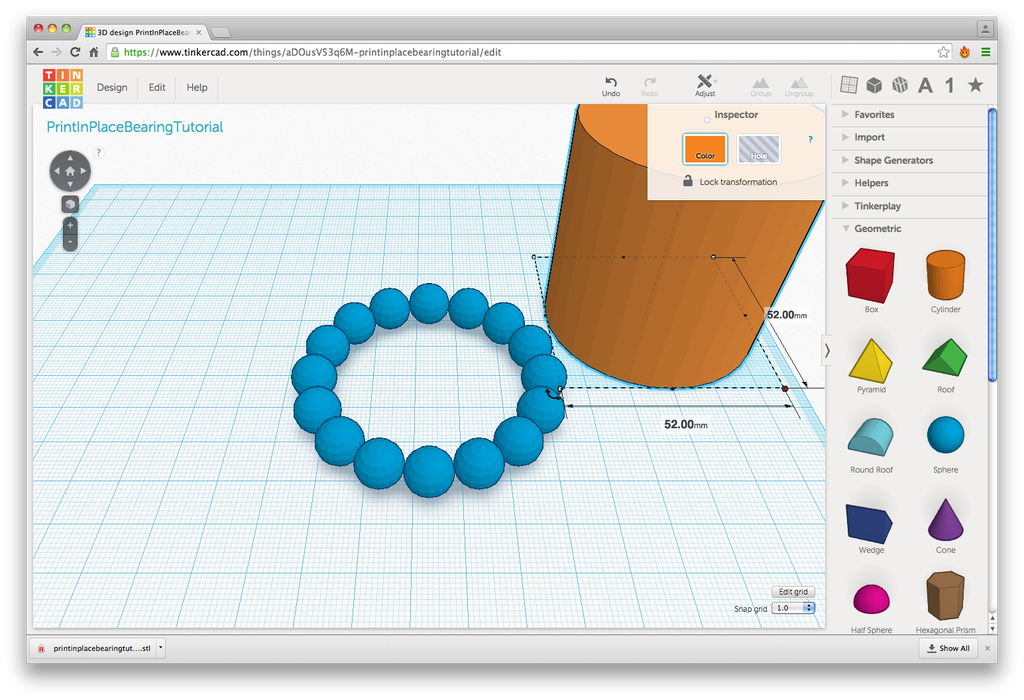
- Use Mouse to go to right side of Tinkercad interface, click on “>Geometric” then left click on “Cylinder” and drag it to the Workplane.
With the cylinder selected, use the Shift key and Left Mouse button to click and drag one of the white-box control handles and scale the cylinder to 52mm in all directions.
Step 5: Make Outer Diameter of Bearing Assembly
The following information is a single lesson in a larger Tinkercad project. Check out this and more projects on Tinkercad.
In this step we’ll be making the overall size of the bearing assembly, focusing on the OD (outer diameter)
- Select the reference cylinder that was just made and click on “Edit” and “Duplicate”
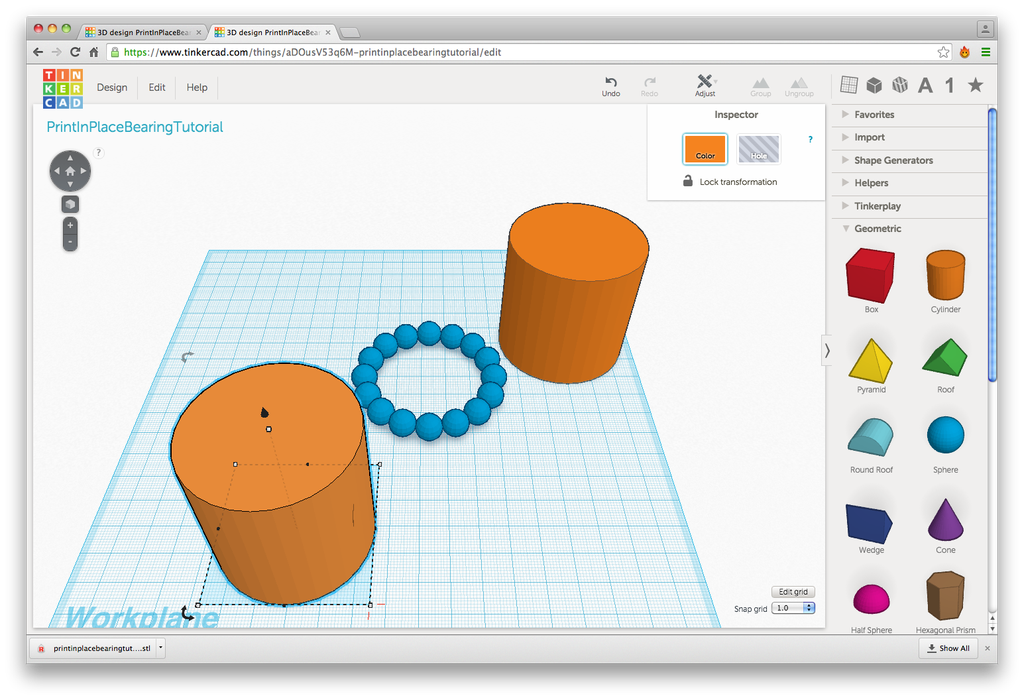
- While the duplicate is selected, use the Left Mouse button to grab and move the new cylinder and drag it to the front of the Workplane.
- Use the Shift key and Left Mouse button to click and drag one of the white-box control handles and scale the cylinder to 67mm (Note: 67mm is 15mm greater than 52mm) in all directions. Then, with just the Left Mouse button, click and drag the top white-box depth control handle and scale the depth to 10mm.
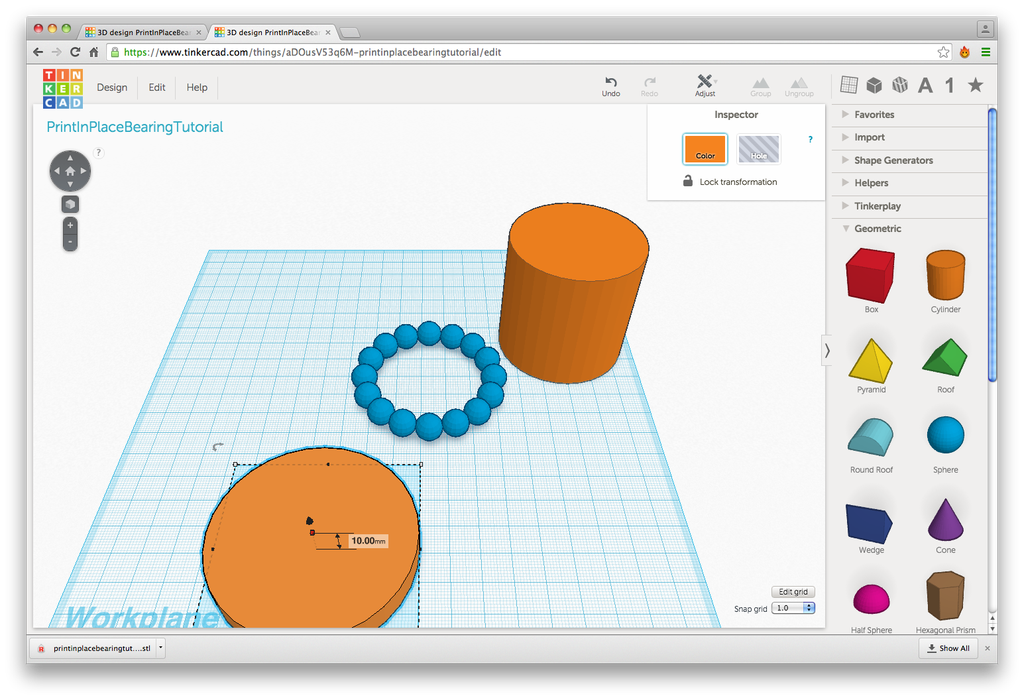
Step 6: Make Inner Diameter of Bearing Assembly
The following information is a single lesson in a larger Tinkercad project. Check out this and more projects on Tinkercad.
In this step we’ll be making the inside hole of the bearing assembly, focusing on the ID (inner diameter)
- Select the reference cylinder that was made earlier and click on “Edit” and “Duplicate”
- While the duplicate is selected, use the Left Mouse button to grab and move the new cylinder and drag it anywhere near the front of the Workplane
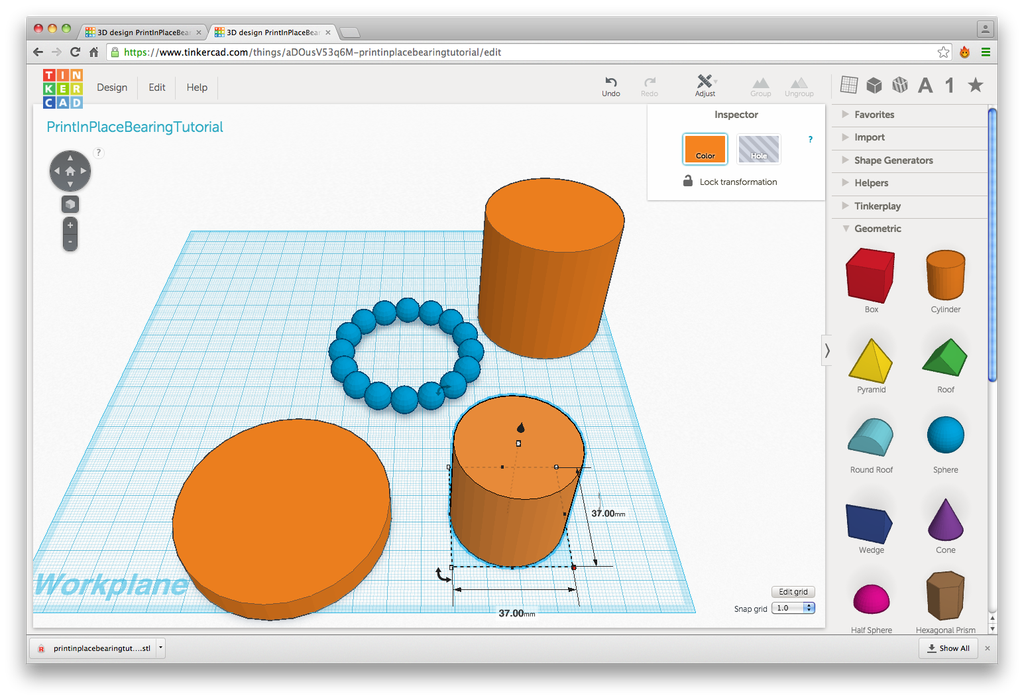
- Use the Shift key and Left Mouse button to click and drag one of the white-box control handles and scale the cylinder to 37mm (Note: 37mm is 15mm less than 52mm) in all directions.
- While this cylinder is selected, find the “Inspector” in the upper right part of the work area. Click on “Hole” and notice how the cylinder changes from a color to a transparency. This prepares this object to be used as a cutter or a drill.
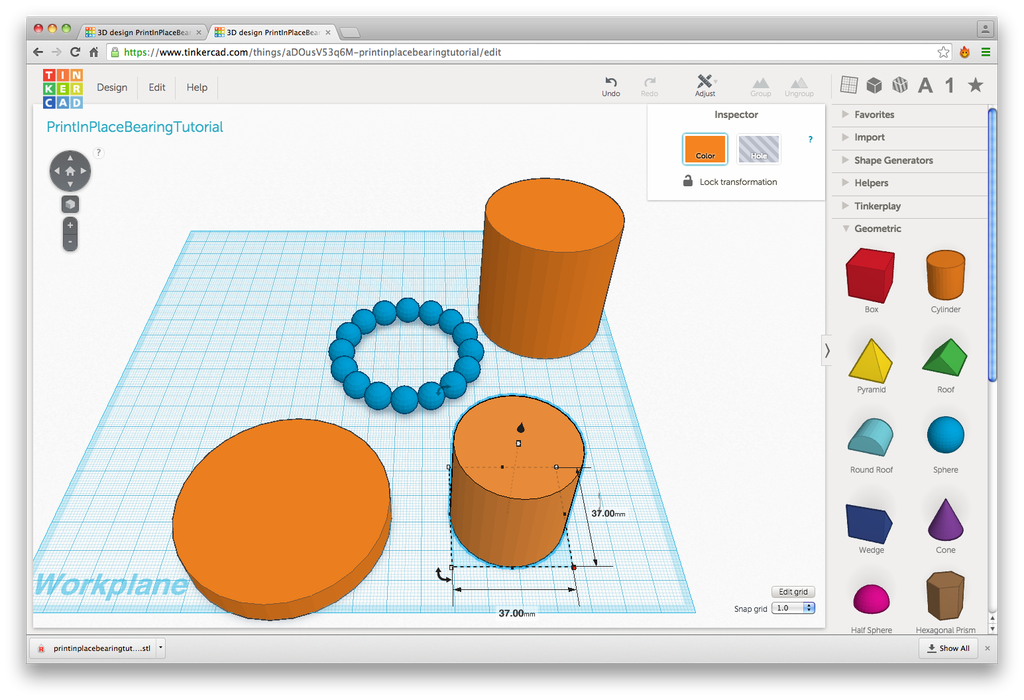
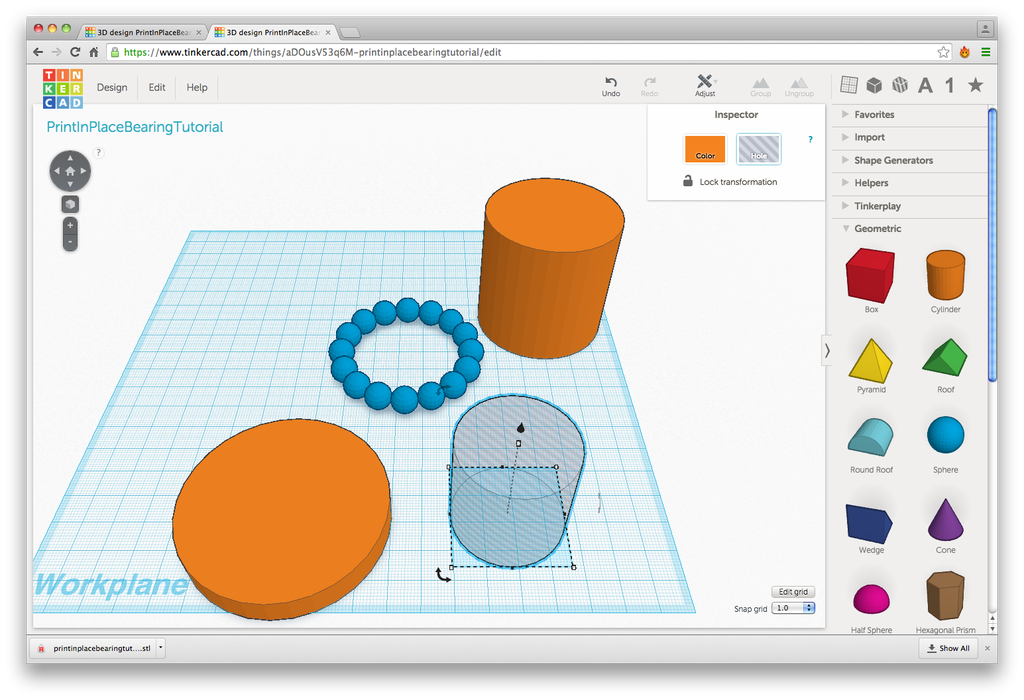
Step 7: Create Overall Shape of Bearing Assembly
The following information is a single lesson in a larger Tinkercad project. Check out this and more projects on Tinkercad.
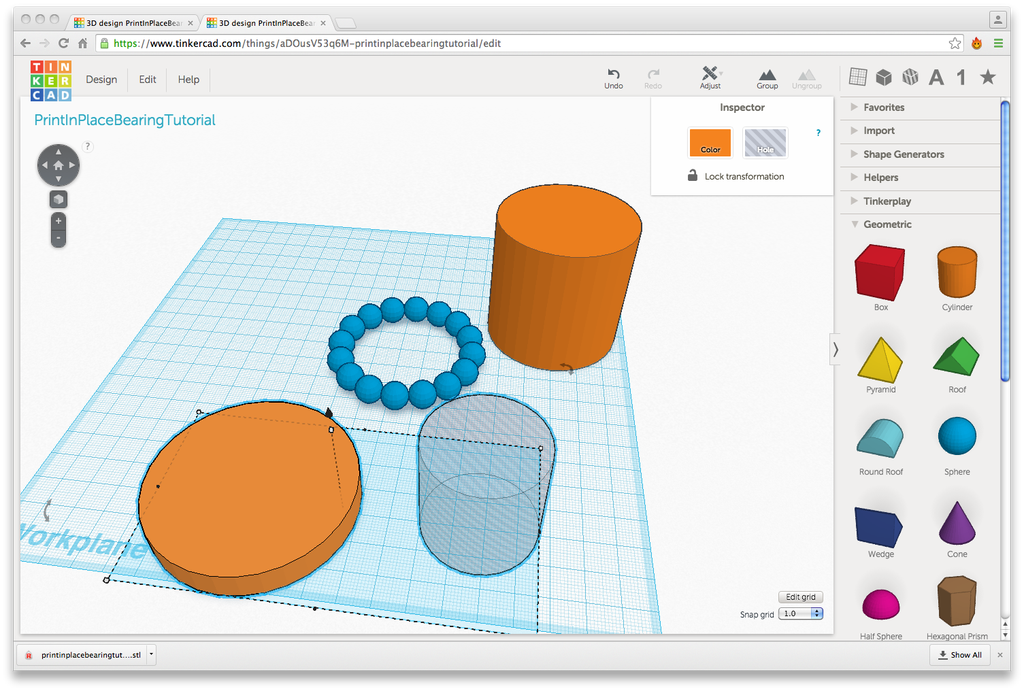
- Select the two new cylinders by holding the Shift key and using the Left Mouse button to click on both objects. When they are both selected, the bounding box will extend around both objects.
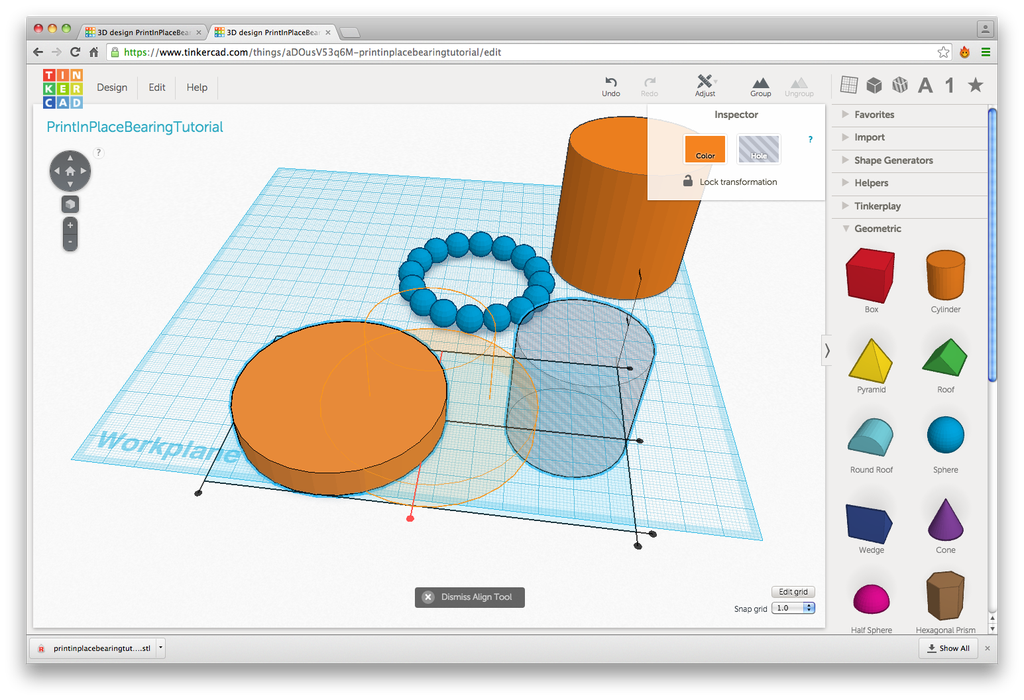
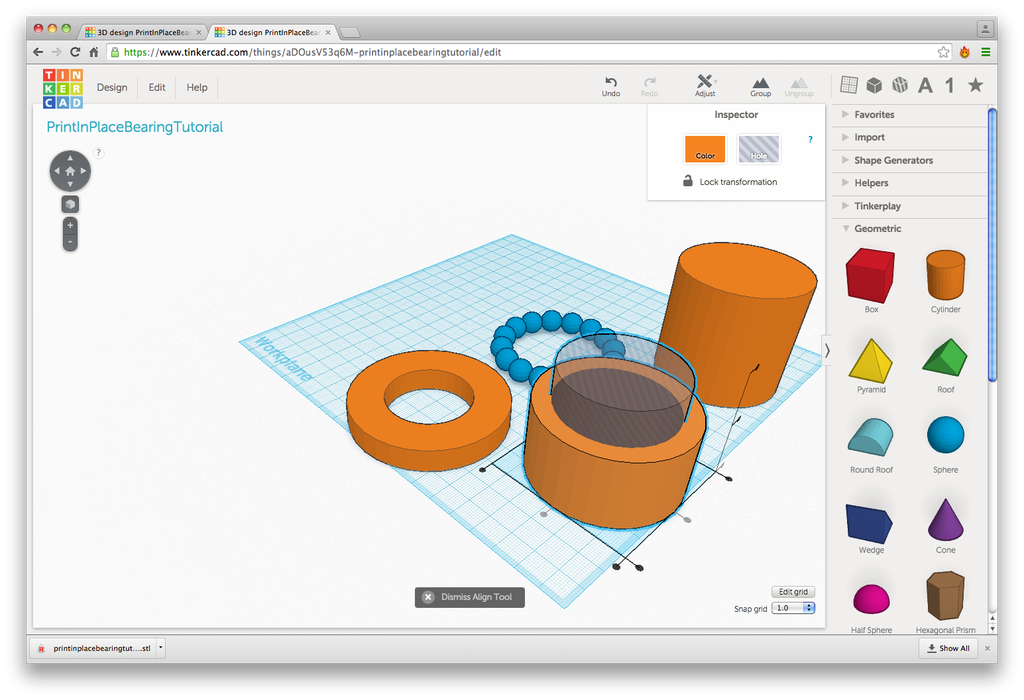
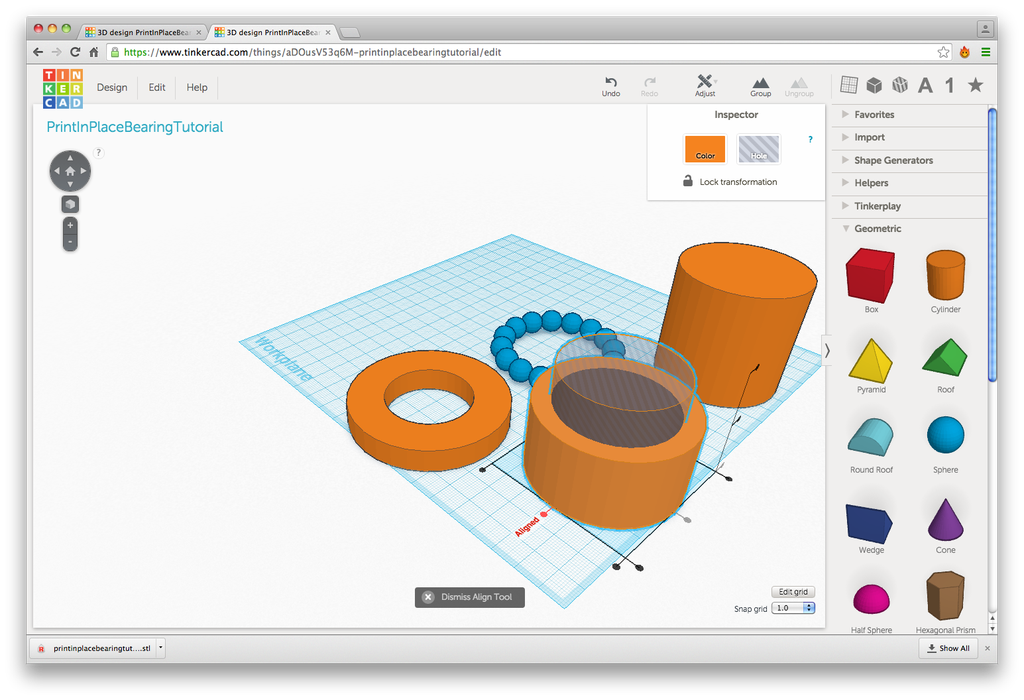
- Now click on “Adjust” on the upper part of the Tinkercad interface. Then click on “Align”. Now you will see additional controls on the workplane.
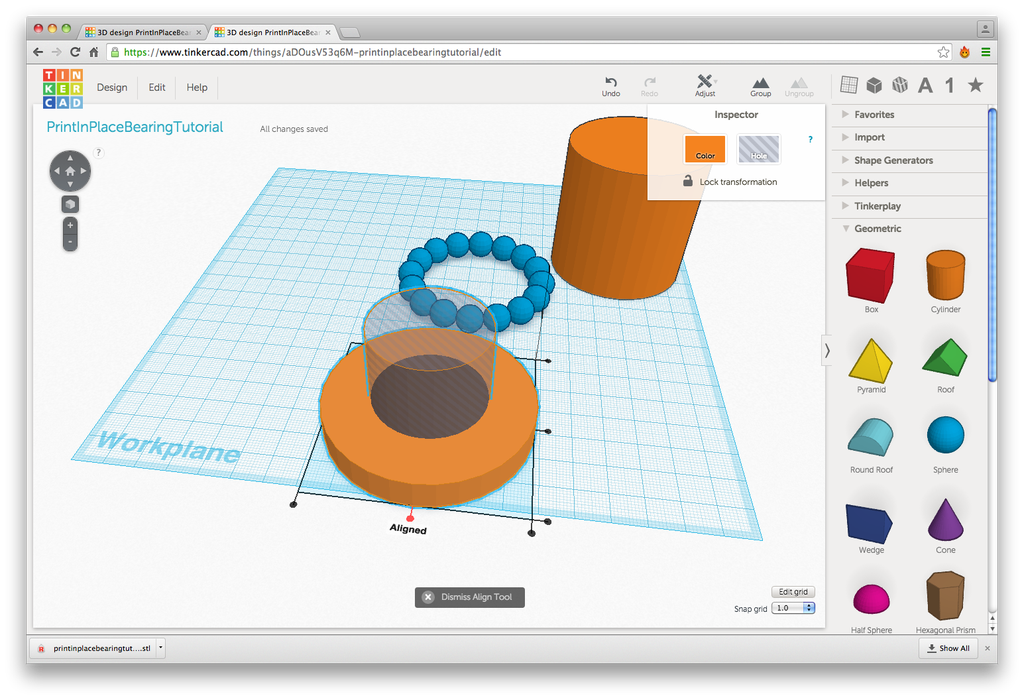
- Clicking on the front-center of these, in this view, aligns the two objects relative to each other on the X axis. When the objects have been aligned on an axis, the word “Aligned” can be seen when the cursor is hovered over the control for that axis. Repeat for the Y axis.
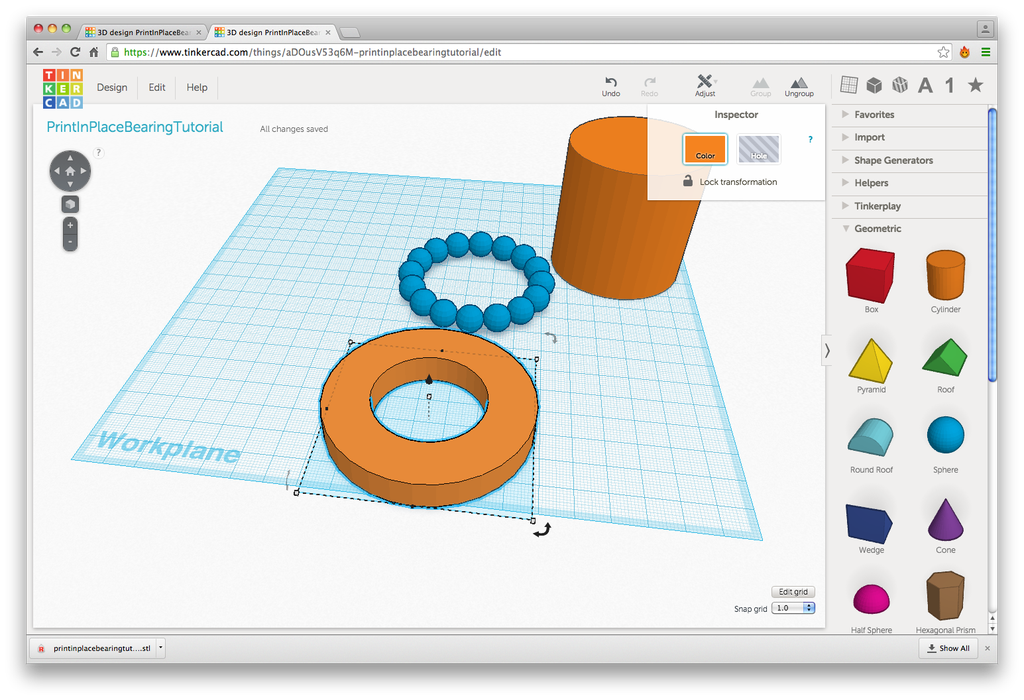
- With both cylinders still selected, now click on “Group” on the upper part of the Tinkercad interface. Tinkercad will automatically “subtract” the inner cylinder from the outer cylinder. Alright! You now have the basic shape of the bearing assembly.
Step 8: Separate Inner Race From Outer Race
The following information is a single lesson in a larger Tinkercad project. Check out this and more projects on Tinkercad.
- Select the reference cylinder from the back of the workplane, then click on “Edit” and “Duplicate” and drag the duplicate closer to the front of the workplane.
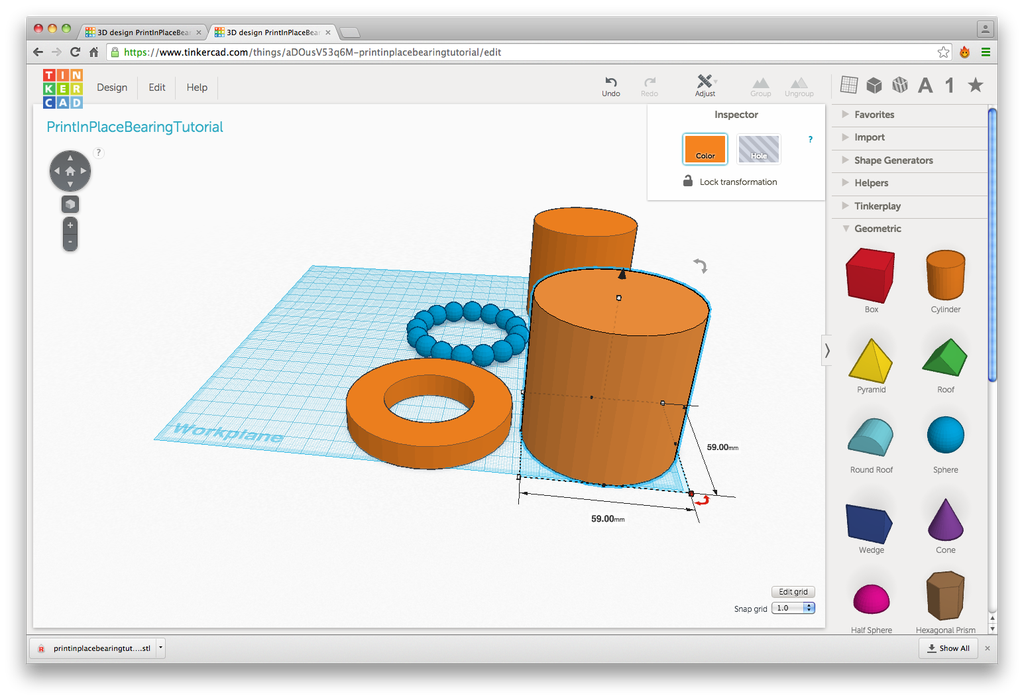
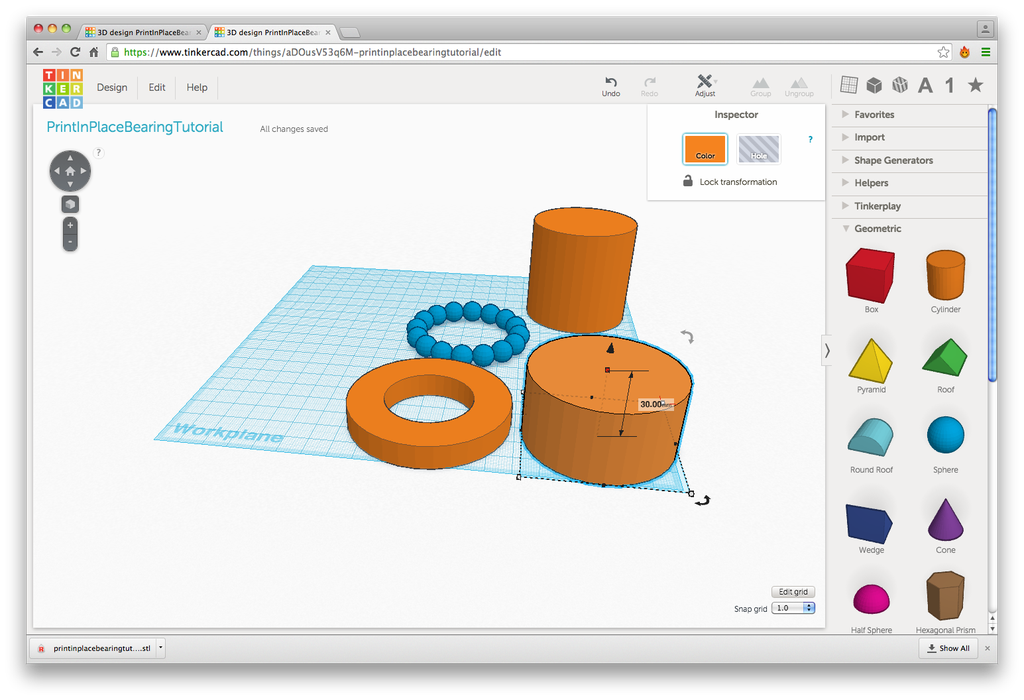
- Use the Shift key and Left Mouse button to click and drag one of the white-box control handles and scale the cylinder to 59mm (Note: 59mm is 7mm greater than 52mm) in all directions. Then, with just the Left Mouse button, click and drag the top white-box depth control handle and scale the depth to 30mm.
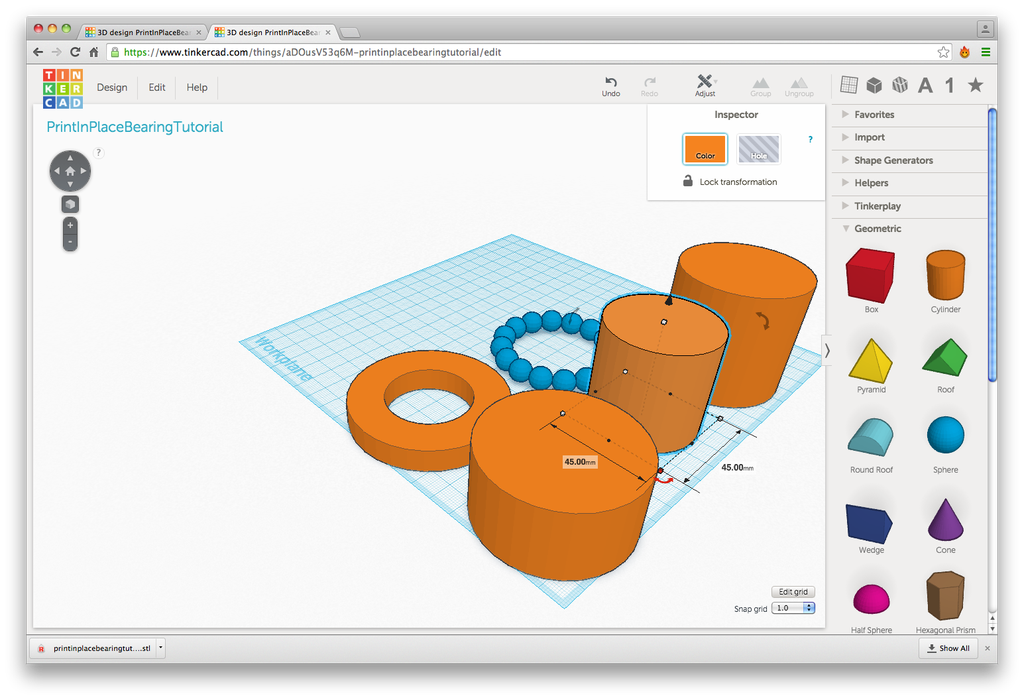
- Once again, select the reference cylinder from the back of the workplane and click on “Edit” and “Duplicate” and drag it anywhere near the front of the Workplane. Use the Shift key and Left Mouse button to click and drag one of the white-box control handles and scale the cylinder to 45mm (Note: 45mm is 7mm less than 52mm) in all directions.
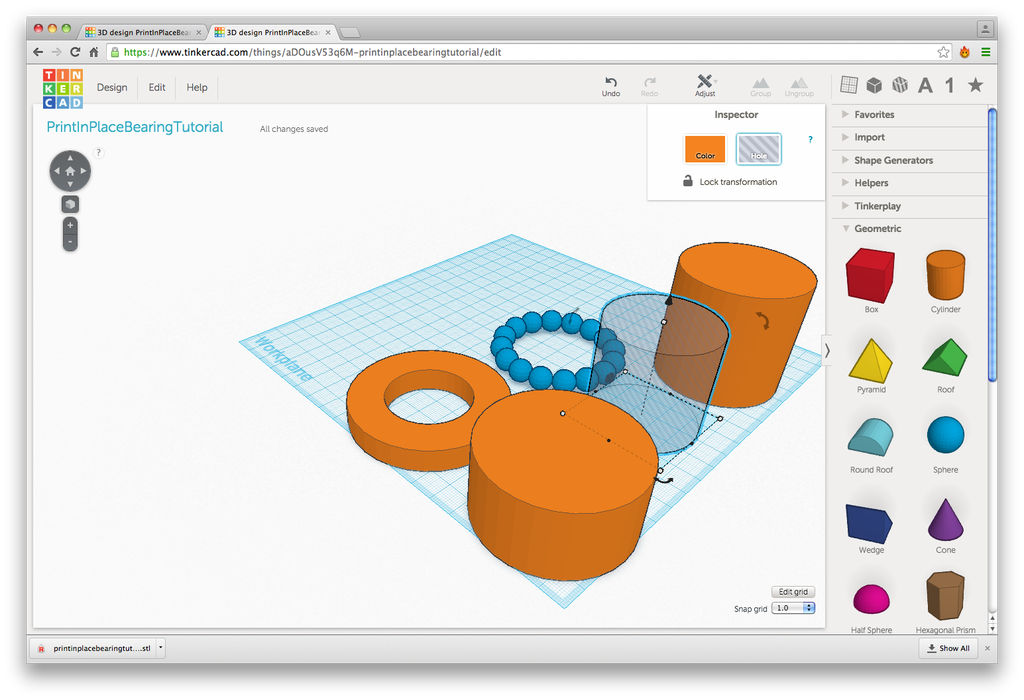
- While this cylinder is selected, find the “Inspector” in the upper right part of the work area. Click on “Hole”
- Select these two new cylinders by holding the Shift key and using the Left Mouse button to click on both objects. When they are both selected, the bounding box will extend around both objects.
- Now click on “Adjust” on the upper part of the Tinkercad interface. Then click on “Align”. Now you will see additional controls on the workplane. Align on both X and Y axes. While both cylinders are still selected, click on Group” on the upper part of the Tinkercad interface.
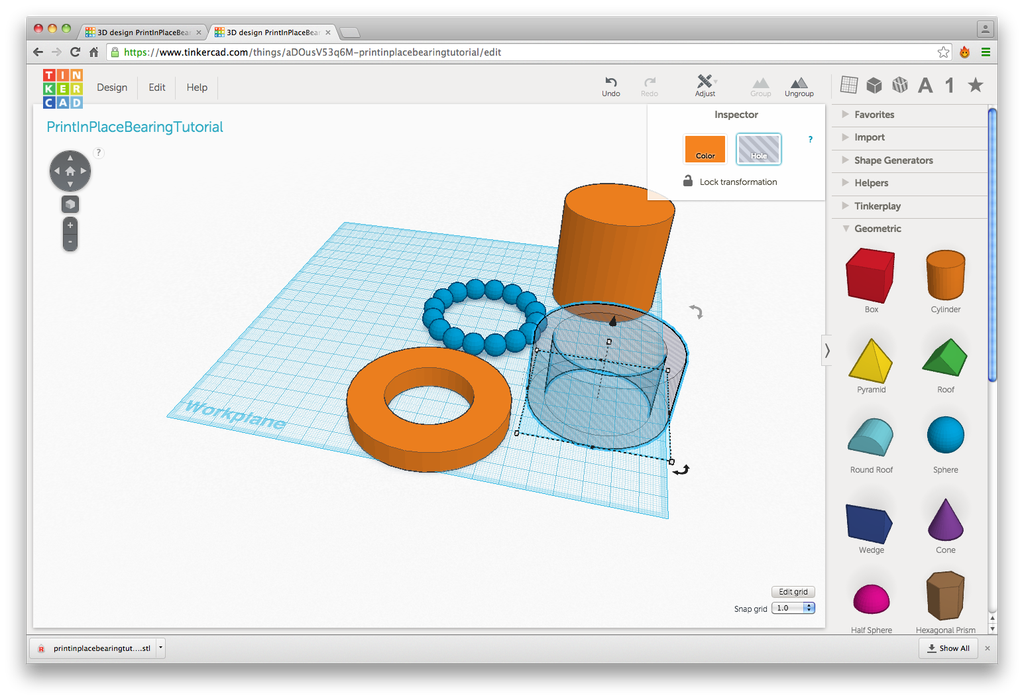
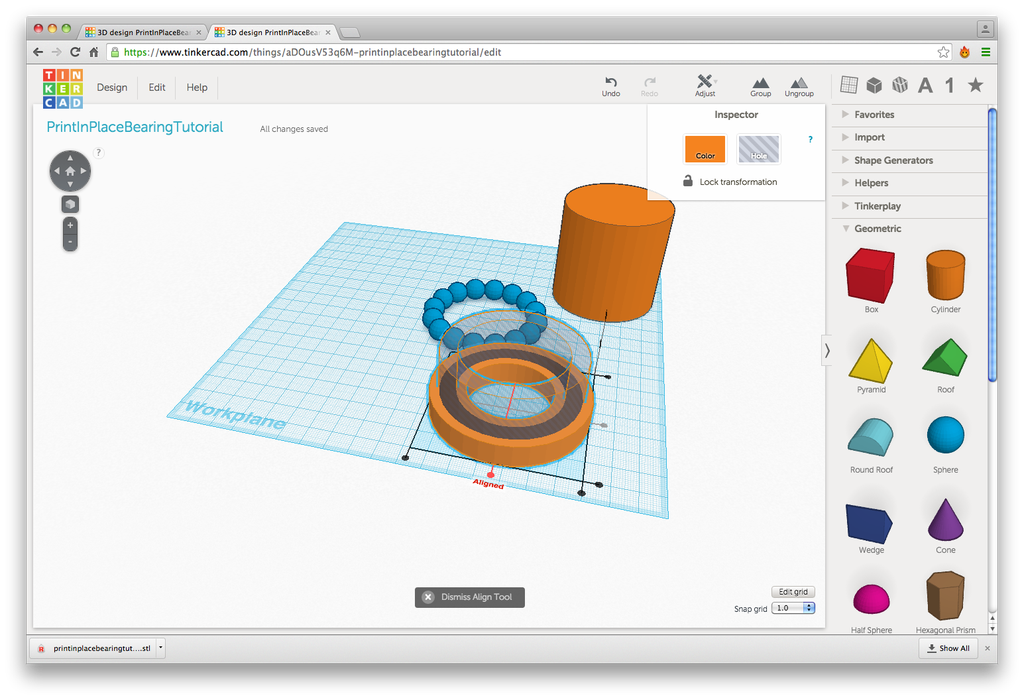
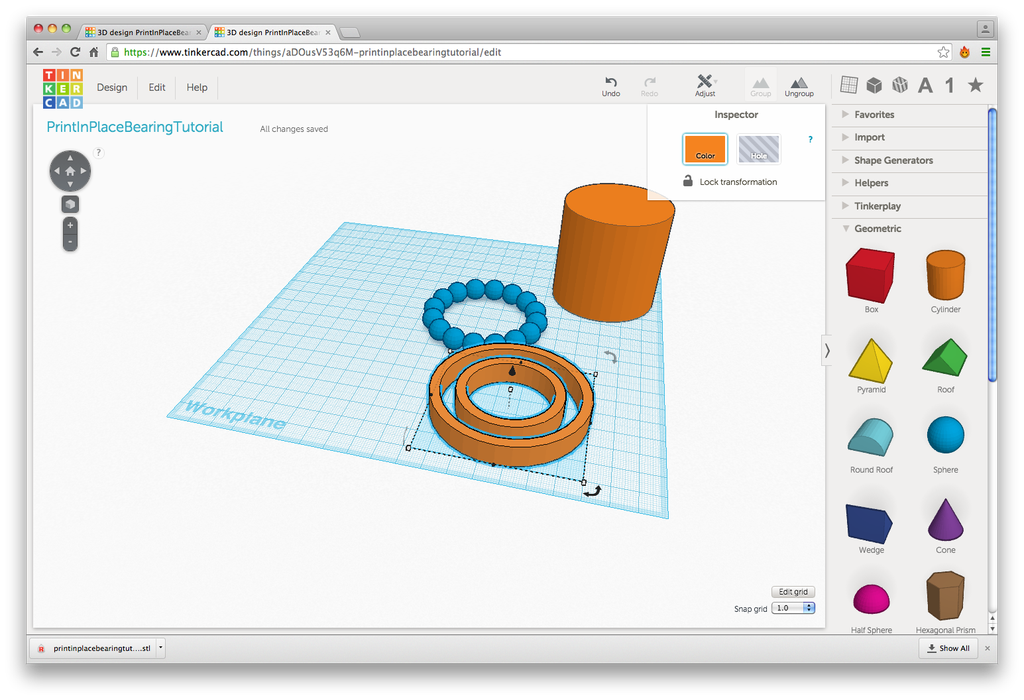
- There should now be two “donuts” (toroids) near the front of the workplane. Select the taller toroid and then go the “Inspector” in the upper right part of the work area and click on “Hole”.
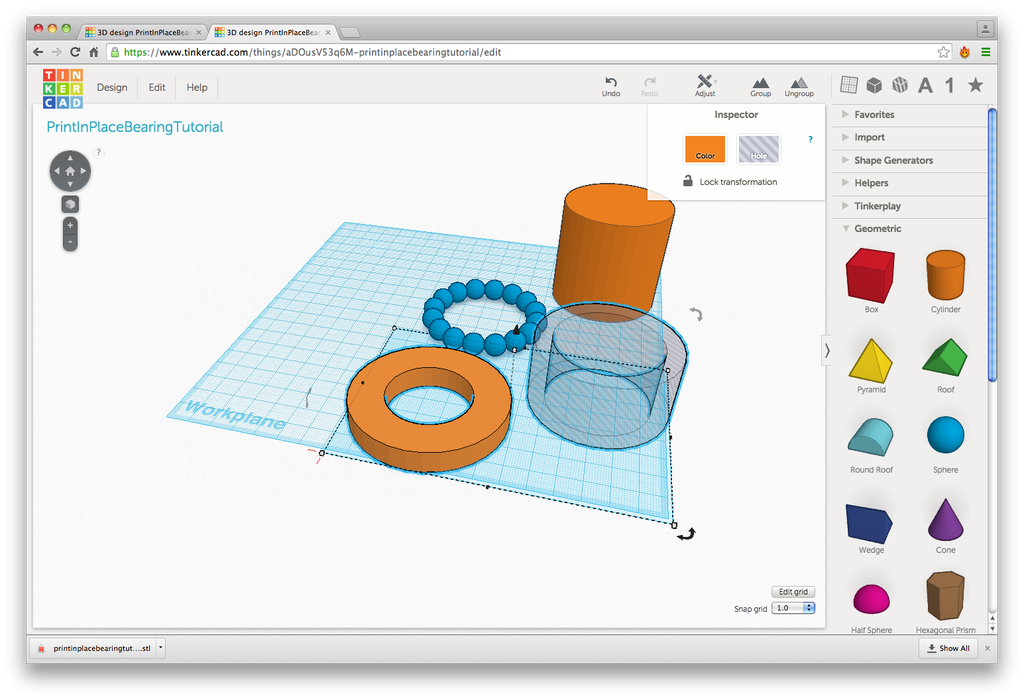
- Now also select the shorter toroid so that both toroids are selected.
- Now click on “Adjust” on the upper part of the Tinkercad interface. Then click on “Align”. With the additional controls on the workplane, align on both X and Y axes.
- While both cylinders are still selected, click on Group” on the upper part of the Tinkercad interface. Awesome. Almost Done!
Step 9: Form the Groove That the Bearings Will Ride In
The following information is a single lesson in a larger Tinkercad project. Check out this and more projects on Tinkercad.
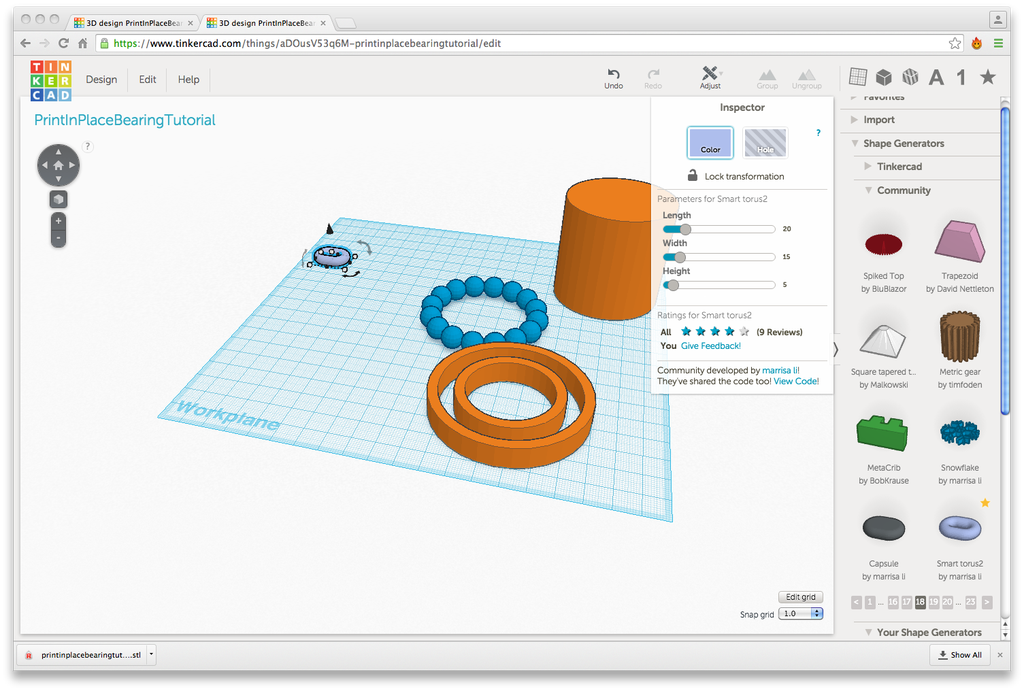
- Use the Mouse to go to right side of Tinkercad interface, click on “>Shape Generators” then click on the subheading “>Community”. Currently on Page 18, there is a shape generator called “Smart Torus2”. Navigate to Page 18, then drag “Smart Torus2” to the left of the Workplane.
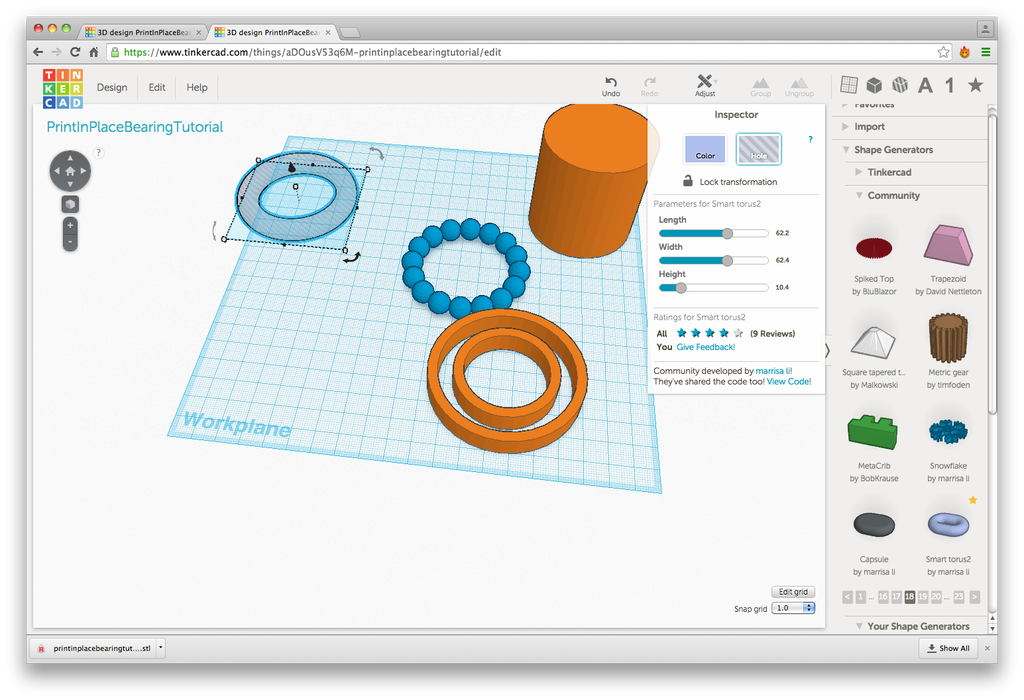
- Notice that the Inspector now has editable parameters that we can manipulate. For the Length, click on the number to the right of the slider and type 62.4 then repeat, entering 62.4 for Width. For Height, enter 10.4. While this is selected be sure to click on “Hole”. Now drag it to near the front of the Workplane.
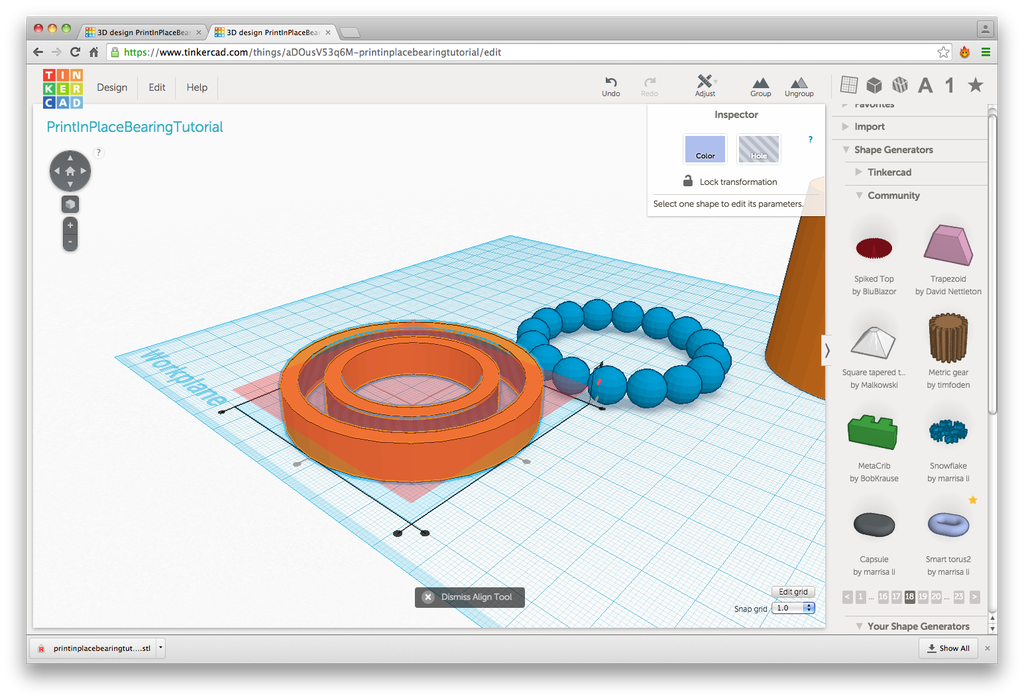
- While the new torus that you just made is still selected, also select the other set of rings. With all rings selected, click on “Adjust” on the upper part of the Tinkercad interface. Then click on “Align”. With the additional controls on the workplane, align on both X and Y axes. You also NEED to align the Z axis (depth) to center as well. While these are all selected, click on Group” on the upper part of the Tinkercad interface. Totally cool! You are SO close.
Step 10: Place Bearings Inside Races
The following information is a single lesson in a larger Tinkercad project. Check out this and more projects on Tinkercad.
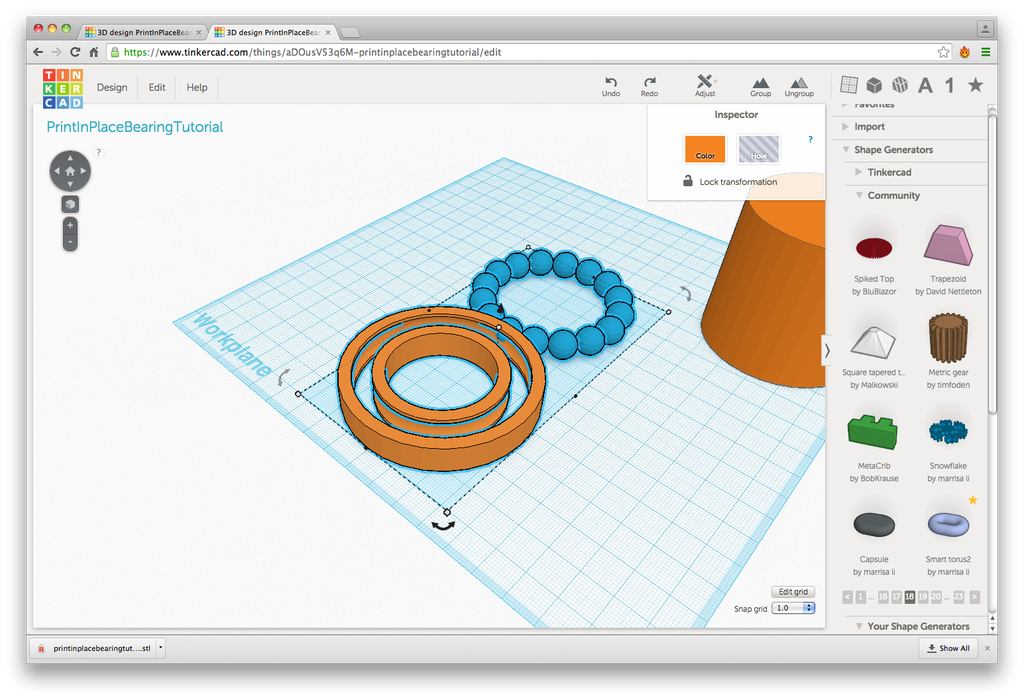
- Select the remaining set of rings and the balls by holding the Shift key and using the Left Mouse button to click on both objects. With both objects selected, click on “Adjust” on the upper part of the Tinkercad interface.
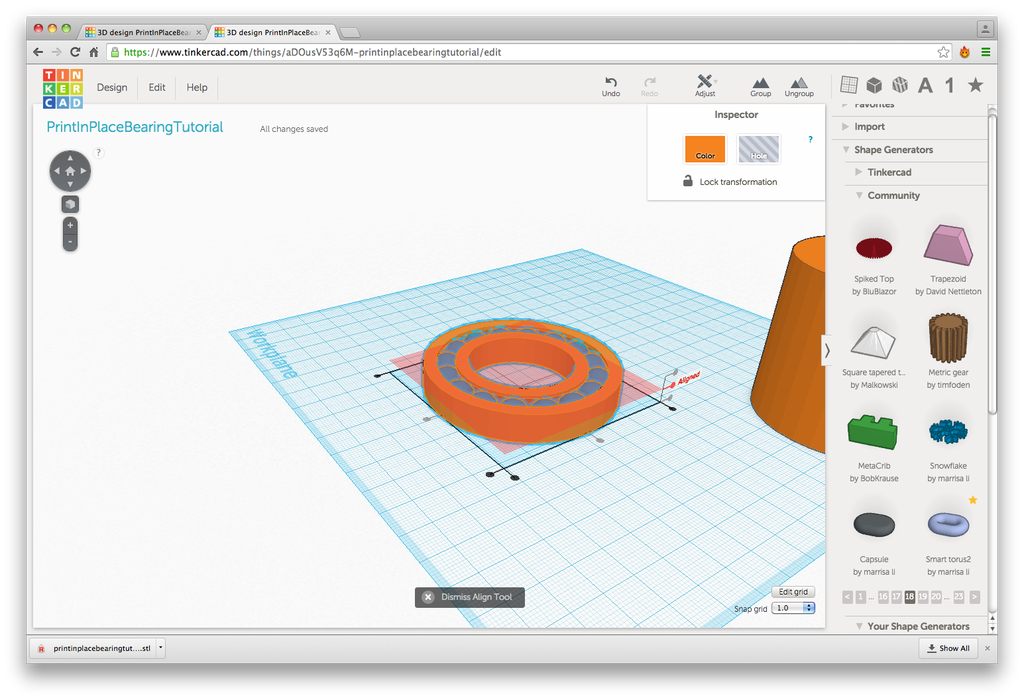
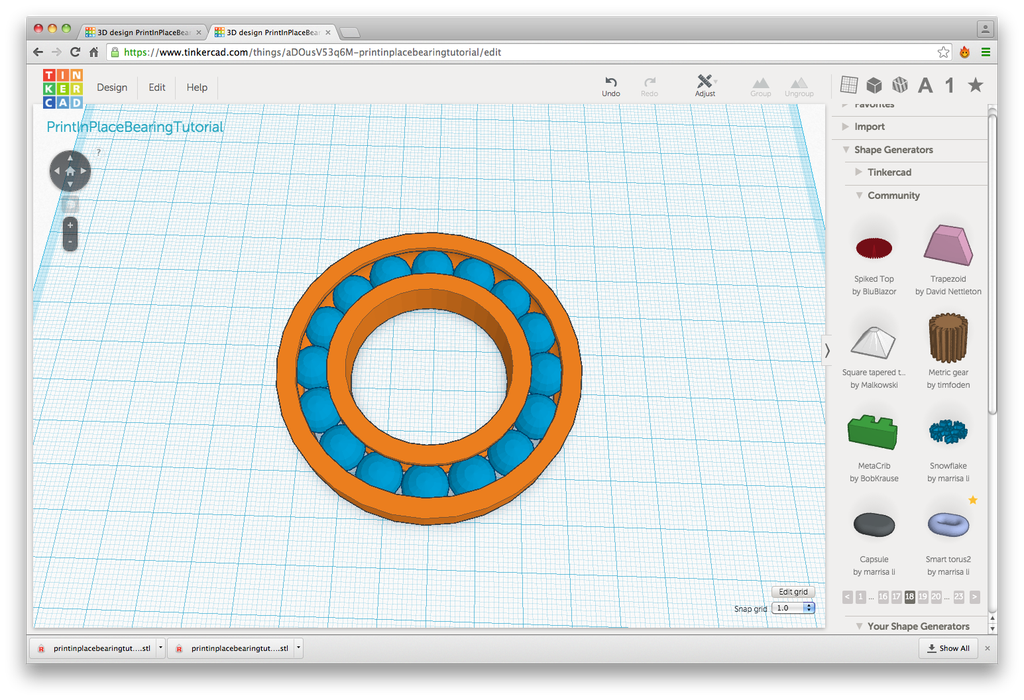
- Then click on “Align”. With the additional controls on the workplane, align to center on X, Y and Z axes. Yay! You have made a bearing assembly in Tinkercad!
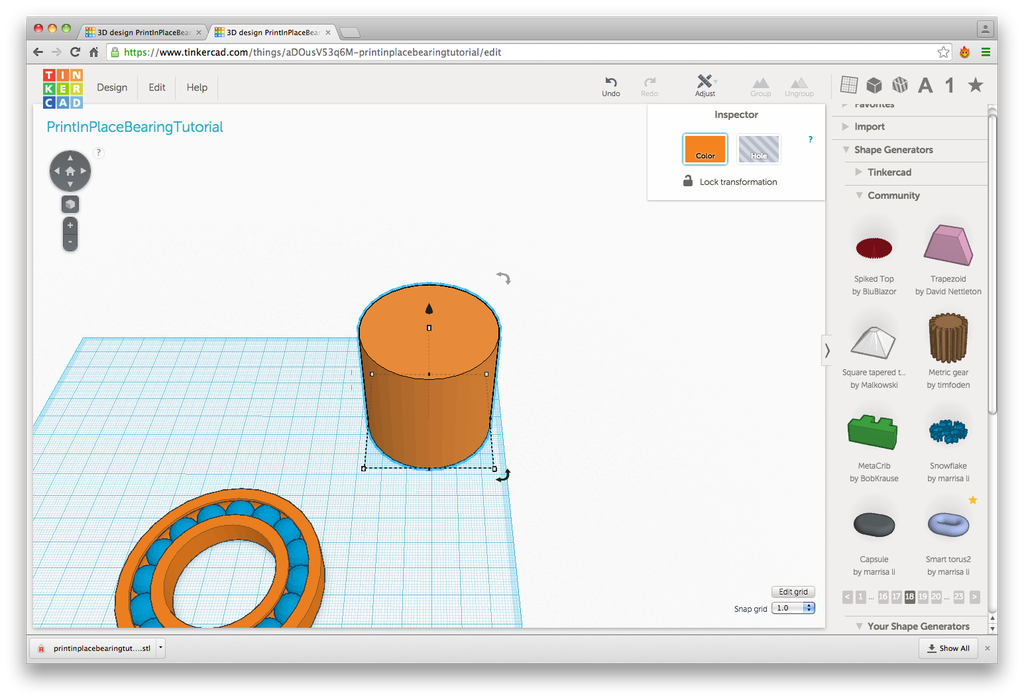
- Go ahead and select the reference cylinder from the back of the Workplane. Make sure it is the only thing selected now. When it is selected, press Delete on the keyboard and the only thing remaining on your Workplane is your bearing assembly.
- Behold your finished bearing and admire your work
Step 11: Save Your Bearing
The following information is a single lesson in a larger Tinkercad project. Check out this and more projects on Tinkercad.
- Save by clicking on “Design” near the upper right part of the Tinkercad interface. Then click on “Download for 3D Printing”.
A dialogue box will open. Most often, you will want to select .STL, so just press on .STL
At this point, a file should automagically download to the designated download folder on your computer.


