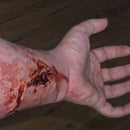
Introduction: Realistic Vampire Bite
In this instructable I will be showing you how to create a realistic looking vampire bite or puncture wound.
Step 1: Supplies
- Nose and Scar Wax
- Spirit Gum & Remover
- Liquid Latex
- Castor Seal
- Basic Make-Up
- Various Brushes
- Setting Powder
- Stage Blood
Step 2: Building the Bite: Part 1
Now that we have all our supplies it is time to start building the vampire bite. I have decided to focus on the classic double puncture, although due to time constraints I will only be making one puncture wound.
For starters we're going to want to begin by applying a bit of spirit gum to the application area.
In the example I used my forearm since it was easiest to photograph. You do not need a lot just a dot slightly smaller then a dime. You'll want to do this twice, one for each puncture spaced accordingly.
Let the spirit gum dry and become tacky. You can speed up the process by using a blow-dryer or lightly tapping at it with your finger. When it has dried some and become tacky you're ready to whip out the Nose and Scar Wax which will be sold under different names depending on the brand.
You don't need a lot, all we're going to use is a small ball. Now the wax is going to be very sticky and will want to stick to your hands. Dipping your fingers in water will eliminate this problem and help you smooth out the wax.
You'll want to take the small ball of wax and press it down onto the spirit gum that you applied earlier. Repeat the process for the second puncture wound. Once the wax has been put into place, use a wet finger to smooth the edges and blend them into the skin. With a little work you can completely get rid of the seam for a flawless transition between skin and wax.
Step 3: Building the Bite: Part 2
Now comes the sculpting. Take whatever sculpting device you like to use, in the example I used the end of a small brush and a tiny screwdriver, and poke into the center of the wax to make a puncture. If you used the end of a brush like I did it'll come out in a perfect circle which doesn't look like a realistic bite mark. So I used the tiny screwdriver to add some jagged edges and more detail to it.
As you can see it already looks pretty good. If you wanted, you could skip the rest of the steps and just fill the wound with stage blood and be ready to go. But of course I want my puncture to be a little sturdier so I'm going to seal it in with some Liquid Latex.
I only applied one thin coat making sure to get some into the puncture and on the top. Then I used a piece of orange hydro sponge to stipple the latex on where the wax meets the skin. This will help it blend into the skin more believably once it's dried.
Wait for the latex to dry, you can speed up the process by using a blow-dryer on it. Once that is complete you will need to set using some kind of setting powder. I used commercial setting powder but baby powder works just as well.
Now that the puncture has been applied and set, you're ready to move on to the make-up application.
Step 4: Make-Up Application
Before I start to apply make-up to the wound I use a small brush to cover any visible latex with a little bit of Castor Seal. Latex tends to burn through make-up and dull the colors making it look very unrealistic.
Now it's time to apply the make-up. I started by using a tattoo color wheel from Mehron that has 5 different skin colored shades on it.
I like to transfer the shades I want to use to a painting palette so I can mix them and come up with the color that matches my skin the best.
Once you've matched your skin tone you can start applying the make-up to your wound. I used a small brush to apply the make-up and then a larger clean brush to blend in the edges. I also added some purple to the surrounding area to give the impression of trauma. Then I set it with some setting powder.
Now that the outside of the wound is complete it's time to start reddening the interior of the puncture. For this I used a black and red that comes in most basic make-up stacks.
I used a small brush to apply a very tiny bit of black to the sides of the puncture and then followed that by filling the wound with the red make-up.
The end result is pretty good and speaks for itself.
Step 5: The Final Touches
Now what's a good vampire bite without some blood dripping from it??
I like to use stage blood to fill in my wounds... some people prefer gel blood or homemade stage blood. Either one works, it's all really up to your personal taste and budget.
The overall effect turned out pretty good. Of course my application has only one puncture wound and a real vampire bite would have two. But that's, "ok" because you can just repeat the process for the second one.
Using the same techniques and with a little bit more wax you could make a full on bite or any kind of puncture style wound you want.
I hope you enjoyed this instructable and have learned some valuable information from it..
Don't forget to leave comments and show off what you've accomplished using the Instructable.


