

Introduction: Servo Control With NodeMCU and Blynk | in IOT Platform


In this tutorial you can control your servo using Blynk app in IOT Platform
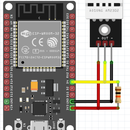
Step 1:

In this tutorial you can control your servo using Blynk app in IOT Platform
In this project you have to need Hardware
1. Nodemcu
2.Servo
3.connection ware
Software
1. Ardunio
2. Blynk App
This tutorial i divided into 4 Part
Part 1: NodeMCU insulation with wifi name and password
char ssid [] = "Your WIFI name";
char pass [] = "Password ";
Explain: Include the Wifi library and wifi name and password that you went to be use for internet
Part 2: Blynk App Option
#include
#define BLYNK_PRINT Serial
char auth [] = "yourAuthkey ";
Explain: Include the blynk app library and reflex your auth key from you gmail
Part 3: Servo operation
#include servo.h
Servo servo1;
#define servo1Pin D2
Explain: Include the servo library and Create the Servo and name it "servo1" and Define the NodeMCU pin to attach the Servo
servo1.attach(servo1Pin);
Explain: NodeMCU (A0) from 0 to 3.3V. Internally, the 10 bits ADC (Analog-Digital converter) will generate a digital value (from 0 to 1023),
servo1Angle = map(PotReading, 0, 1023, 0, 180);
Explain: We should "map" this digital value, in order that the Pulse Width Modulated (PWM) digital output of pin D2, will vary from 0 to 180 (servo1Angle). and With this signal, the servo will turn from 0 to 180 degree, using the bellow command.
Step 2: Part 4: Creating a Blynk App to Control the Servo Flowing Image


Downlode Code Click Here
1.Intoduction to nodemcu8266 & Steps to Import ESP Board Libraries
2.NodeMCU8266 Basic Project-Blink a LED
3.NodeMCU8266 Digital Read (Push Button)
4.Analog Data read using NodeMcu8266
5. NodeMcu LED control Use in Blynk app in IOT platform
6.NodeMcu to DHT Interface in Blynk app| On IOT Platform
7.The Best Way To nodemcu gps tracker blynk app |in IOT platform
