Introduction: Simple DIY Bedside Phone Charger, Nightlight & Clock


Who needs an alarm clock anymore? With smart phones doing so much, most just take the phone to bed with us for our alarm, night time music player, text messages, and oh yeah, as our phone since we cancelled the land line. To do this we just put a charger on the nightstand. Well, how about when you need it in the dark and can’t see? just add a nightlight. When the phone goes to sleep? just add a clock. Combining these is really simple, and inexpensive. This instructable is a guide to making your own bedside charger/nightlight/clock.
If you want to make one and don’t have a printer or the parts, I will be posting the kit to my Etsy store if you want to build one yourself. I will update with a link HERE when I get it online. Not only will you get to make your own project, it helps support me for the work I put into these projects and I really appreciate it!
Step 1: Parts


Any case will do, but I chose to print one with some component frames that gave me a head start. I also needed to print the charger stand, so I just designed and printed them all.
Arduino Nano
Real Time Clock
Cheap touch sensor (I used a TTP223 capacitive touch from Amazon)
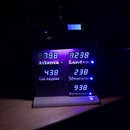
.96inch OLED display
Adafruit NeoPixel stick (8 LED)
Power barrel (or use a USB Mini cable)
(2) buttons (hour up, hour down)
(2) 10K resistors
Phone charge cable
Wire and solder
Step 2: Assembly


While printing the case, frames and charger stand, solder the Nano and RTC to a PCB and begin attaching the wires to the PCB. Run ground and power wires to form rows to use. If you play by the instruction sheet, also have a 2nd ground available directly to the Arduino for use with the NeoPixel stick. Use the resistors for the (2) buttons. Use digital GPIO pins for the buttons, NeoPixel and touch sensor. The OLED and RTC will both need to use the SDA (A4) and SCL (A5) so plan to have 2 connections available.
Because I used a 3D printed case, I also printed some PCB supports to glue inside the case. Secure the supports, power barrel and begin running the wires where you need them.
For testing purposes, attach the components loosely and load the software. don’t forget to set the time on the RTC. I did not include my code here, but if you want to make one, drop me a message and I’ll be glad to get you my code. Be warned, I am not a programmer and it is a bit sloppy, but it works. On the bright side this is a pretty simple project, so jump right in!
When everything works the way it should, begin assembling the case with the components firmly (solder or dupont connectors) attached. I made a box with a 2 button cover to secure the time adjust buttons, I did this next to last once I had all of my components in place. The last piece is to glue the charger stand to the unit and you’re done!
Step 3: What Now?
The bedside charger and nightlight is, well, just that. You place your phone in the cradle and it will be charged in the morning. If you have a portable blue tooth speaker, keep it close and you can play music to go to sleep by without draining the battery. If you need a nightlight, touch the sensor on the top of the unit and the NeoPixel lights up for a predetermined time. Mine is set to blue (0,0,255 all LEDs, 30 seconds) so it is not too intense for sleepy eyes. An added benefit is you don’t disturb your partner but there is plenty of light to see around you, not just the phone.
If you want to get real creative, consider adding more custom touches like a POT to adjust the colors or duration of the light. Maybe a built in bluetooth receiver and small speaker for night music. If you’re brave, change the touch for a motion sensor on the rear to wave your hand over to activate the light. I use those for my bathroom night light clocks, so when you walk in, it lights up a softer light than overhead, same instructions, just different input method. If you try it for the nightstand, just don’t roll around to much. I also don’t recommend a larger display as the backlight will keep you up! For an even less expensive project, you can use (5) standard LED bulbs in place of the NeoPixel and there are enough I/O pins to accommodate it.
Step 4: Conclusion


Thank you for checking out my project! If you like it, leave a comment. If you want to make one, be sure to visit my Etsy store. If you build one, post a picture! Good luck and happy tinkering!