Introduction: Small Geometric Cutting Boards With Only a Tablesaw


I had a block of wood - I'm not certain what species - about 12 x 3.5 x 2" and I realized I could make some handy 'personal size' cutting boards from it.
I started using my mitre saw but noticed (two cuts into the project) that every cut I did could be done on the tablesaw, so I'm writing this as if it was 100% tablesaw produced. If you are starting out with woodworking, or don't have many tools; I would recommend that a tablesaw be one of your first investments, and this is a good project to start using it to its full potential.
Tools & Materials Needed:
- Chunk of hardwood (12" x 3.5" x 2")
- Tablesaw
- Drill press or drill (Optional, for the hole to run a leather strap through it)
- Random Orbit sander
- Sandpaper - 200, 400, 600 grit
- File
- A few clamps; I used 2 small C-clamps and two Irwin Quick Grip clamps.
- Cutting Board Sealer / Surface treatment (I'm using Watco Butcher Block sealer, but I've never used that particular product before. There are lots of instructables on sealing cutting boards, check them out!)
- I used a planer but, if the wood you use is in good condition, you don't really need one, or you could use a hand plane.
- Leather cord about 8" long (Optional also)
- 12" ruler / straightedge & pencil to mark out cuts
Step 1: Cut Off Any Rough Edges


The block of wood I had had one side rough; from the original sawmill.
I trimmed the block down to 3.5" wide x 2" high
Step 2: Angle the Sides & Draw the Handles


I cut a 2.5 degree angle on each side so that the board widens out at the opposite end to from the handle. On a tablesaw; you can do this by making a spacer and clamping it to your board for the cut, or by using a taper jig. The overall difference from front to back is slightly less than 1/2" of taper per side.
Note, the first picture shown is on my mitre saw.
After cutting the angles; draw the handle on the narrow end of the taper. Note that the maximum height of the handle can not exceed the maximum height of your table saw blade at full extension. Since my table saw extends about 3 1/8" max; I made the handle 3" long.
The handle also flares out; which is at about 9 degrees; and the connection between the main body and the handle is tapered around 38 degrees (relative to the sloped edge of the cutting board.)
The pencil lines for the handle layout don't show up very well in this photo, keep reading to see what it looks like after cutting.
Step 3: Cut the Handle Out


I angled the saw blade and cut the handle out; being careful to set the height of the blade appropriately.
Normally I don't take enough pictures when I do a project, but the pictures here are pretty self explanatory, and I added some notes to some to draw attention to specific points on the pictures.
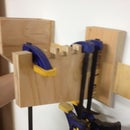
Step 4: Cut the Wood in Half


By now you have a nice looking cutting board; but it's twice as thick as it should be. So: Measue the overall thickness of your piece of wood. Measure the thickness of your saw kerf. Then set the distance from the fence to the blade to be (Wood thickness /2) - Kerf. This should get you two equally thick boards.
(Note: Most blade teeth cut on alternating sides; so the kerf will be a bit wider than any measurement you can actually make on the blade itself. If this is the case with your blade, make a small cut partway into some scrap and measure the cut width.)
Step 5: Plane or Sand or Trim Flush

I had some damage to one side of one of the boards; so I planed them both down about 1/32". If you don't have a planer, you can cut them (two passes) on the tablesaw, use a jointer, use a hand planer, or just sand the boards.
Step 6: Drill a Hanging / Lanyard Hole


Optional Step! I have a drill press, so I put a hanger hole in the top of both boards. I used a 3/8" dia. drill bit.
Step 7: Sand & Finish


I sanded all around with my random orbit sander, and used a file to get into the sharp corners without rounding them (I wanted it to look nice and angular).
I used 200 grit first, then 400, did a quick 600 grit on top to get it nice and smooth.
I sealed the boards with Watco butcherblock sealer as I mentioned earlier. EDIT: So this seems to work out quite well as a finish, it dries well and has a nice smooth sheen to it.