Introduction: Smart Home With Arduino MKR1000 and M.I.T. Android App


In this tutorial I describe how to improve your smart home with just a few components.
The heart of this smart home design is the Arduino MKR1000 board, controlled with an app, designed on the development website of the M.I.T. (Massachusetts Institute of Technology).
How is it done?
On the website from the M.I.T. you can log in with your google account to create an app for an Android smartphone yourself. You can define the screens and program all underlying commands. The latter is done with a clear WYSIWYG (what you see is what you get) visual programming language with block functions.
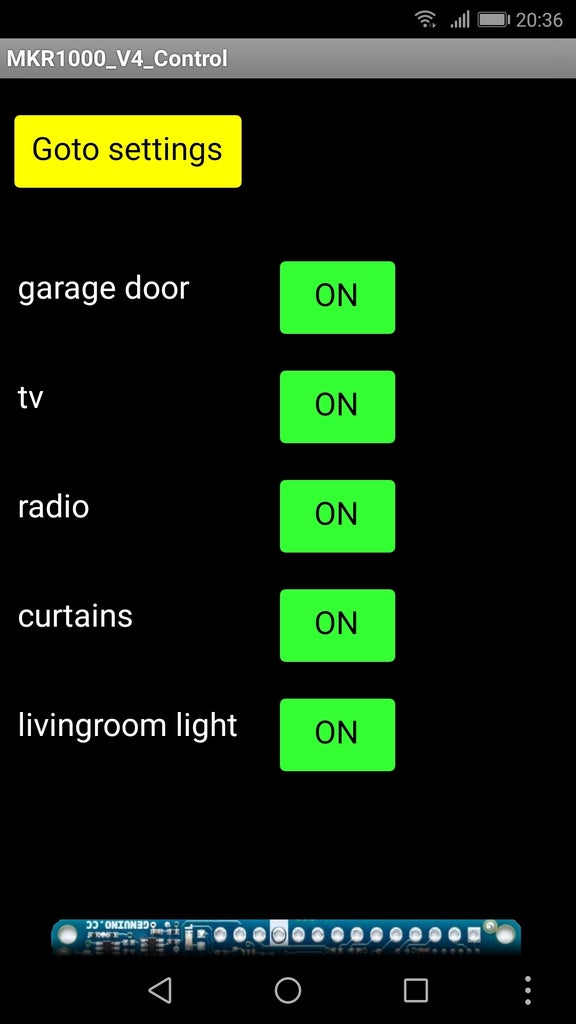
I made an app to control the Arduino MKR1000 board via WiFi with 5 different outputs to switch 5 different devices in a “smart home”. Initially, only LEDs are connected, but they can easy be replaced by switching relays to connect domestic appliances.
Supplies
1 Arduino board type MKR1000,
7 resistors 1kOhm.
7 led 5 mm, different colors.
Breadboard and wiring.
5V DC relays one per domestic application.
5V Dc power supply for the MKR1000 (wall wart USB supply will do).
PC with Arduino IDE software installed.
Step 1: Demo!

Here you can see how the 5 different outputs with LEDs are switched on and off.
Also the screen setting is demonstrated, you can select the number of buttons using the check boxes. (minimum one button, maximum five buttons).
The buttons are green when the LEDs can be switched ON and turn to red if the LEDs can be switched OFF.
After closing the app the status of each button is stored in memory.
There are two additional LEDs, a white one showing the MKR1000 is searching for the correct WiFi channel and a blue one showing the connection is established and OK. This takes appr. 20 seconds after powering up.
When the WiFi goes down, the MKR1000 will start searching again for the connection.
Step 2: The Arduino Ino Program


The Arduino MKR1000 needs a program to work with the app from M.I.T. It is an extended and improved version of the program described in Agus Kurniawan's publication “Arduino and Genuino MKR1000 Development Workshop 2016”.
Download the file, copy the text into the Arduino IDE and then upload the program into your Arduino MKR1000. See www.arduino.cc for an explanation about installing and using the necessary software and programming the Arduino. Before loading the program into the MKR1000, first replace the “xxx” values with your (secret) codes for your WiFi network in your own smart home.
If you have not previously programmed an MKR1000, you must first make the MKR1000 visible in the IDE. The MKR1000 is not included as standard. First install the required “Wifi101 ″ library. To do this, go to “tools/manage libraries” and select the WiFi101 library. The last step is to add the MKR1000 board. To do this, go to “tools/board/Boards Manager”. From the list of boards, locate the “Arduino SAMD Boards (32-bit ARM Cortex-M0 +)”. Click there on “More info” and “install” to install this board.
Attachments

Step 3: M.I.T. App Design

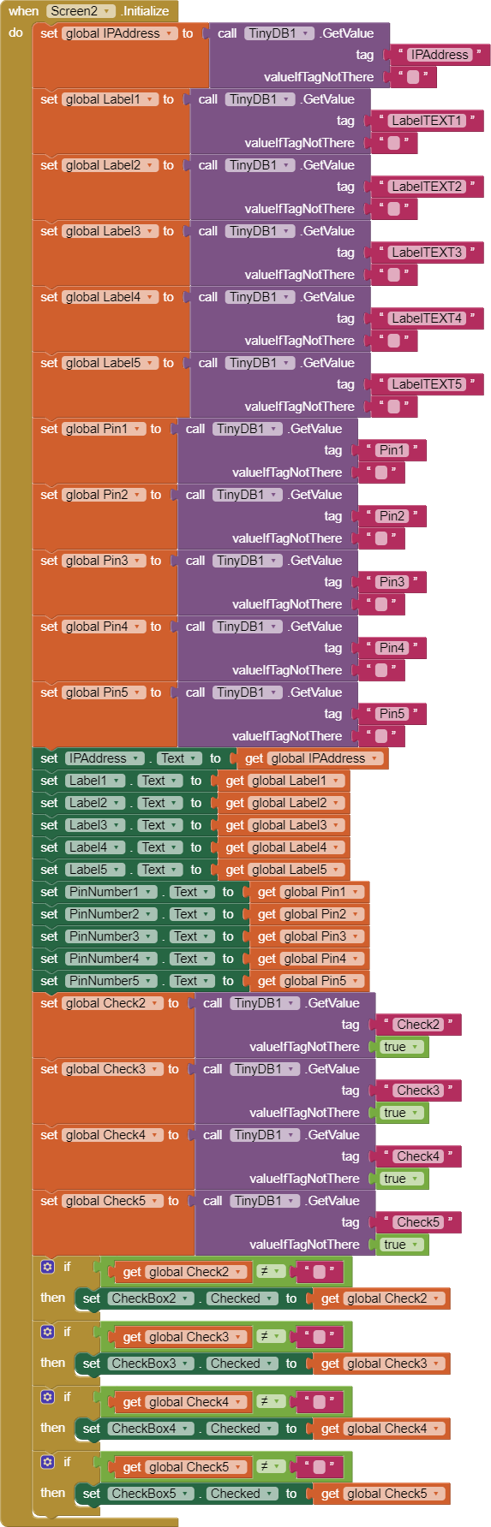


On the website from the M.I.T. you can log in with your google account to create an app for an Android smartphone yourself. You can define the screens and program all underlying commands. The latter is done with a clear WYSIWYG (what you see is what you get) visual programming language with block functions.
My Android program can be found in the gallery of the M.I.T. development website. Log in and search for “MKR1000” and download the most recent version “MKR1000_V4_Control”. You will get a copy on your own development page you can view and change or improve.
If you want to try out the Android executable file (the APK file) without logging into the M.I.T. website you can directly download the file here and copy and install it on your own smartphone.
The M.I.T. website is packed with tutorials, a get started guide and a large forum. You can learn to program step by step, designing your phone screen and all the blocks that control the buttons.
important note:
when your app is ready to be installed, copy it to your phone and doubleclick on the apk file.
It is safe to use, however your virusscanner will probably go crazy and starts warning with multiple wrong safety messages. Just ignore them, the main reason is that you download an app outside the official app store...
Attachments
Step 4: Domestic Appliances

Instead of LEDs you can connect little 5V DC relays to switch domestic appliances. These are all connected to dangerous voltages (110 V AC or more) so be careful and work safe.
The relays themselves need power, if you install all 5 relays I suggest to use a separate 5 V DC supply for the relays. Else the MKR1000 5VDC connection will be overloaded.

Participated in the
Arduino Contest 2020


