Introduction: Sonos Like Spotify Wifi Speaker
In this project we will build a Wifi Speaker that has Spotify Client build in. This means that you can easily choose in spotify to play on that specific speaker. You don't have to deal with crappy bluetooth since this is based on the ethernet. Your music will even play further if you accidently close your Spotify. It is like a Sonos but then made on your own.
It is based on the Raspotify software for Raspberry Pi. This is an easy to use and not so hard to setup software.
I tried my best to explain everything as simple as possible so that everyone can build this, even the beginners that never builded something before should be able to recreate this.
Step 1: Parts Used
Before you start this project, I advise you to buy all the parts.
- Raspberry Pi 4
- micro SD card (at least 8GB) (+if necessary an adapter)
- Computer
- Speakers and amplifier (look at step 4)
- Tools
- Power supply (look at step 6)
Now that you have everything, the real fun can start.
Step 2: Installing Raspbian
Before we can start the project, we have to install an operating system on our Raspberrry pi. In this case we will use "Raspbian Buster with desktop and recommended software".
Installing Raspbian on the Raspberry Pi is pretty straightforward. We’ll be downloading Raspbian and writing the disc image to a microSD card, then booting the Raspberry Pi to that microSD card.
You’ll need a microSD card (go with at least 8 GB), a computer with a slot for it, and, of course, a Raspberry Pi and basic peripherals (a mouse, keyboard, screen, and power source).
Step 1: Downloading the OS
Raspian can be installed from this website. We have to install "Raspbian Buster with desktop and recommended software". Now click on "Download ZIP" and the download should start. (this can take a couple of minutes depending on your ethernet connection)

Step 2: Writing the image to the SD card
Now you will need to download & install the software that will write the image to the SD card. A good one to use is called Etcher, and it works on all platforms (Linux, Mac, and Windows). You’re able to download it from over at their website.
1. Once you have downloaded Etcher, follow the prompts to install it.
2. Insert your SD card into your computer. (Because some computers do not have an SD card reader, you may need to use a USB adapter.)
3. Open Etcher and select the Raspbian image that we just downloaded.

4. Select the SD card that you wish to install Raspbian on. Double check to make sure it’s the correct drive as this will wipe it clean.

5. Once you have confirmed the image and the drive you can then proceed to flash the SD card, select Flash.

6. Once it’s finished, you can safely remove the SD card from the computer.
7. Insert the SD card into your Raspberry Pi and any other extra cords such as power, mouse, keyboard, and the HDMI cord.
8. Now you will be guided through the setup proces. Make sure you don't forget to connect to the ethernet because Spotify Connect is based on the Ethernet. The setup proces is pretty straight forward, so it shouldn't be a problem.
9. You've now succesfully installed Raspian on your Raspberry Pi and you can proceed to the next step. Congrats!
Step 3: Installing Raspotify on the Raspberry Pi
Raspotify is a Spotify Connect client for Raspbian on the Raspberry Pi that Just Works™. Raspotify is a Debian package and associated repository which thinly wraps the awesome librespot library by Paul Lietar and others. It works out of the box on all three revisions of the Pi, immediately after installation.
The install itself is as easy as it gets, just follow the following steps and you'll be up and running in 5 minutes.
1. Open the Terminal using the shortcut "CTRL + ALT + T"
2. Type in the Terminal the following and hit enter afterwards. This command downloads and installs the Debian package and adds its apt repository, which ensures you'll always be up to date with upstream changes.
curl -sL https://dtcooper.github.io/raspotify/install.sh | sh
3. After the installation we will run a quick check. Open your Spotify and look for Available Devices. There should be a "raspotify (raspberrypi)" speaker available like shown below.

4. Now that everything works we can configure Raspotify. By typing the following command in the Terminal, we can change the settings, like the name that we want to be displayed on Spotify.
sudo nano /etc/default/raspotify
5. After you've hit enter, you should see the following.
What you've opened is the Raspotify config file. Within this file, you will see multiple different options that you can configure yourself. We will change only 2 settings: the Bitrate and the Device Name.
6. To change the device name, we will have to uncomment the line first. This can be done by hitting the delete key, your text of that line will now become white. Now we can pick a name that will be displayed in Spotify, I chose Dining Room because that is the place where my speakers will be sitting. Just replace raspotify with the name you want.
For example:
DEVICE_NAME="Dining Room"
7. After we've changed our name we will change the Bitrate. This will give us a little bit better audio quality.
Uncomment the line and replace 160 by 320.
BITRATE="320"
8. Now the code should look like this, except for the name difference.
<p># /etc/default/raspotify -- Arguments/configuration for librespot<br>
# Device name on Spotify Connect
DEVICE_NAME="Dining Room"</p><p># Bitrate, one of 96 (low quality), 160 (default quality), or 320 (high quality)
BITRATE="320"</p><p># Additional command line arguments for librespot can be set below.
# See `librespot -h` for more info. Make sure whatever arguments you specify
# aren't already covered by other variables in this file. (See the daemon's
# config at `/lib/systemd/system/raspotify.service` for more technical details.)
#
# To make your device visible on Spotify Connect across the Internet add your
# username and password which can be set via "Set device password", on your
# account settings, use `--username` and `--password`.
#
# To choose a different output device (ie a USB audio dongle or HDMI audio out),
# use `--device` with something like `--device hw:0,1`. Your mileage may vary.
#
#OPTIONS="--username  --password
"</p><p># Uncomment to use a cache for downloaded audio files. Cache is disabled by
# default. It's best to leave this as-is if you want to use it, since
# permissions are properly set on the directory `/var/cache/raspotify'.
#CACHE_ARGS="--cache /var/cache/raspotify"</p><p># By default, the volume normalization is enabled, add alternative volume
# arguments here if you'd like, but these should be fine.
#VOLUME_ARGS="--enable-volume-normalisation --linear-volume --initial-volume=100"</p><p># Backend could be set to pipe here, but it's for very advanced use cases of
# librespot, so you shouldn't need to change this under normal circumstances.
#BACKEND_ARGS="--backend alsa"</p>
10. To save the file hit "CTRL + X" followed by "y" and last but not least hit enter.
11. Restart Raspotify by using the following command.
sudo systemctl restart raspotify
Give it a quick check like we did in step 3 and look wheter the name has changed or not.
12. Now everything is ready and we can make our speakers ready!
Step 4: Deciding Which Speaker to Use
In this project I will go over 2 types of speakers. The ones that are already amplified and the speakers that are not amplified yet.
The pre-amplified speakers are the easiest to deal with because you just have to connect an aux cable to its input. That makes these type of speakers the best choice for people that don't know much about electronics or just like a more out of the box experience.
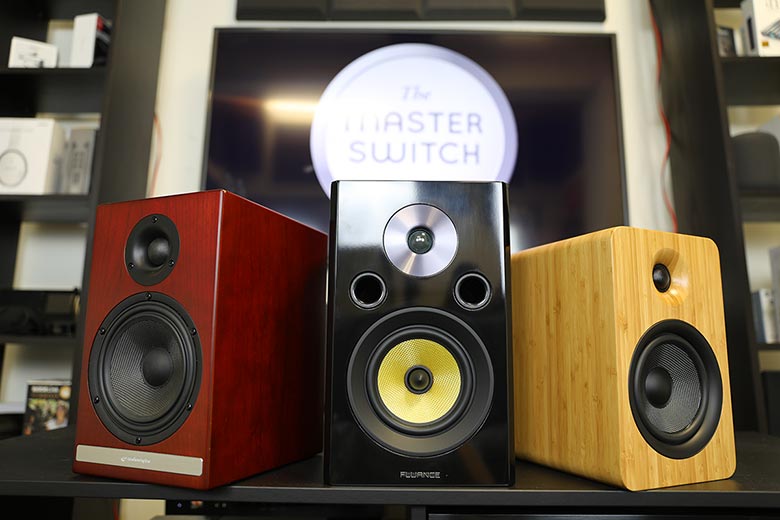
The speakers that are not amplified already are a bit harder to work with. We will have to connect an amplifier to the speakers and build a case around that. This is a great way to re-use old bookshelf speakers, like I will do. We will add a cheap amplifier from China to reduce our overall costs. If you love doing DIY projects, you can even build a bookshelf speaker yourself. I recommend the one from this Instructable. I used the speakers from my old Phillips Streamium MCI900. Unfortunatily the Amplifier of it broke, so I now it is a non-amplified speakerset. We will also need a power supply to power our project, but we'll talk about that in a minute.

If you use a pre-amplified speakers, you can go the next step.
If you use a non-amplified speakers, you can skip the next skip.
Step 5: Connecting Pre-amped Speakers
If your speakers are already connected to an amplifier that has an AUX port, you should just connect an aux cable from the Raspberry Pi to the amplifier and disconnect the pheripherals from the Raspberry Pi. Everything should work right now! Make sure you don't disconnect the Power Cable and Ethernet Cable(only when your not connected via Wifi) as well as the AUX cable. You should have kind of the same connections as in the image below and now you are finished. You created a sonos like speaker with a Raspberry Pi and you can start listening to music.
Note that the ethernet cable is not necessary.

Step 6: Picking the Right Amplifier
How to choose the right amplifier and power supply? That's the question we will be answering in this step.
1. How many watts do you need? This should be listed in the specifications of the bookshelf speaker. I have two speakers that use 50 watt each. Thats means I have to buy a 50 * 2 amplifier. Just go an sites like ebay, amazon, alibaba and search for "2 * 50W amplifier". The only thing the amplifier should have is an AUX port. You can buy one with bluetooth as well, but it's not necessary. I wen with this one. It's a 2 *50W Amplifier based on a TPA3116 chip. This will suit my speakers.
2. What power supply should I buy? The power needed to power your amplifier is listed at the amplifiers specification sheet. Mine needed 24V so I had to buy a 24V power supply. The amperage needed can be easily calculated with this formula: I = P(watts) / U, so in my case I have to do 100 / 24 = 4.16 ==> So I need a 24V 4.2A power supply. Its better to go for a higher amperage PSU, so you don't put too much stress on the power supply.
I had an old laptop charger laying around, that outputs 24V and 100watts. So I decided to use it. If you don't have such a power supply laying around, you can you use industrial ones like shown in the picture below. They have a very good bank for the buck.
Step 7: Connecting Everything Togheter
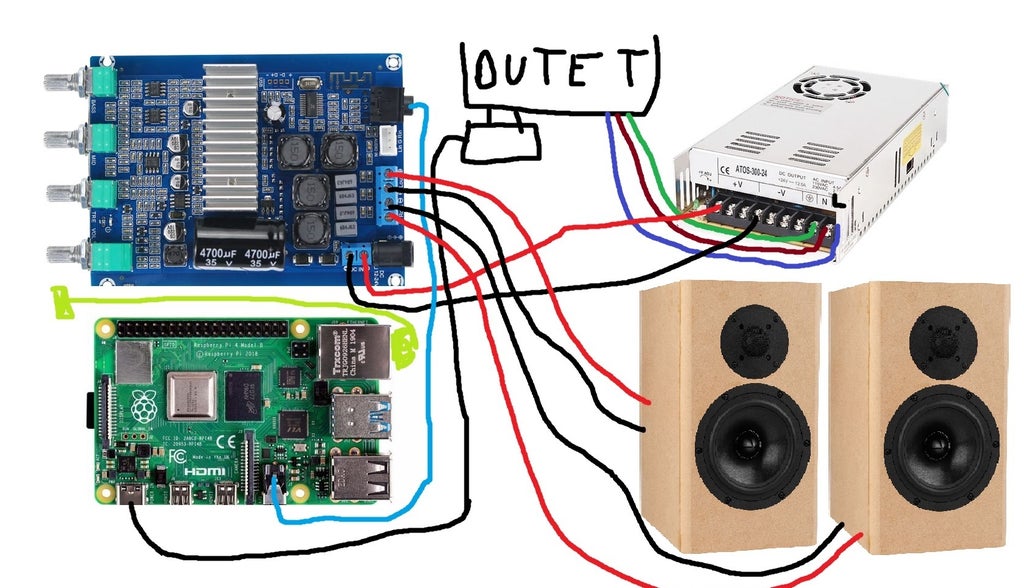
The connection is different for every amplifier, but the principal is the same. This was my schematic, your's should look the same.
Power supply:
Connected to AC wall outlet.
Blue wire to N
Brown wire to L
Green/Yellow wire to GND
V+ --> DC + of amplifier
V- --> DC - of amplifier
Raspberry pi:
USB C to wall outlet
AUX cable to amplifier
(Ethernet cable to router)
Amplifier:
DC out - to speakers
DC out + to speakers
Eventually you will end up with something like in the image below. Now Everything should run fine and your new WIFI speakers are ready to play some music.

Step 8: Building the Enclosure
You could if you want to build a really nice enclosure for the electronics, but it is not necessary. I just putted my electronics in a lunchbox, since I will hide the lunch box. I drilled holes for the potentiometers and drilled mounting holes for the amplifier and Raspberry Pi. My powersupply is from a laptop charger, so I decided to not put it in the lunchbox to safe some space. But if you bought the industrial it is necessary to put the PSU inside the box for safety reasons.
I don't think that my lunchbox looks any good, but like I said it will be hidden. But withouth further ado, here are some pictures of my lunchbox amplifier!


Step 9: Finished Product
I am very happy with the end result. The audio quality is pretty good espacially when you consider that the project only costed me 60 euros in total. The look of my amplifier still needs some work though.
I think it is pretty cool that you can have a Spotify Client build into your already existing speakers. It is just so conviennent that you don't have to connect via bluetooth like most speakers. You can just choose what speaker you want in a click of a button. It's just like a Sonos speaker but then for dirt cheap.
Here are some pictures of the end result!


Participated in the
Raspberry Pi Contest 2020


