

Introduction: Space Pirate Cannon


Figure 1: Two ships battling in space with multiple moons.
This Space Pirate Cannon project is carried out by Purdue University ECET380 students. Space pirates was the group's focus when submitting prompts to Mid Journey AI. From the numerous AI images, an image of two ships battling in space with multiple moons, as shown in Figure 1 above, sparked the attention. After deep examination of the image details, the idea of constructing a space pirate cannon prop came to mind. The prop will be used in film or theater to enhance the visual and performance of the show. Since the purpose of a prop is affordability, safety, and ease of construction, the project will cost less than $100 and will be buildable by the average high schooler. In this project, step-by-step instruction on how to build a Space Pirate Cannon prop is given.
Supplies
Step 1: Mechanical Assembly


- Lever arm design
- Determined by the placement of solenoid
- Solenoid direction of action same as the direction of recoil
- Use a lever arm with the fixed pivot at bottom of the pivot arm and both the solenoid and cannon barrel connected above.
- Direction of action opposite of recoil
- Use a Lever arm with a fixed pivot in the middle and a solenoid arm connecting to the opposite end from the cannon barrel.
- Multiplication of solenoid throw length determined by the ratio of distances to the pivot point of the solenoid mounting point and the cannon body mounting location.
- Once the location of mounting points is determined, transfer holes onto cardboard and create multiple layers to be adhered together to give strength to the lever arm.
- For cases where solenoid has appropriate throw distance, mounting directly to box and cannon body is possible.
- For cases where solenoid is underpowered, lever arm can be used to decrease throw distance and increase force by mounting solenoid to the longer ratio.
- Box modification

- Determine placement of electronics
- Mount components with zip ties, hot glue, or double-sided tape.
- Determine the location of the solenoid and lever arm
- Cut pass-through for lever arm to attach to canon body
- Color and style accordingly
- Cannon body

- Size appropriately to match the footprint of the base
- Modify to mount to Lever arm on the bottom side of cannon as well as to mount to Box
- Consider methods for lighting and if necessary create a cannon shot with clear glue or other light-diffusing material.

- Insert LED into the base of the glue stick
- Stuff the cannon body with light diffusing material like cotton balls and place LED at bottom
- Use a clear plastic tube and attach LED to the bottom to create a lighting effect on the shot.
Step 2: Solenoid Hardware Setup

- To hook up the hardware:
- Using wire jumpers, hook up the solenoid, 12V power supply, and the microcontroller as shown in the wiring diagram in Figure 2. When done, it should look somewhat like in Figure 3.
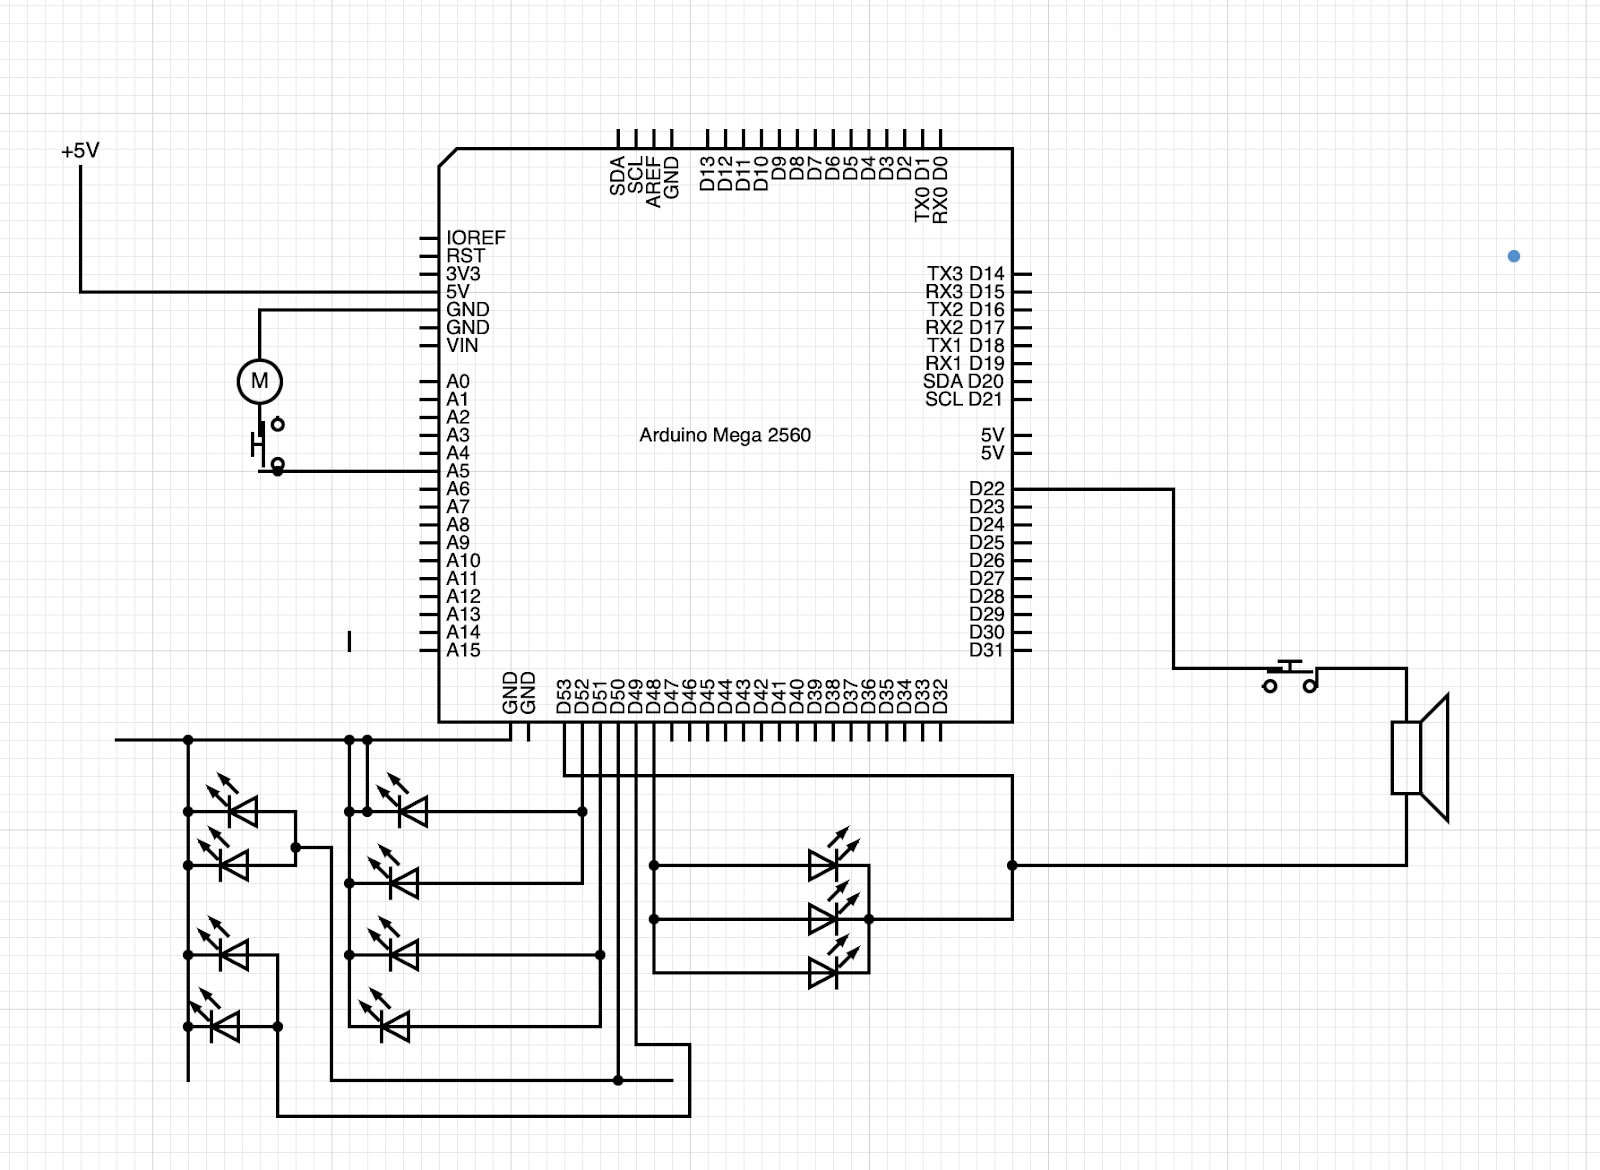
Figure 2: Wiring diagram of the system.
Step 3: Tricolor LED Setup


How to wire LED:
Firstly for the Rails:
Wire the LED cathode to the Digital Ground and the anode to the PWM Output with a 330-ohm resistor
Then we will add the LED into our resin and secure it to place
Secondly for the firing lights:
Wire the TricolorLED similar to the figure above with a 3,330-ohm resistor to the PWM Outputs.
Then we will add the LED into our resin and secure it to place.
Step 4: Audio Module Setup


The MP3 Module will take the serial command from the microcontroller and playback the audio file from in the Micro SD card inserted. The Module supports MP3 or WAV files and the output is mono with a single speaker output. The name of the audio file should be formatted as plain numbers (01, 02, 03, etc.) so the serial command can select between them. Two sound files are provided; '01.wav' is for the firing effect and '02.wav' is for the charge-up effect.
- The Serial UART MP3 Module is connected to the Microcontroller with +5V supply, ground.
- The RX from the MP3 Module is connected to the TX (pin 14) of the Microcontroller, and TX from the Module to RX (pin 15) of the Microcontroller.
- Connect the 8Ohms 1W speaker to the MP3 Module
- Insert the Micro SD card (with downloaded MP3 files inside) into the MP3 Module.
- Download, compile, and upload the provided code into the microcontroller (Step 2).

Step 5: Software Setup
Follow these steps to setup your Microcontroller with the code:
- download Arduino IDE at Software | Arduino
- After installation, launch the IDE
- Download the code provided in the attachment, named Space_Pirate_Cannon_Code
- In the IDE, click file>open then browse for the code code
- Scroll over to Tools>Board then choose ATMEGA2560
- Scroll over to Tools>Port then choose the available COM#
- Click on the verify check mark
- Click upload then you're all set!


