

Introduction: Sugru Thumb Loop for Bottle


Word on the street is that glass water bottles are the super green, super healthy way to go. Supposedly, they don't leach tastes and harmful chemicals the way plastic and aluminum do, and require less energy to produce. I can't say I've done extensive research to verify this, but the aluminum taste of my previous bottle was enough to get me to switch. Unfortunately, many refillable glass bottles are stupid expensive.
Here's where Voss bottles come in. They come in both glass and plastic, and while the glass are a bit expensive (around $3 for the large size) if just used once, $3 is very reasonable if you intend to reuse it. Plus it looks really cool.
To make the bottle more like a refillable commercial bottle, we're making a thumb loop for it from Sugru.
You'll just need:
- A bottle (any bottle will work, I just like the Voss).
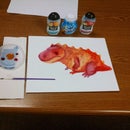
- Sugru
- Exacto knife
- Drill
- Something to make a mold (optional)
Step 1: Designing the Loop


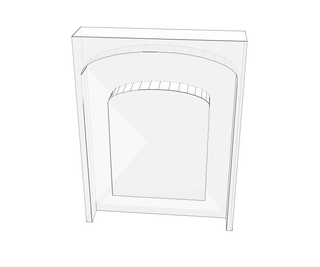
First we, need to design the loop. To do this, decide on a shape and form it by hand, or use a mold. I chose to make a mold, to try and get a more professional looking result. Once I sketched out the basic shape, since we have access to a 3D printer, I used Tinkercad to make the shape all precise and fancy.
If you design your own, design the actual shape of the loop first, then set that shape to a "hole" in Tinkercad and combine it with a block, making sure it comes above the top face of the block. When you group them, you'll get the negative of the object, which can be printed to make the mold. If you want to see what I'm talking about, or if you just want to use my design, I've included the STL file from Tinkercad for reference, or printing.
If you don't have a 3D printer, you can form the loop by hand, or make a mold in a different way. I've previously had success with making a negative out of stacks of plastic sheet glued together.
Attachments
Step 2: Drilling the Holes


I've seen plenty of people simply attach Sugru to items, and trust that it will adhere strongly enough on its own. While I'm sure that would work just fine, since this is glass, I've taken one extra precaution. Here, I drilled out holes in the cap of the bottle where I wanted the loop, with the holes falling near the corners of the loop design.
Step 3: Making Supports


At this point, I fitted the inside of the cap with a blob of Sugru, and pushed some extra material through the holes, until they come out the other side. A little bit should be fine, so no need to go overboard.
Step 4: Making Molds and Making Connections


I took the mold and coated it with a film of dish soap and water to act as a mold release agent. Then I pushed a bunch of Sugru into the mold, forcing it in with my thumbs until it overflowed. Once there was enough Sugru, I flipped the mold over and pressed it against the table to smooth the open side. A film of soapy water helps here as well, to prevent the Sugru from sticking to the table.
Once the mold is filled, it gets mounted to the top of the cap, over the holes we drilled earlier. Mash it down good to make a strong connection between the Sugru and the tabs from the holes, as well as the rest of the edge against the top of the cap.
Use an Exacto knife to score the spots where the Sugru nubs and the loop meet in a crosshatched pattern to create a stronger bond.
And now, we wait . . .
Step 5: Cleaning It Up.


Leave the Sugru in the mold while it cures. Allow sufficient time for it to cure fully, which may mean leaving it longer than the recommended time from the instructions. Sugru says 24 hours, but due to the thickness and the soapy water, I had to let mine go a little longer. Once it has cured fully, remove the mold.
At this point, the finished loop can be cleaned up, removing the excess material carefully with an Exacto knife.
It's worth doing some stress checks with the loop before taking it live, just to make sure the connections are solid. If they weren't properly secured, you don't want to sling this guy and see him fly across the room. Broken glass is no fun. Once you've checked it out, you are ready to go.
You don't have to stop here. You can continue to customize the bottle to make it even better. Maybe try making a protective sleeve for the whole bottle out of Sugru. The possibilities are limitless.


