Introduction: The Anti-Siphon Valve Project


From This To This
We moved to Florida in September of 2004, and leased a house, which we ended up buying in the spring of 2005. Our house, in fact our entire neighborhood was built around 1978. The sprinkler system was created with probably three or four zones, but over the years and several landlord owners later, was a mess of mismatched milieu that needed an extreme make-over.
I knew nothing about sprinkler systems. I could program the controller with no problem, but that was about it. I bought books, picked the brains of several home improvement folks, and I found a great site with the oracle of sprinkler knowledge (Jess Stryker’s Irrigation Tutorials.com.) Armed with all of this knowledge, I tackled the sprinkler system.
I quickly learned how to fix broken sprinkler heads chewed off by hungry lawn mowers, power edgers, and weed eaters. I even learned to expand the system. I replaced old, thin pipe with pipe that was the correct thickness, standardized on 3/4 inch lateral lines, and also standardized on funny pipe connectors for new sprinkler heads.
The valves were a big challenge. They were the Richdel 204 model -- Richdel was bought out years ago. The valves were from 1978 and always breaking down; and they were buried in the dirt — not in a nice little box with gravel in the bottom. Also, two of these valves were installed right next to each other. Trying to replace one meant tedious work and extra time. And all of this was in the dirt, which of course became mud. What a hassle!
So I decided I would create a project that would fix this crappy sprinkler system once and for all: The Anti-Siphon Valve Project, or the ASVP.
Step 1: Design the Manifold

The first thing I had to do was design the manifold. You can buy ready-made manifolds, but I wanted control over this, so I decided to design mine from the ground-up. I designed the manifold input to come into one end, and to leave the other end capped off in case we wanted to expand the system.

I know that my handwriting is hard to read, and the fact that we’re trying to read from a photograph is even more difficult, but please bear with me.
I tried to label everything in a standard manner so that my “Old-Timer’s wouldn’t get the best of me. Also, all of my connectors are slip connectors except where noted. I’m using one inch Schedule 40 pipe (which must be cut on a saw, not with hand pipe cutters.)

The first idea is to bring the valves as close to a wall as possible but still allow room to work on the valves. That led me to design a straight line manifold run with slip Ts at 90° perpendicular to the main manifold run. Here I’ve labeled the pipe MSn where MS stands for Manifold Side, and n is one of the integers 1-7. I have also labeled the slip Ts T 1-6, which corresponds with one of each of the valves. On the input side of the manifold is elbow EM, for Elbow Manifold, and on the opposite side I have a slip to female threaded connector labeled SFT, I suppose for Slip Female Thread.
Step 2: Move Values to a Better Location

We will also move the valves to a more convenient location, allowing Cheryl (my wife) to better use the old location with her plans for a walkway on the west side of the house.
Step 3: Start Cutting PVC Pipe


Most of the cuts will be on the circular saw with a PVC blade. Makes cutting one inch schedule 40 pipe a breeze.
Step 4: Start Welding PVC Pipe


As you can see, I marked every piece with its part number.
Step 5: Dig Out the Old Valves


Luckily, this was in November, so it was relatively cool to start digging.
Step 6: Start Installing


Now it's time to cut out the old valves, and route the laterals to the new valve area. I stuffed shop towels into the cut-off ends to try to keep dirt out of the pipes.
We also stuffed shop towels into the new pieces for the same reason.
Step 7: More Installation
There certainly lots of joints to weld, and the whole is quite too small for me. I'm very lucky that my wife is very small and nimble!

We also had our cat, "Witten", supervising. He kept wanting to break for lunch. (My kinda cat!)

Step 8: Finished
After letting everything dry overnight, finished wiring the valves to the controller box. After a quick test of the system, I buried everything and smoothed out the dirt as best as I could.
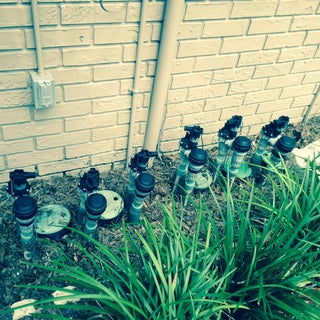
After a few days and a few plants, the final result looks like this:
I hope this Instructable was helpful to anyone who needs to redo their irrigation valves.