

Introduction: Turn a Confined Dark Area Into a Back Lighted Bookcase


Since moving in new house, plenty of books are still in boxes, so I decided to make a bookcase. I chose a rather confined place in the attic, relatively dark.
The task was how to turn this triangular confined dark area into a decorative and useful bookcase, without using a complete workshop or farfetched equipment/tools.
I wanted a light effect, also. Not very bright, not warm light (the attic was already "warm" by the pine wood)
I spent approximately 2 days in designing, measuring, calculating and rendering (FUSION 360), 1 day in gathering the necessary tools, accessories and wood planks, and 2 days in building the bookcase.
All in all, the outcome was beyond my expectations, regarding the resources allocation, its cost efficiency and the easiness of the construction.
Plus, it gave the place a certain "character".
Supplies
- measuring tape
- saw
- ruler
- portable drill
- drill bit
- wood pegs
- wood pegs drilling template
- carpenter’s square
- pencil
- tape
- sandpaper
- wood planks
- Led tapes
- Led tape transformer
- fasteners
(optional if drilling seems difficult: electrical screwdriver, screws, metal T junctions)
Step 1: Inspiration and Ideas


Chose the place:
(PHOTO 1 & 2)
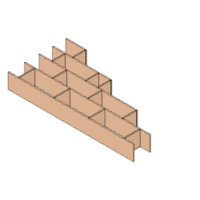
Set clear targets: the bookcase a) should use the maximum of the available space, b) should fit books of every dimension, c) should be low budget and d) should be easy to construct without turning the place into a woodcraft workshop.
After many sketches and preliminary measurements, I came into this:
(PHOTO 3 & 4)
TIP: spend some time to measure/categorize sizes of the books you have. You will avoid false shelf height.
TIP: check local stores for sizes and dimensions of wooden planks. You might avoid a lot of sawing.
Step 2: Preparing the Area for Woodworking


Make a simple workbench. You will do some basic woodworking (sawing, drilling, measuring)
The whole project would take place in the attic. I made a workbench with just two stools and a plank
(PHOTO 1& 2)
TIP: Any old wooden table would be good enough for the amount of craftsmanship it shall handle.
Step 3: Gather the Equipment/tools
You will need at least the following, so make a list: measuring tape, saw, ruler, portable drill, drill bit, wood pegs, wood pegs drilling template, carpenter’s square, pencil, tape
Wood planks
Led tapes
Led tape transformer
Fasteners
(optional if drilling seems difficult: electrical screwdriver, screws, metal T junctions)
Step 4: Designing (FUSION 360)


- Make preliminary measurements of the area
- Define wood planks' width and thickness
- Set shelves’ height and length
TIP: check local stores for sizes and dimensions of wooden planks. I found planks of 25cm width and 1,8cm thickness. Pretty adequate for my project (saved a lot of time and money from ordering, cutting, sawing e.t.c.)
- Use CAD software to visualize your idea. You can even use photo realization to get a glimpse of what is to expect.
I used FUSION 360 for 3d planning.
(check FUSION 360 file)
Attachments
Step 5: Make a Construction Plan

After creating the 3d design, export a list with every piece, its dimensions and the peg holes' positions
Step 6: Sawing


- Cut every piece/part of the bookcase
TIP: if you feel confident for your measurements and calculations, you could buy ready cut planks
But then, you might miss the fun of sawing (actually, making something with your own hands). Take the cost under
consideration.
- Clear rοugh edges with sandpaper
Step 7: Marking Holes for Wood Pegs


- Choοse wood pegs according to plank thickness
(for 1,8cm thickness, a 6mm x 3cm peg is perfect)
(PHOTO 1)
- Mark peg holes in wood pieces.
TIP: make a verification tool. I just took a pre-drilled metal corner and marked the desired distance between holes and edges. After that, marking vertical wood pieces was done in a few minutes.
(PHOTO 2 & 3)
TIP: check the wooden boards for defects. Choose which side goes up/down.
TIP: choose in advance which side of each piece goes to the front and rear, and which side is up/down. I used an arrow to set the front side and a symbol ( ┴ ) to set the side that fits the lower plank.
(PHOTO 4 & 5)
TIP: to mark horizontal pieces, use the carpenter’s square for drawing a line in the desired distance, take the marked vertical piece, set it in place and mark the horizontal plank exactly in the spots that the vertical piece is marked. Use the verification tool.
(PHOTO 6 & 7)
Step 8: Drill the Holes


- Measure the desired depth of the holes.
TIP: horizontal pieces – each hole does not exceed half the width (for 1,8cm max 0,9cm)
Vertical piece – the rest of the peg’s length (for 3cm pegs and 0,9cm depth in horizontal piece, the depth reaches 2,1cm)
(PHOTO 1 - 5)
- Mark the drill bit in the desired distance (hole depth) with tape
(PHOTO 6 - 9)
- Make a base to keep the wood plank steady
(PHOTO 10 & 11)
- Drill the holes using pegs drilling template
(PHOTO 12 -14)
TIP: after each pair of holes, use the verification tool
Step 9: Assemble


- Follow the patern/sketch/design you have and assemble the pieces.
TIP: if you want to avoid drilling, there is another solution. You can use T junctions an screw vertical and horizontal pieces together. Choose screws that are thin and their length exceeds the planks thickness (for 1,8cm thickness screws should be around 2cm)
WARNING: if you choose to use screws, keep in mind that the pieces should me extremely accurate regarding its dimensions. Minor differences could lead in difficulties to achieve the alignment needed, which it could result in poor connection of the pieces or in poor aesthetics.
Step 10: Put the Led Tapes in the Back Side of the Bookcase


- Fasten the led stripe in the rear
TIP: chose led stripes in flexible silicone. They are much more easier to handle.
I bought led stripe coming with silicone fastener/stapler (PHOTO 2)
On what power, A, V, type of led should you choose, which transformer, how to make the connections/circuit e.t.c., please refer to another source (led stripes is not the main subject of the task).
ATTENTION: electricity is lethal. Always be careful. Always follow regulations and instructions.
Step 11: Finalize


Set the bookcase in place, get the books and ornaments...
TIP: The weight of the books will keep the shelves tight together. But, for avoiding any risks, it would be better if the case was screwed to the wall (improved stability)

Participated in the
Books and Bookshelves Contest


