

Introduction: Two Turtle Dove Gloves


These are currently hanging in the Twelve Days of Christmas art show at Tin Umbrella Coffee in Seattle. Each artist chose the day he or she wanted to portray and I chose the second day of Christmas where my true love gave to me two turtle doves.
They are absolutely ridiculous and utterly impractical but if you were in a school play or carolling in your neighborhood and they were singing The Twelve Days of Christmas, when they got to the part where they sing, "Two turtle doves!" you could bust these out and steal the show.
My daughter already called dibs on them so on Christmas day she'll be able to say her true love gave to her two turtle doves. I'm not giving her golden rings, lord-a-leapings, or the rest of that nonsense though.
If you would like to give your true love two turtle doves (that double as gloves) too, then here's how to do it...
Step 1: The Making of the Mouth.


In hindsight, I have to say that you should skip this complicated step and just make simple mittens with pointed tops for the beaks. That would be easier. But then, they wouldn't be as puppet-like. I chose to give them each a half-birdbeak / half-turtlemouth so when I move my 3 middle fingers up and down, it looks like they're moving their beak/mouths. I also chose to give them plastic craft eyes and fill the heads with stuffing. Button eyes and unstuffed heads would be much easier to make.
But, if you're like me and insist on doing things the hard way, here's how to do it...
First, cut out a mitten/glove shape with two "thumbs". This will give you a space for your thumb, a space for your pinky, and a space for the 3 fingers in between. Make sure this "mitten" is about an inch and a half larger than your hand all the way around.
Chop the middle 3-finger area in half on ONE side (the top side) of your mitten and add 2 orange triangles for the beak. Save the green rounded tip to attach to the lower jaw.
Sew one orange triangle to the mitten. Sew a 3-inch rectangle to the bottom of your other triangle (this will protect your hand from the nubs of the plastic eyes later on). Sew the tips of your triangles together inside out, turn it right-side out, fill it with a little stuffing, and sew it closed on the line between the orange beak and green fabric
Cut two tiny holes and attach plastic craft eyes.
On the other side of your mitten/glove (the bottom side) take the green rounded tip you cut earlier and sew it to the tip of your bottom mitten/glove shape. Turn it inside-out, line up the edge of the partial piece with the bottom edge of the plush beak and attach them together. Put the outsides of the mitten facing one another and continue to sew the sides of the head to the shoulders. Stuff the area between the the top of the head and your rectangle. Stitch a line behind the eyes to close this stuffed area and create a plush head.
Finally, continue stitching around the fingers and down each side of the body. Fold the bottom edge in a half an inch and hem it.
Now, do this all over again to make your second turtle dove.
Step 2: Attach the Shell, Legs, and Wings.


Now that your body is done, you need to attach legs, a shell, wings and tail feathers.
For the shell, cut 2 pieces of fabric in an oval shape. Stitch them together around the edge, cut a small hole in the bottom side of your shell, reach in the hole and pull it right-side out, sew around the edge one more time, and stuff it through the hole.
Make 2 back legs (2 pieces of fabric per leg) the same shape as the thumbs from your mittens. Sew around the edges of your legs, turn them inside out, fill with stuffing, and sew them closed along the bottom edges. Attach the legs to the underside of the shell by sewing over the line you previously sewed around the edge of your shell.
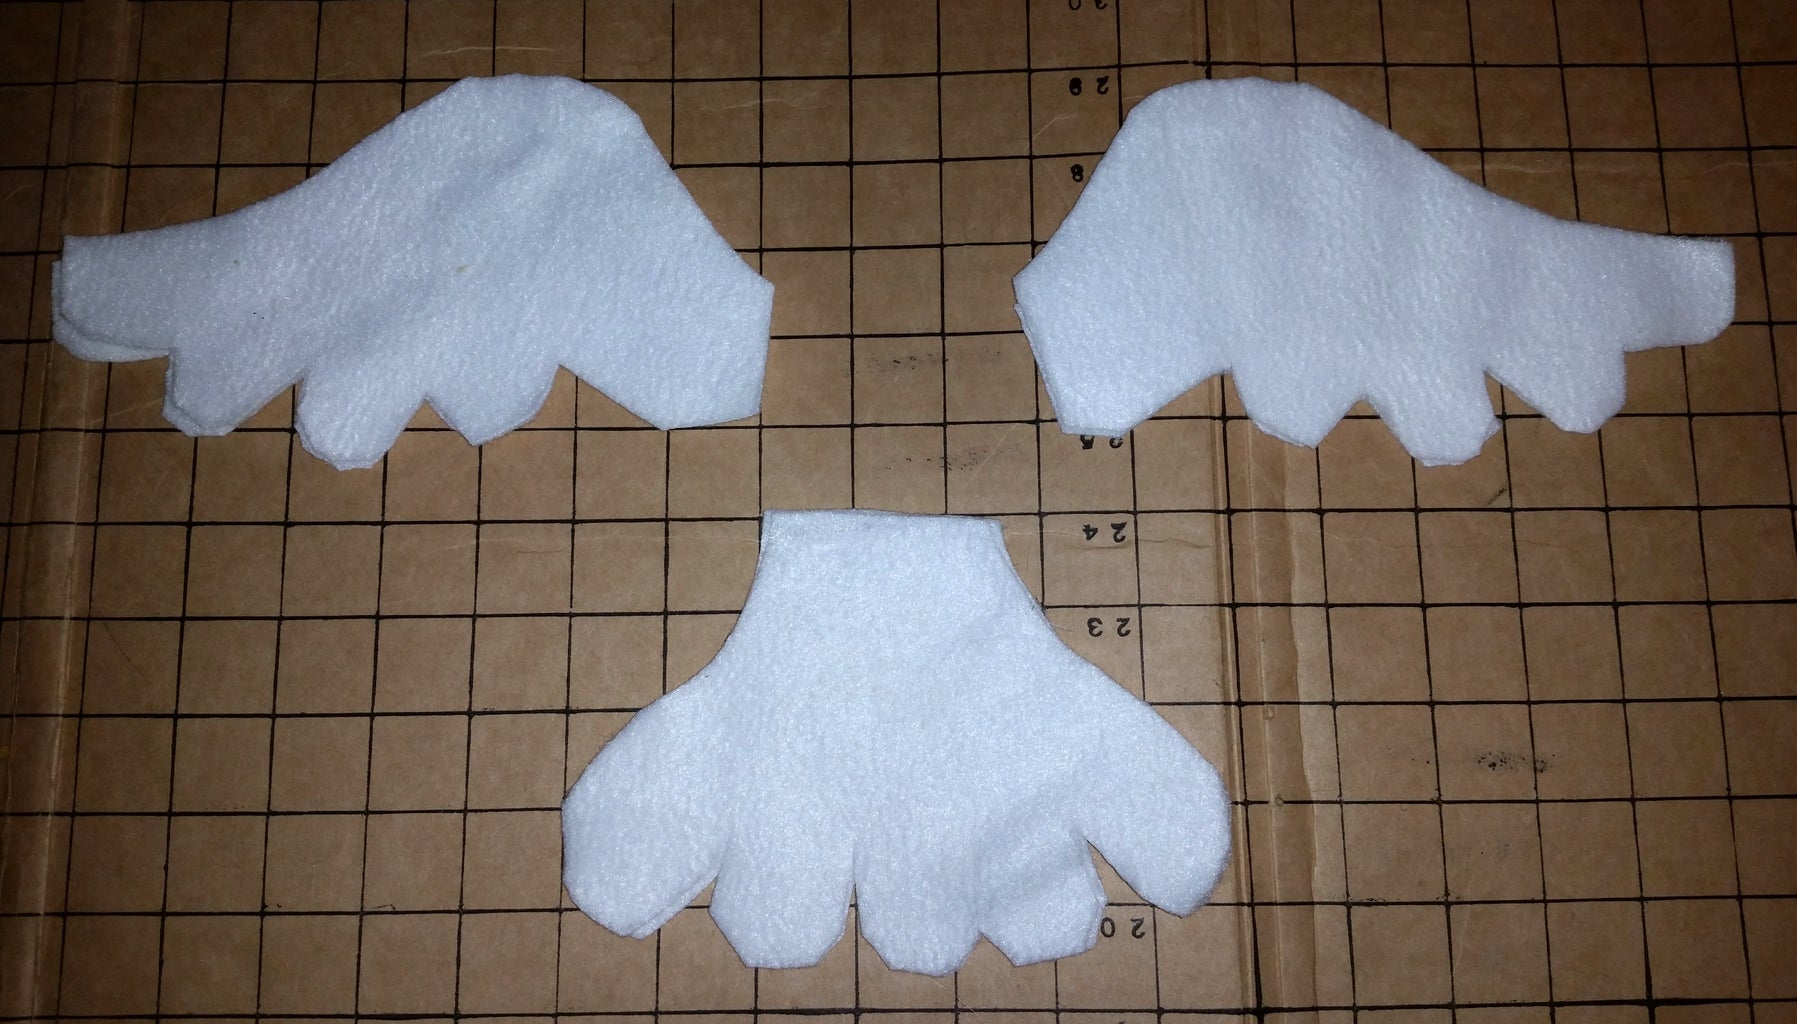
Next, make outstretched wings and tail feathers like the ones I have pictured above (2 pieces of fabric each). Sew around the outer edges and them turn inside-out. Attach the tail feathers to the underside back end of your shell in the same way you attached the legs. Attach the wings by sewing the open edge of each wing directly to the stuffed shell. It takes a little effort getting the stuffed shell and wing under the presser foot on your sewing machine, but it's possible and the end result is a firmly attached wing that pops out a little from the plush shell.
Step 3: Attach a Cord to Connect Them.


The final step is to hand sew the shell and wings to the body of your mitten/glove and braid a cord to connect them.
I cut 3 strips of fleece about an inch wide and 60 inches long and braided them together. Then I sewed velcro to each end of the cord and to the underside of the turtle/dove's tail feathers. This makes them easier to display and helps them stay together as a team.
Step 4: Set Them Free!


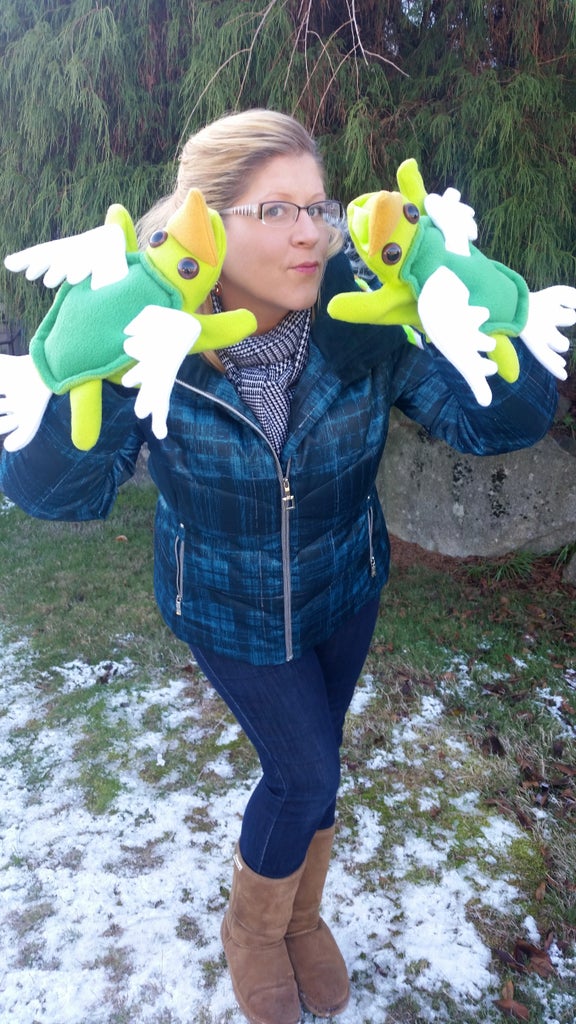

They're done! Now slip your hands in there and flap them around like puppets or just wear them like mittens to keep your hands warm. If a crowd of people suddenly belt out The Twelve Days of Christmas you'll be prepared for your part.

Third Prize in the
Winter Wearables Contest

Participated in the
Homemade Gifts Contest


