Introduction: UCL-IIoT - Smart Industry 4.0 IIoT Production Cloud-based Supervision Controller


The main part of this project is to design and implement an automated system following the Industry 4.0 principles.
- Smart Connected
- Flexible
- Social
- High Quality Services
This project seeks to follow the principles of IOT with an Industrial aspect in enabling data from sensors to be accessible through the cloud but also by controlling a stepper motor remotely and thereby enabling two-sided communication.
The principle of this communication is through writing values from sensors to separate .txt-files in matching input- and output-folders as well as overwriting the corresponding files to ensure all data is handled correctly. Another part of this system is the ability of enabling or disabling data exchange with the IoT2040-device using a separate signal-folder with .txt-files containing a string, which is read from first ensuring that the system follows directions from the user and doesn't spend computing power with irrelevant readings.
Although, by limitations of security options for the IoT2040, this project will not seek to make the interface of this device accessible on the internet, it will instead make data available through HTTP communication to separate servers.
Step 1: Hardware Required


- 1x Siemens IOT2040
- 1x prototype Shield v.5
- 1x Siemens Simatic PM 1507 190W 120/230VAC - 6EP1333-4BA00
- 1x Micro SD-card 8gb or 16gb
- 1x Stepper Motor 12V 28BYJ-48
- 1x Stepper Motor Driver ULN2003
- 1x Ultrasonic sensor HC-SR04
- 1x Gas sensor MQ-2
- 1x Automatic Pet Feeder (Optional)
Step 2: Setting Up the Hardware

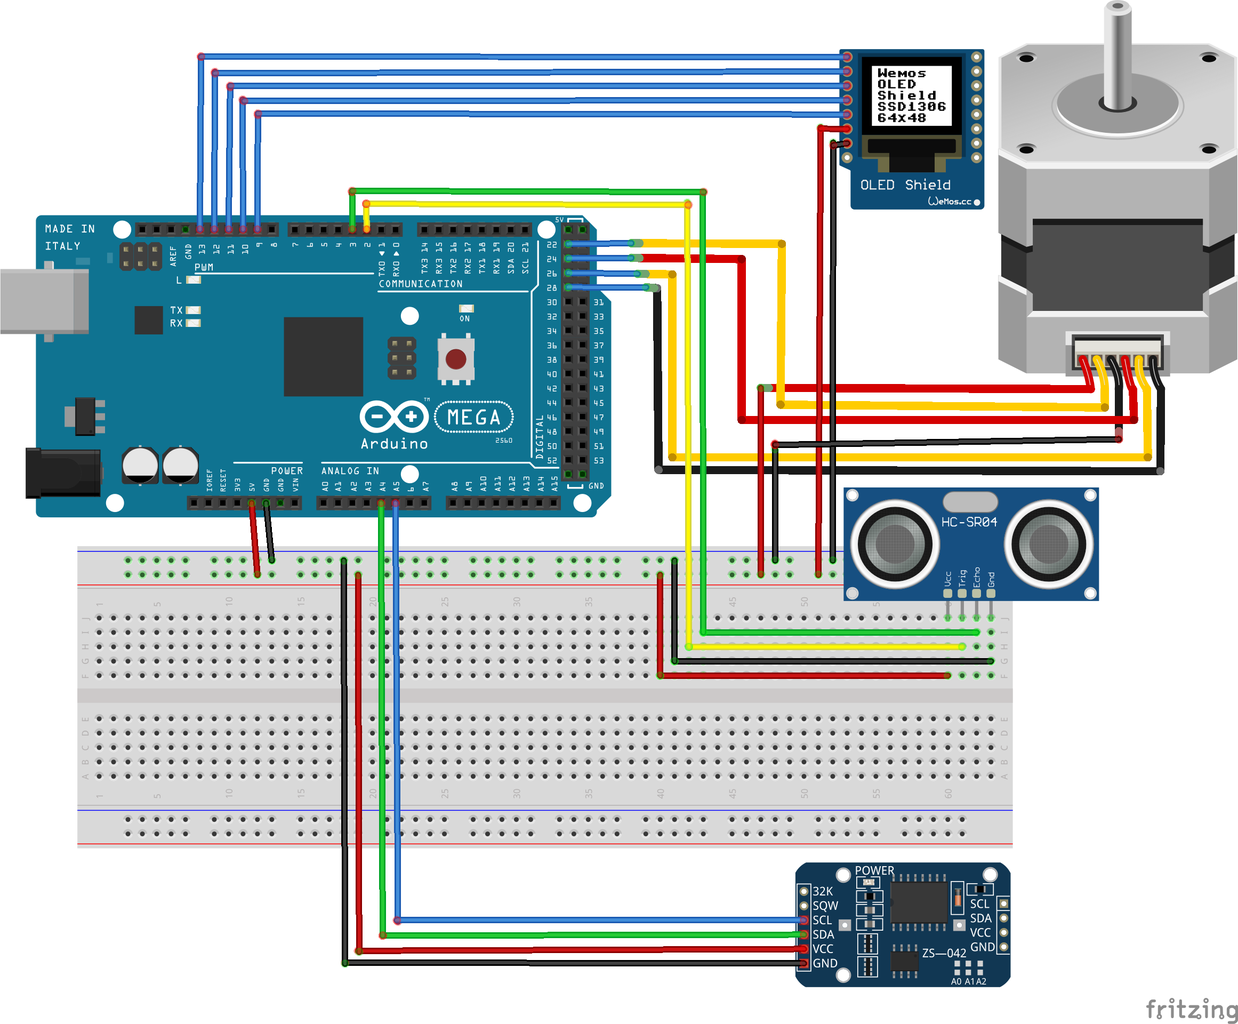
As mentioned this project focuses on enabling one to access values from sensors via the principles of IOT with an Industrial aspect. In this case two sensors and one stepper motor will be wired directly to the "Ardunio"-side of the IoT2040. Following the connectivity of these modules the primary goal will be reading from the designated inputs and writing to the equal outputs by creating a file on the IoT2040 and writing values to it or reading from it.
Another alternative would be connecting another Arduino (eg. Arduino Mega2560) through the USB-port of the IoT2040, and reading from the serial monitor at a specific communication port, but for this project the focus will instead be on the aforementioned read-write-file method.
Attachments

Step 3: Software Required


- Terminal (MacOS)
- cmd.exe (Windows)
- BalenaEtcher (or equivalent) https://www.balena.io/etcher/
- Newest ‘Example_Image_V2.4.0.zip’ (365,0 MB) https://support.industry.siemens.com/cs/document/...
- FileZilla (or equivalent - optional) https://filezilla-project.org
Step 4: Setup & IOT2000Setup


Standard IP: 192.168.200.1
Subnet mask: 255.255.255.0
Before establishing a ethernet-connection to the Siemens IOT2040 device, it’s critical to configure the computer’s ethernet-port to match the gateway (ex. 192.168.200.10 matches standard gateway 192.168.200.1 of IOT2040) and subnet (ex. 255.255.255.0) of the IOT2040. This can be configured using the network settings on your system of choice. For this Instructable I configured and programmed the IOT2040 using MacOS which has SSH built-in to the native Terminal app while Windows has programs like PuTTY to handle communication. On MacOS go to System Settings → Network and choose you ethernet hardware, in my case: “USB 10/100/1000 LAN”. From here we want to focus on ‘Configure IPv4’ setting it to ‘Manual’, while ‘IP-address: 192.168.200.10’, ‘Subnet mask: 255.255.255.0’ and ‘Router: 192.168.200.1’ for the first run, which can later be changed to something more fitting for your application. Remember to hit ‘Apply’ afterwards.
Next up is the built-in MacOS Terminal to establish the first connection with your IOT2040. Before we can continue with this it’s necessary to assign a known host key fingerprint (ECDSA) on 192.168.200.1 to tell MacOS that communication with the IOT2040 on that specific IP is safe. Therefore we can run ssh-keygen -R 192.168.200.1 to add the device on a list of known hosts. This way we’ve now added the IOT2040 using IP-address 192.168.200.1 including it’s host key fingerprint to our list of known hosts.
Having completed this step we should be able to communicate with the IOT2040 using SSH and the user root to IP-address 192.168.200.1. So in Terminal use the command ssh root@192.168.200.1, to establish the connection. Since it’s the first time MacOS is connecting to this IP it will require a prompt so just enter yes.
An important step in securing the IOT2040 is as alway changing the password, since it currently won’t have any set as standard. To do this is a simple command passwd which will prompt for the new password to be set and then repeated.
Step 5: More IOT2000Setup


This is mostly formalities, but nevertheless quite important in having a secure and properly setup of the IoT2040-device.
It's recommended to configure the two network interfaces on the IoT2040 by entering the "Network" tab of the "IOT2000Setup". Here both interface eth0 and eth1 are selected. For this project interface eth0 should have a different IP to that of the default 192.168.200.1. In the example 192.168.40.1 is chosen, but any preferred IP is possible. Eth1 is optional as to whether or not it should be DHCP or a static IP. This project uses Eth1 for ensuring and internet connection on the IoT2040 so that it's possible to communicate through HTTP with services such as ThingSpeak and Google Forms and Sheets. After revisioning the changed settings all that's left is to press "OK" and wait for the IoT2040 to restart.
Step 6: First Access to Node-RED


Now in order to access Node-RED from our browser, we have to use the IP-address we've defined for , but moreover Node-RED as default runs on port 1880, so all that's needed is to enter: 192.168.200.1:1880, if you're running it on the default IP-address.
In our case we simply enter: 192.168.40.1:1880, and if everything has started successfully we should be greeted by the first flow in Node-RED and consequently it's programming interface.
The built-in Node-RED dashboard can also be accessed through: 192.168.40.1:1880/ui/#/0, but requires some programming first.
Step 7: Node-RED Flow


Now it's possible to start programming Node-RED. For this project, the following can be copy-pasted and deployed. At it's core, it allows one to control communication of values from two sensors through enabling and disabling as well as enabling or disabling control of a stepper motor, by telling the "Arduino"-side of the IoT2040 to run a specific part of the code. Furthermore, it's also possible to control the delay of the Arduino-code from one communication of values to the next enabled. Of course the main part of the Node-RED flow, is to receive values from the two sensors and controlling the stepper motor which is configurable from the custom interface. Historic values are also available through a local database on the IoT2040-device, allowing the user to store valuable information of previous reading. All values of sensors, stepper and delay will be sent to ThingSpeak via HTTP through an established ethernet-connection to the internet. The aforementioned values will also be sent to a Google Sheets document, setup through a latter step in this Instructable and via a similar method of HTTP and ethernet-connection.
[{"id":"3fb67b7c.e3f284","type":"tab","label":"Arduino -> Node-RED | Node-RED -> Arduino","disabled":false,"info":""},{"id":"2aff25f1.8e35da","type":"iot2000-gpio-din","z":"3fb67b7c.e3f284","name":"","pin":"4","updateInterval":"1000","x":1390,"y":160,"wires":[[]]},{"id":"53e245a1.5e181c","type":"iot2000-gpio-userled","z":"3fb67b7c.e3f284","name":"","x":1030,"y":120,"wires":[]},{"id":"7b3571d5.f5c35","type":"ui_chart","z":"3fb67b7c.e3f284","name":"","group":"514d33ab.77991c","order":4,"width":0,"height":0,"label":"Gas dev chart","chartType":"line","legend":"false","xformat":"HH:mm:ss","interpolate":"linear","nodata":"","dot":false,"ymin":"","ymax":"","removeOlder":1,"removeOlderPoints":"","removeOlderUnit":"3600","cutout":0,"useOneColor":false,"colors":["#1f77b4","#aec7e8","#ff7f0e","#2ca02c","#98df8a","#d62728","#ff9896","#9467bd","#c5b0d5"],"useOldStyle":false,"outputs":1,"x":640,"y":680,"wires":[[]]},{"id":"be26070d.de7ea8","type":"ui_numeric","z":"3fb67b7c.e3f284","name":"","label":"Distance measured numeric","tooltip":"","group":"514d33ab.77991c","order":5,"width":0,"height":0,"passthru":true,"topic":"","format":"{{value}}","min":0,"max":10,"step":"","x":680,"y":480,"wires":[[]]},{"id":"85665454.3716b8","type":"ui_switch","z":"3fb67b7c.e3f284","name":"","label":"measure gas switch signal","tooltip":"","group":"514d33ab.77991c","order":6,"width":0,"height":0,"passthru":true,"decouple":"false","topic":"#","style":"","onvalue":"writeDistanceFile","onvalueType":"str","onicon":"","oncolor":"","offvalue":"false","offvalueType":"bool","officon":"","offcolor":"","x":140,"y":80,"wires":[["f1b78afa.1ba808","cce1ad13.41e08"]]},{"id":"5612b70f.0b7738","type":"ui_switch","z":"3fb67b7c.e3f284","name":"","label":"measure distance switch signal","tooltip":"","group":"514d33ab.77991c","order":7,"width":0,"height":0,"passthru":true,"decouple":"false","topic":"#","style":"","onvalue":"writeGasFile","onvalueType":"str","onicon":"","oncolor":"","offvalue":"false","offvalueType":"bool","officon":"","offcolor":"","x":150,"y":240,"wires":[["4737672b.12dae8","86e8b8cc.a84dc8"]]},{"id":"53690008.874a9","type":"ui_date_picker","z":"3fb67b7c.e3f284","name":"","label":"date","order":0,"width":0,"height":0,"passthru":true,"topic":"","x":170,"y":40,"wires":[[]]},{"id":"19f8ce41.4eba92","type":"mraa-gpio-din","z":"3fb67b7c.e3f284","name":"","pin":"3","interrupt":"","x":1390,"y":40,"wires":[[]]},{"id":"1cb2a691.d5c679","type":"mraa-gpio-din","z":"3fb67b7c.e3f284","name":"","pin":"4","interrupt":"","x":1390,"y":120,"wires":[[]]},{"id":"dc19c1de.fb2b7","type":"iot2000-gpio-din","z":"3fb67b7c.e3f284","name":"","pin":"3","updateInterval":"1000","x":1390,"y":80,"wires":[[]]},{"id":"86c5549b.58f838","type":"watch","z":"3fb67b7c.e3f284","name":"","files":"/home/root/input-arduino/write-distance-input.txt","recursive":"","x":200,"y":460,"wires":[[]]},{"id":"a7437f1.cc03b8","type":"file","z":"3fb67b7c.e3f284","name":"write read-distance-signal-output.txt","filename":"/home/root/signal-arduino/read-distance-signal-output.txt","appendNewline":false,"createDir":false,"overwriteFile":"true","encoding":"none","x":570,"y":100,"wires":[["c0776777.7232e8","da0ddc2e.0ac1a"]]},{"id":"f1b78afa.1ba808","type":"debug","z":"3fb67b7c.e3f284","name":"","active":false,"tosidebar":true,"console":false,"tostatus":false,"complete":"false","x":350,"y":40,"wires":[]},{"id":"c0776777.7232e8","type":"debug","z":"3fb67b7c.e3f284","name":"","active":true,"tosidebar":true,"console":false,"tostatus":false,"complete":"false","x":830,"y":40,"wires":[]},{"id":"9cd5bd2d.1f615","type":"inject","z":"3fb67b7c.e3f284","name":"","topic":"#","payload":"writeDistanceFile","payloadType":"str","repeat":"","crontab":"","once":false,"onceDelay":0.1,"x":130,"y":160,"wires":[["cce1ad13.41e08"]]},{"id":"44c63266.375f9c","type":"inject","z":"3fb67b7c.e3f284","name":"","topic":"#","payload":"writeGasFile","payloadType":"str","repeat":"","crontab":"","once":false,"onceDelay":0.1,"x":110,"y":320,"wires":[["86e8b8cc.a84dc8"]]},{"id":"cdb8fe01.b2d08","type":"file","z":"3fb67b7c.e3f284","name":"write read-gas-signal-output.txt","filename":"/home/root/signal-arduino/read-gas-signal-output.txt","appendNewline":false,"createDir":false,"overwriteFile":"true","encoding":"none","x":570,"y":260,"wires":[["fd735491.52c338","ab90fcca.5de99"]]},{"id":"8f99365d.692ab8","type":"tail","z":"3fb67b7c.e3f284","name":"tail write-distance-input.txt","filetype":"binary","split":"[]{0,1}","filename":"/home/root/input-arduino/write-distance-input.txt","x":130,"y":500,"wires":[["1f1a895a.cf6987"]]},{"id":"1f1a895a.cf6987","type":"file in","z":"3fb67b7c.e3f284","name":" read write-distance-input.txt","filename":"/home/root/input-arduino/write-distance-input.txt","format":"utf8","chunk":false,"sendError":false,"encoding":"none","x":400,"y":540,"wires":[["707a6b63.1d5114","e4f0592a.be23f8","be26070d.de7ea8"]]},{"id":"707a6b63.1d5114","type":"debug","z":"3fb67b7c.e3f284","name":"","active":true,"tosidebar":true,"console":false,"tostatus":false,"complete":"false","x":630,"y":520,"wires":[]},{"id":"62483bc3.4a3db4","type":"inject","z":"3fb67b7c.e3f284","name":"manual return true","topic":"","payload":"true","payloadType":"bool","repeat":"","crontab":"","once":false,"onceDelay":0.1,"x":130,"y":540,"wires":[["1f1a895a.cf6987"]]},{"id":"e9d7cc58.c3b9","type":"inject","z":"3fb67b7c.e3f284","name":"automated","topic":"","payload":"true","payloadType":"bool","repeat":"30","crontab":"","once":false,"onceDelay":0.1,"x":110,"y":580,"wires":[[]]},{"id":"489e217a.5851f","type":"tail","z":"3fb67b7c.e3f284","name":"tail write-gas-input.txt","filetype":"binary","split":"","filename":"/home/root/input-arduino/write-gas-input.txt","x":120,"y":700,"wires":[["cec881e0.72a51"]]},{"id":"cec881e0.72a51","type":"file in","z":"3fb67b7c.e3f284","name":"read write-gas-input.txt","filename":"/home/root/input-arduino/write-gas-input.txt","format":"utf8","chunk":false,"sendError":false,"encoding":"none","x":390,"y":740,"wires":[["b6684893.d625f8","e8d5794e.c88408","7b3571d5.f5c35"]]},{"id":"116d2bbb.0290d4","type":"inject","z":"3fb67b7c.e3f284","name":"manual return true","topic":"","payload":"true","payloadType":"bool","repeat":"","crontab":"","once":false,"onceDelay":0.1,"x":130,"y":740,"wires":[["cec881e0.72a51"]]},{"id":"7f23159d.91232c","type":"inject","z":"3fb67b7c.e3f284","name":"automated","topic":"","payload":"true","payloadType":"bool","repeat":"30","crontab":"","once":false,"onceDelay":0.1,"x":110,"y":780,"wires":[[]]},{"id":"b6684893.d625f8","type":"debug","z":"3fb67b7c.e3f284","name":"","active":true,"tosidebar":true,"console":false,"tostatus":false,"complete":"false","x":630,"y":720,"wires":[]},{"id":"dbddbb62.b00d48","type":"ui_button","z":"3fb67b7c.e3f284","name":"","group":"514d33ab.77991c","order":9,"width":0,"height":0,"passthru":false,"label":"read gas value","tooltip":"","color":"","bgcolor":"","icon":"","payload":"","payloadType":"str","topic":"","x":100,"y":820,"wires":[["cec881e0.72a51"]]},{"id":"dcde2da1.bca99","type":"ui_button","z":"3fb67b7c.e3f284","name":"","group":"514d33ab.77991c","order":8,"width":0,"height":0,"passthru":false,"label":"read distance value","tooltip":"","color":"","bgcolor":"","icon":"","payload":"","payloadType":"str","topic":"","x":110,"y":620,"wires":[["1f1a895a.cf6987"]]},{"id":"e8d5794e.c88408","type":"function","z":"3fb67b7c.e3f284","name":"Parser","func":"//splits/converts the data\n\nvar data = msg.payload;\n\nmsg.payload = {}; //null msg obj and create new properties\nmsg.payload.gasinput = parseInt(data[0]);\n\nreturn msg;","outputs":1,"noerr":0,"x":610,"y":760,"wires":[["eb574361.fd59a"]]},{"id":"33460565.303daa","type":"debug","z":"3fb67b7c.e3f284","name":"","active":false,"tosidebar":true,"console":false,"tostatus":false,"complete":"payload","targetType":"msg","x":930,"y":800,"wires":[]},{"id":"eb574361.fd59a","type":"http request","z":"3fb67b7c.e3f284","name":"","method":"GET","ret":"txt","paytoqs":false,"url":"https://docs.google.com/forms/d/e/1FAIpQLSeDAaSYHPWJawQSl3uAJf5pZYAYqmY9VxGtPMKbjiz5EUoP6g/formResponse?entry.566191156={{payload.gasinput}}","tls":"","proxy":"","authType":"","x":770,"y":780,"wires":[["33460565.303daa"]]},{"id":"e4f0592a.be23f8","type":"function","z":"3fb67b7c.e3f284","name":"Parser","func":"//splits/converts the data\n\nvar data = msg.payload;\n\nmsg.payload = {}; //null msg obj and create new properties\nmsg.payload.distanceinput = parseInt(data[0]);\n\nreturn msg;","outputs":1,"noerr":0,"x":610,"y":560,"wires":[["70bf7cd3.18c5b4"]]},{"id":"aa98a6ca.b83208","type":"debug","z":"3fb67b7c.e3f284","name":"","active":false,"tosidebar":true,"console":false,"tostatus":false,"complete":"payload","targetType":"msg","x":930,"y":600,"wires":[]},{"id":"70bf7cd3.18c5b4","type":"http request","z":"3fb67b7c.e3f284","name":"","method":"GET","ret":"txt","paytoqs":false,"url":"https://docs.google.com/forms/d/e/1FAIpQLSeDAaSYHPWJawQSl3uAJf5pZYAYqmY9VxGtPMKbjiz5EUoP6g/formResponse?entry.1356112457={{payload.distanceinput}}","tls":"","proxy":"","authType":"","x":770,"y":580,"wires":[["aa98a6ca.b83208"]]},{"id":"a8d617d4.7eab28","type":"comment","z":"3fb67b7c.e3f284","name":"fail-safe mode?","info":"add automated local storage of sensor readings\nin case of lost internet connection","x":600,"y":600,"wires":[]},{"id":"485e69fc.5a5ae8","type":"comment","z":"3fb67b7c.e3f284","name":"fail-safe mode?","info":"add automated local storage of sensor readings\nin case of lost internet connection","x":600,"y":800,"wires":[]},{"id":"fd735491.52c338","type":"debug","z":"3fb67b7c.e3f284","name":"","active":true,"tosidebar":true,"console":false,"tostatus":false,"complete":"false","x":830,"y":220,"wires":[]},{"id":"79c69c66.3796d4","type":"iot2000-gpio-userled","z":"3fb67b7c.e3f284","name":"","x":1030,"y":240,"wires":[]},{"id":"1140f74a.584d49","type":"delay","z":"3fb67b7c.e3f284","name":"","pauseType":"delay","timeout":"50","timeoutUnits":"seconds","rate":"1","nbRateUnits":"1","rateUnits":"second","randomFirst":"1","randomLast":"5","randomUnits":"seconds","drop":false,"x":140,"y":120,"wires":[[]]},{"id":"68f36f14.1379a","type":"delay","z":"3fb67b7c.e3f284","name":"","pauseType":"delay","timeout":"25","timeoutUnits":"seconds","rate":"1","nbRateUnits":"1","rateUnits":"second","randomFirst":"1","randomLast":"5","randomUnits":"seconds","drop":false,"x":140,"y":280,"wires":[[]]},{"id":"ab90fcca.5de99","type":"trigger","z":"3fb67b7c.e3f284","op1":"true","op2":"false","op1type":"bool","op2type":"bool","duration":"250","extend":false,"units":"ms","reset":"","bytopic":"all","name":"","x":820,"y":260,"wires":[["79c69c66.3796d4","75294904.f65568"]]},{"id":"bf894cf7.af4b8","type":"trigger","z":"3fb67b7c.e3f284","op1":"true","op2":"false","op1type":"bool","op2type":"bool","duration":"250","extend":false,"units":"ms","reset":"","bytopic":"all","name":"","x":1160,"y":320,"wires":[["3420031.4ffeefc"]]},{"id":"da0ddc2e.0ac1a","type":"trigger","z":"3fb67b7c.e3f284","op1":"true","op2":"false","op1type":"bool","op2type":"bool","duration":"250","extend":false,"units":"ms","reset":"","bytopic":"all","name":"","x":840,"y":100,"wires":[["53e245a1.5e181c"]]},{"id":"3420031.4ffeefc","type":"iot2000-gpio-userled","z":"3fb67b7c.e3f284","name":"","x":1330,"y":360,"wires":[]},{"id":"75294904.f65568","type":"delay","z":"3fb67b7c.e3f284","name":"","pauseType":"delay","timeout":"250","timeoutUnits":"milliseconds","rate":"1","nbRateUnits":"1","rateUnits":"second","randomFirst":"1","randomLast":"5","randomUnits":"seconds","drop":false,"x":1010,"y":280,"wires":[["bf894cf7.af4b8"]]},{"id":"661ae4dd.645d0c","type":"comment","z":"3fb67b7c.e3f284","name":"","info":"Returns string like tail but includes full\naddress of file - less safe but more precise\ndata management","x":80,"y":420,"wires":[]},{"id":"b510dae5.c91388","type":"comment","z":"3fb67b7c.e3f284","name":"","info":"Returns string like file but doesn't include\nfull address of file - more safe but less\noptimized data management","x":300,"y":420,"wires":[]},{"id":"12dde6fa.da94b9","type":"ui_template","z":"3fb67b7c.e3f284","name":"","order":0,"width":0,"height":0,"format":"<div ng-bind-html="\"msg.payload\""></div>
","storeOutMessages":true,"fwdInMessages":true,"templateScope":"local","x":560,"y":20,"wires":[[]]},{"id":"429116d1.848668","type":"mraa-gpio-ain","z":"3fb67b7c.e3f284","name":"analog read from A5 direct on arduino","pin":"5","interval":"3000","x":370,"y":340,"wires":[[]]},{"id":"4737672b.12dae8","type":"debug","z":"3fb67b7c.e3f284","name":"","active":false,"tosidebar":true,"console":false,"tostatus":false,"complete":"false","x":370,"y":200,"wires":[]},{"id":"cce1ad13.41e08","type":"switch","z":"3fb67b7c.e3f284","name":"","property":"payload","propertyType":"msg","rules":[{"t":"eq","v":"writeDistanceFile","vt":"str"},{"t":"false"}],"checkall":"true","repair":false,"outputs":2,"x":330,"y":120,"wires":[["a7437f1.cc03b8"],["165b28b9.1adc37"]]},{"id":"165b28b9.1adc37","type":"file","z":"3fb67b7c.e3f284","name":"clr read-distance-signal-output.txt","filename":"/home/root/signal-arduino/read-distance-signal-output.txt","appendNewline":false,"createDir":false,"overwriteFile":"true","encoding":"none","x":560,"y":140,"wires":[["1f26e9bf.4a91a6"]]},{"id":"1f26e9bf.4a91a6","type":"debug","z":"3fb67b7c.e3f284","name":"","active":true,"tosidebar":true,"console":false,"tostatus":false,"complete":"false","x":790,"y":140,"wires":[]},{"id":"86e8b8cc.a84dc8","type":"switch","z":"3fb67b7c.e3f284","name":"","property":"payload","propertyType":"msg","rules":[{"t":"eq","v":"writeGasFile","vt":"str"},{"t":"false"}],"checkall":"true","repair":false,"outputs":2,"x":350,"y":280,"wires":[["cdb8fe01.b2d08"],["593310eb.1e5c4"]]},{"id":"593310eb.1e5c4","type":"file","z":"3fb67b7c.e3f284","name":"clr read-gas-signal-output.txt","filename":"/home/root/signal-arduino/read-gas-signal-output.txt","appendNewline":false,"createDir":false,"overwriteFile":"true","encoding":"none","x":560,"y":300,"wires":[["a428d07c.f46d7"]]},{"id":"a428d07c.f46d7","type":"debug","z":"3fb67b7c.e3f284","name":"","active":true,"tosidebar":true,"console":false,"tostatus":false,"complete":"false","x":770,"y":300,"wires":[]},{"id":"514d33ab.77991c","type":"ui_group","z":"","name":"Default","tab":"791a2c28.106194","disp":true,"width":"6","collapse":false},{"id":"791a2c28.106194","type":"ui_tab","z":"","name":"Home","icon":"dashboard","disabled":false,"hidden":false}]<br><br>
Step 8: Writing Arduino --> Node-RED & Node-RED --> Arduino Code Setup


It's also necessary to add a bit of code to the "Arduino"-side of the IoT2040, in order to enable full communication. Below is included an example of how such a sketch could look like, all that's needed is to download the sketch or copy-paste from below. Inside the Arduino-editor, under "Tools", it's important to choose the correct board, which in this case is: "Intel® Galileo Gen2". However, to enable this board, it's necessary to again go under "Tools", "Boards" and then "Board Manager", where one is to search for "i586" and installing package: "Intel i586 Boards". By doing this, it's will then be possible to use the board on the IoT2040.
As mentioned briefly before the communication of the IoT2040 is at it's core, to allow control of communication with values from two sensors through enabling and disabling as well as enabling or disabling control of a stepper motor, by telling the "Arduino"-side of the IoT2040 to run a specific part of the code.
Furthermore, it's also possible to control the delay of the Arduino-code from one communication of values to the next enabled. Of course the main part of the Node-RED flow, is to receive values from the two sensors and controlling the stepper motor which is configurable from the custom interface. Historic values are also available through a local database on the IoT2040-device, allowing the user to store valuable information of previous reading. All values of sensors, stepper and delay will be sent to ThingSpeak via HTTP through an established ethernet-connection to the internet. The aforementioned values will also be sent to a Google Sheets document, setup through a later step in this Instructable and via a similar method of HTTP and ethernet-connection.
// #include <time.h>

FILE *myInputWriteFolder; // folders for writing
FILE *myOutputReadFolder; // folders for reading
FILE *myFile; // files for writing
FILE *myDistanceWriteFile;
FILE *myGasWriteFile;
FILE *myStepperReadFile;
FILE *myCheckReadDistanceFile; // files for reading
FILE *myCheckReadGasFile;
FILE *myCheckWriteStepperFile;
FILE *myFifo1File; // some fifo files
//String writeDistanceFile = "writeDistanceFile";
String writeDistanceFileString;
String writeGasFileString;
String readStepperFileString;
//int writeGasFile;
//int readStepperFile;
/*
  struct ReadSignal
  {
  char DistanceFile[20];
  char GasFile[20];
  char StepperFile[20];
  };
*
//char ReadDistanceFile[20];
//ReadSignal dataread;
int i;
int g;
int t;
char logstring[100];
time_t curtime;
char timestring[100];<br>char ReadDistanceString[100]; //char and int for reading
char DebugDistanceString[100];
int workDistance;<br>char ReadGasString[100]; //char and int for reading
char DebugGasString[100];
int workGas;<br>// char ReadStepperString[100]; // char and int for reading
char DebugReadStepperString[100];
int workReadStepper;<br>char WriteStepperString[100]; //char and int for writing
char DebugWriteStepperString[100];
int workWriteStepper;<br>const int trigPin = 9; // pins for distance measuring
const int echoPin = 10;<br>long duration; // variables also for distance measuring
int distance;
char distanceChar[10];
String distanceString;
char distanceStringChar[50];<br>int smokeA0 = A5; // variables for gas measuring
int sensorThres = 400; // threshold value
char analogSensorChar[10];
String analogSensorString;
char analogSensorStringChar[50];
void setup()
{
  pinMode(trigPin, OUTPUT); // Sets the trigPin as an Output
  pinMode(echoPin, INPUT); // Sets the echoPin as an Input<br>  pinMode(smokeA0, INPUT);<br>  sleep(3); // Just to have some time to open the serial monitor...
  Serial.begin(9600);
  Serial.println("Arduino Code start...");
  //work = 55;
  /*
    myFile = fopen("/home/root/input-output-arduino/test.txt", "a+"); // open the file
    if (!myFile) {
    Serial.println("couldn't open - file doesn't exist, will create"); // Create the file
    system("touch /home/root/input-output-arduino/test.txt");
    }
  */
  // CHECK & CREATE INPUT-ARDUINO FOLDER
  myInputWriteFolder = fopen("cd /home/root/input-arduino/", "r+"); // check folder input-arduino exist // for r+ overwrites first line
  if (!myInputWriteFolder) {
    Serial.println("No 'input-arduino' folder, trying to create");
    system("mkdir /home/root/input-arduino/"); // create folder if not exist
    myInputWriteFolder = fopen("/home/root/input-arduino/", "r+"); // check folder input-arduino exist again
    if (!myInputWriteFolder) {
      Serial.println("An error occurred - Unable to create 'input-arduino' folder");
    }
    else if (myInputWriteFolder) {
      Serial.println("Success creating 'input-arduino' folder");
    }
  }
  // CHECK & CREATE OUTPUT-ARDUINO FOLDER
  myOutputReadFolder = fopen("/home/root/output-arduino", "a+"); // check folder output-arduino exist
  if (!myOutputReadFolder) {
    Serial.println("No 'output-ardunio' folder, trying to create");
    system("mkdir /home/root/output-arduino/"); // create folder if not exist
    myOutputReadFolder = fopen("/home/root/output-arduino/", "a+"); // check folder output-arduino exist again
    if (!myOutputReadFolder) {
      Serial.println("An error occurred - Unable to create 'input-arduino' folder");
    }
    else if (myOutputReadFolder) {
      Serial.println("Success creating 'output-arduino' folder");
    }
  }
  // OPEN & CREATE INPUT-ARDUINO DISTANCE FILE
  myDistanceWriteFile = fopen("/home/root/input-arduino/write-distance-input.txt", "a+"); // try to open it
  if (!myDistanceWriteFile) {
    Serial.println("Couldn't open 'write-distance-input.txt' - file might not exist, trying to create");
    system("touch /home/root/input-arduino/write-distance-input.txt"); // then create
    fclose(myDistanceWriteFile); // close the file
  }
  // OPEN & CREATE INPUT-ARDUINO GAS FILE
  myGasWriteFile = fopen("/home/root/input-arduino/write-gas-input.txt", "a+"); // try to open it
  if (!myGasWriteFile) {
    Serial.println("Couldn't open 'write-gas-input.txt' - file might not exist, trying to create");
    system("touch /home/root/input-arduino/write-gas-input.txt"); // then create
    fclose(myGasWriteFile); // close the file
  }
  // OPEN & CHECK OUTPUT-ARDUINO STEPPER FILE
  myStepperReadFile = fopen("/home/root/output-arduino/read-stepper-output.txt", "a+"); // try to open it
  if (!myStepperReadFile) {
    Serial.println("Couldn't open 'read-stepper-output.txt' - file might not exist, are you connected to node-red?");
    fclose(myStepperReadFile); // close the file
  }
  /*
    else if (myFile) {
    Serial.println("success opening - file exists, will eliminate");
    system("rm /home/root/input-output-arduino/test.txt");
    system("touch /home/root/input-output-arduino/test.txt");
    }
  */
  // IF CONNECTION INPUT-ARDUINO DISTANCE FILE READY
  else if (myDistanceWriteFile) {
    Serial.println("Successfully opened 'write-distance-input.txt'- connection ready");
    fclose(myDistanceWriteFile); // close the file
  }
  // IF CONNECTION INPUT-ARDUINO GAS FILE READY
  else if (myGasWriteFile) {
    Serial.println("Successfully opened 'write-gas-input.txt' - connection ready");
    fclose(myGasWriteFile); // close the file
  }
  // IF CONNECTION OUTPUT-ARDUINO STEPPER FILE READY
  else if (myStepperReadFile) {
    Serial.println("Successfully opened 'read-stepper-output.txt' - connection established");
    fclose(myStepperReadFile); // close the file
  }
}</p><p>void loop()
{
  //writeDistanceFile = 0;
  //writeGasFile = 0;
  //readStepperFile = 0;
  myCheckReadDistanceFile = fopen("/home/root/signal-arduino/read-distance-signal-output.txt", "a+"); // try to open it
  if (myCheckReadDistanceFile) {
    Serial.println("Success opening 'read-distance-signal-output.txt', reading command");
    //dataread. = atoi();
    //char ltr = myCheckReadDistanceFile.read();
    //SD_Read += ltr;
    //Serial.println(SD_Read);<br>    if (fgets(ReadDistanceString, 100, myCheckReadDistanceFile) != NULL) {
      Serial.println("Reading of 'read-distance-signal-output.txt, done.");
      workDistance = atoi(ReadDistanceString);
      writeDistanceFileString = String(ReadDistanceString);
      // writeDistanceFile = ReadDistanceString;
      Serial.println(workDistance);
      Serial.println(ReadDistanceString);
    } else {
      Serial.println("Error reading 'read-distance-signal-output.txt...");
    }
  } else if (!myCheckReadDistanceFile) {
    Serial.println("Failed to open 'read-distance-signal-output.txt, skipping...");
  }
  //sprintf(debugstring, "work = %d\n", work);
  Serial.println(DebugGasString);
  fclose(myCheckReadDistanceFile); // close the file<br>  delay(5000);</p><p>  myCheckReadGasFile = fopen("/home/root/signal-arduino/read-gas-signal-output.txt", "a+"); // try to open it
  if (myCheckReadGasFile) {
    Serial.println("Success opening 'read-gas-signal-output.txt', reading command");    if (fgets(ReadGasString, 100, myCheckReadGasFile) != NULL) {
      Serial.println("Reading of 'read-gas-signal-output.txt, done.");
      workGas = atoi(ReadGasString);
      writeGasFileString = String(ReadGasString);
      Serial.println(workGas);
      Serial.println(ReadGasString);
    } else {
      Serial.println("Error reading 'read-gas-signal-output.txt...");
    }
  } else if (!myCheckReadGasFile) {
    Serial.println("Failed to open 'read-gas-signal-output.txt, skipping...");
  }
  //sprintf(debugstring, "work = %d\n", work);
  Serial.println(DebugGasString);
  fclose(myCheckReadGasFile); // close the file<br>  delay(5000);<br>  myCheckWriteStepperFile = fopen("/home/root/signal-arduino/read-stepper-output.txt", "a+"); // try to open it
  if (myCheckWriteStepperFile) {
    Serial.println("Success opening 'read-stepper-output.txt', reading command");<br>    if (fgets(ReadStepperString, 100, myCheckWriteStepperFile) != NULL) {
      Serial.println("Reading of 'read-stepper-output.txt, done.");
      workWriteStepper = atoi(ReadStepperString);
      readStepperFileString = String(ReadStepperString);
      Serial.println(workWriteStepper);
      Serial.println(ReadStepperString);
    } else {
      Serial.println("Error reading 'read-stepper-output.txt...");
    }
  } else if (!myCheckWriteStepperFile) {
    Serial.println("Failed to open 'read-stepper-output.txt, skipping...");
  }
  //sprintf(debugstring, "work = %d\n", work);
  Serial.println(DebugWriteStepperString);
  fclose(myCheckWriteStepperFile); // close the file<br>  //writeDistanceFile = workDistance;
  //writeGasFile = workGas;
  //readStepperFile = work;<br>  delay(5000);<br>  int analogSensor = analogRead(smokeA0); //initialize gas sensor
  sprintf(analogSensorChar, "%d\n", analogSensor); //convert gas reading to char<br>  digitalWrite(trigPin, LOW); // Clears the trigPin
  delayMicroseconds(2);
  digitalWrite(trigPin, HIGH); // Sets the trigPin on HIGH state for 10 micro seconds
  delayMicroseconds(10);
  digitalWrite(trigPin, LOW);
  duration = pulseIn(echoPin, HIGH); // Reads echoPin, returns sound wave travel time in microseconds
  distance = duration * 0.034 / 2; //calculate the distance
  sprintf(distanceChar, "%d\n", distance); //convert distance to char<br>  myFile = fopen("/home/root/input-arduino/test.txt", "a+");<br>  if (writeDistanceFileString == "writeDistanceFile") {
    myDistanceWriteFile = fopen("/home/root/input-arduino/write-distance-input.txt", "r+"); // try to open it // r+ overwrites first line
    if (myDistanceWriteFile) {
      Serial.println("Success opening file 'write-distance-input.txt', deleting then writing...");
      // system("rm /home/root/input-arduino/write-distance-input.txt"); // remove arduino Distance data write file
      fclose(myDistanceWriteFile);<br>      myDistanceWriteFile = fopen("/home/root/input-arduino/write-distance-input.txt", "r+"); // try to open it // r+ overwrites first line PROPER
      if (myDistanceWriteFile) {
        // system("touch /home/root/input-arduino/write-distance-input.txt"); // create arduino Distance data write file
        digitalWrite(trigPin, LOW); // Clears the trigPin
        delayMicroseconds(2);
        digitalWrite(trigPin, HIGH); // Sets the trigPin on HIGH state for 10 micro seconds
        delayMicroseconds(10);
        digitalWrite(trigPin, LOW);
        duration = pulseIn(echoPin, HIGH); // Reads echoPin, returns sound wave travel time in microseconds
        distance = duration * 0.034 / 2; //calculate the distance
        sprintf(distanceChar, "%d\n", distance); //convert distance to char</p><p>        fprintf(myDistanceWriteFile, distanceChar, "%\n");
        fclose(myDistanceWriteFile);
      }
      else if (!myDistanceWriteFile) {
        Serial.println("File spontanously dissappeared!");
      }
    }
    else if (!myDistanceWriteFile) {
      while (t < 2) {
        Serial.println("Failed to open 'write-distance-input.txt', retrying once...");
        system("touch /home/root/input-arduino/write-distance-input.txt"); // create arduino Distance data write file
        myDistanceWriteFile = fopen("/home/root/input-arduino/write-distance-input.txt", "a+"); // try to open it again
        if (!myDistanceWriteFile) {
          t++;
          Serial.println("Still not able to open 'write-distance-input.txt'");
          // int t = 2; // just breakout
        }
      }
      int t = 0; // too many attempts reset after breakout
    }
  }
  else if (writeDistanceFileString == "false") {
    Serial.println("'false'-signal in 'read-distance-signal-output.txt' from Node-RED, won't write value");
  }
  else {
    Serial.println("Error reading 'read-distance-signal-output.txt', skipping...");
  }<br>  if (writeGasFileString == "writeGasFile") {
    //system("touch /home/root/input-arduino/write-gas-input.txt"); // create arduino Gas data write file
    myGasWriteFile = fopen("/home/root/input-arduino/write-gas-input.txt", "r+"); // try to open it
    if (myGasWriteFile) {
      Serial.println("Success opening file 'write-gas-input.txt', writing...");
      // system("rm /home/root/input-arduino/write-gas-input.txt"); // remove arduino Distance data write file
      fclose(myGasWriteFile);<br>      myGasWriteFile = fopen("/home/root/input-arduino/write-gas-input.txt", "r+"); // try to open it
      if (myGasWriteFile) {
        system("touch /home/root/input-arduino/write-gas-input.txt"); // create arduino Distance data write file<br>        int analogSensor = analogRead(smokeA0); //initialize gas sensor
        sprintf(analogSensorChar, "%d\n", analogSensor); //convert gas reading to char<br>        fprintf(myGasWriteFile, analogSensorChar, "%\n");
        fclose(myGasWriteFile);
      }
      else if (!myGasWriteFile) {
        Serial.println("File spontanously dissappeared!");
      }
    }
    else if (!myGasWriteFile) {
      Serial.println("Failed to open 'write-gas-input.txt', skipping...");
    }
  }
  else if (writeGasFileString == "false") {
    Serial.println("'false'-signal in 'read-gas-signal-output.txt' from Node-RED, won't write value");
  }
  else {
    Serial.println("Error reading 'read-gas-signal-output.txt', skipping...");
  }

  // READ FROM OUTPUT-ARDUINO FILE TO DO THINGS
  if (readStepperFileString == "readStepperFile") {
    myStepperReadFile = fopen("/home/root/output-arduino/write-stepper-output.txt", "a+"); // try to open it
    if (myStepperReadFile) {
      Serial.println("Success opening file 'write-stepper-output.txt', reading...");
      if (fgets(WriteStepperString, 100, myStepperReadFile) != NULL) {
        Serial.println("Reading of 'write-stepper-output.txt, done.");
        workWriteStepper = atoi(WriteStepperString);<br>        Serial.println(workWriteStepper);
        Serial.println(WriteStepperString);
      } else {
        Serial.println("Error reading 'write-stepper-output.txt...");
      }
    }
    else if (!myStepperReadFile) {
      Serial.println("Failed to open 'write-stepper-output.txt, skipping...");
    }
    //sprintf(debugstring, "work = %d\n", work);
    Serial.println(DebugWriteStepperString);
    fclose(myStepperReadFile); // close the file
  }
  else if (readStepperFileString == "false") {
    Serial.println("'false'-signal in 'write-stepper-output.txt' from Node-RED, won't read value");
  }
  else {
    Serial.println("Error reading 'write-stepper-output.txt', skipping...");
  }
  Serial.println();
  delay(5000);                       // wait for a second<br>
Attachments
Step 9: Sending Data to ThingSpeak


This part is actually pretty simple. Since it's preferable to safely send the data to a place where it can be accessed everywhere, a neat solution is using GET through an API. The requirements a simply an API-key as well as pointing the data towards the right place through a designation such as 1-8. Since HTTP is used, this allows one to use a web address containing the API-key to ensure the right channel is used as well as the aforementioned 1-8 designation of which of the data-fields should be used. Using the HTTP node in Node-RED one will be able to easily transfer data to the generated URL. A setup of this is included and attached in the previous Node-RED step.
Step 10: Making It Send to a Google Sheets Document


In addition to sending the data of the sensor and stepper values, another option is to send all of the received data to a Google Sheets document via HTTP by creating a Google Forms document and allowing it to export a Sheets-file and updating it automatically. This has already been set-up in the included Node-RED flow but how it's possible to get there hasn't been explained yet. First step is of course to create a Google Forms document.
Through an examination of the HTTP node in the included flow, it's relevant to note how similar the GET set-up is to the equivalent in the ThingSpeak node, but where they differ is through the URL. Where ThingSpeak allows using GET to a channel using a simple 1-8 designation as a pointer for a specific placement, the Google Sheets method must use a specific entry "key", which is found by examining the HTML on the Google Forms document. What's then needed is every possible entry "key" from the answer field in the Google Forms document. Following this data a simple edit of the shared link in Google Forms allows one to end up with a link similar to ThingSpeak consisting of an API designation as well as a destination for the data.
The end result is a regularly updated Google Sheets document with data from the IoT2040-device.
Participated in the
Robotics Contest


