Using ESP8266 SPIFFS

211K7344

Intro: Using ESP8266 SPIFFS

Introduction

Did you know each ESP8266 allows you to partition the system flash such that you can use it to store both code and support a file system?

This filing system can be used to store infrequently changing data such as; web pages, configurations, sensor calibration data etc.

This short Instructable details how to use SPIFFs, configure your Arduino IDE to upload files direct to your ESP8266 and figure out how much flash your device has.

.

What parts do I need?
System entry requirements;

  1. Your Arduino IDE has been set up to programme the ESP8266 (Setting Up the Arduino IDE to Program the ESP8266-01)
  2. An ESP8266-01 programming device (Practical Circuit Construction With Strip Board, Step 9 onwards)
  3. An ESP8266-01

.

What software do I need?

  • Arduino IDE 1.6.9

.

What skills do I need?
To set the system up, use the source code (provided) you will need the following;

  1. Knowledge of Arduino and it's IDE,
  2. Some knowledge of the ESP8266,
  3. Some Patience.

.

Topics covered

  1. So what is SPIFFS,
  2. Installing the Arduino ESP8266 filesystem uploader,
  3. How can I tell how much flash memory my ESP8266 has?
  4. How to upload files to your ESP8266 SPIFFS,
  5. How to test your SPIFFS and see it in action,
  6. Conclusion,
  7. References used.

.

Note 1 : Actually the ESP8266 flash also supports OTA updates, however the scope of this Instructable is limited to that of the SPIFFS functionality.

Note 2 : Whilst the examples given uses the ESP8266-01 it works equally well with the ESP8266-07, ESP8266-12, ESP8266-12E, ESP8266-13, as implied by the Instructable image.

STEP 1: So What Is SPIFFS

SPIFFS

Which stands for SPI Flash Filing System was designed for SPI flash devices on constrained embedded microprocessor systems with little RAM.

What SPIFFS does:

  • Specifically designed for low ram usage
  • Uses statically sized ram buffers, independent of number of files
  • Posix-like api: open, close, read, write, seek, stat, etc
  • Implements static wear leveling to prolong the life of system flash

What SPIFFS does not do:

  • SPIFFS does not support directories and uses a flat structure. Creating a file with path tmp/myfile.txt will create a file called tmp/myfile.txt instead of a myfile.txt under directory tmp.
  • It is not a real time stack. One write operation might take much longer than another. So is best used at start up, shut down or when time critical activities are not scheduled.
  • Presently, it does not detect or handle bad blocks.

.

STEP 2: Installing the Arduino ESP8266 Filesystem Uploader

To install the Arduino ESP8266 filesystem uploader carry out the following;

    1. Go here and download a copy of 'ESP8266FS-0.2.0.zip,
    2. Unzip the file,
    3. Drop the esp8266fs.jar file into Arduino tool directory (the path will look something like [home_dir]\Arduino\tools\ESP8266FS\tool\esp8266fs.jar),
      • In my case (as in pic 1 above);
      • C:\Users\Win 7\Documents\Arduino\tools\ESP8266FS\tool
      • I needed to create;
      • tools\ESP8266FS\tool\
      • Under;
      • C:\Users\Win 7\Documents\Arduino\
    4. Restart Arduino IDE.

    .

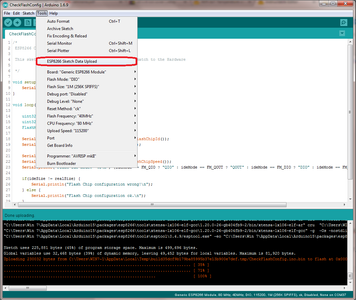
    If you have got it correct you will see a new menu item 'ESP8266 Sketch Data Upload' under under 'Tools' as in pic 2 above.

    STEP 3: How Can I Tell How Much Flash Memory My ESP8266 Has?

    Given most of these ESP8266 devices are sourced from Chinese suppliers who are less than forthcoming in releasing clear and concise product data, one way to figure out how big your flash is to read the chip details (assuming they haven't been scrubbed) and carrying out an internet search. I did this for two of my ESP8266-01s;

    • BergMicro 25Q80ASSIG 1602 : 8M/bit
    • Winbond 25Q80DVSIG 1626 : 8M/bit

    Here the former and latter are 1M byte. The problem with this method of identification is it simply won't work with the ESP8266 variants which house all the active components under an RF shielding can such as the ESP8266-07 and ESP8266-12E etc.

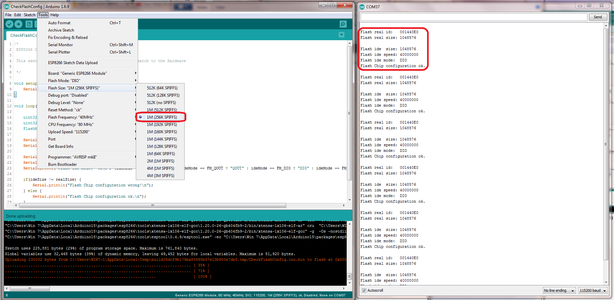
    Consequently, I found the most reliable and quickest method was to programme the device with the CheckFlashConfig.ino' sketch and review the output from the serial monitor as in Pic 1 above.

    .

    .

    You can download the full Arduino ESP8266 Core from here;

    and the CheckFlashConfig Source from here;

    Alternatively, copy given below.

    .

    STEP 4: How to Upload Files to Your ESP8266 SPIFFS

    Carryout the following to upload your files to the ESP8266 SPIFFS;

    1. Ensure you have a sub-directory within your sketch directory named 'data',
    2. Place the files you wish to upload into the 'data' directory,
    3. From 'Tools' menu, select the correct ESP8266 device and choose the 'Flash Size' with the SPIFFS you require ie. '1M (256K SPIFFS)'. See pics 1 and 2 above,
    4. Ensure the serial monitor dialogue box is closed,
    5. Prepare the ESP8266 device for upload;
      1. Hold down 'Flash',
      2. Pulse 'Reset'
      3. Release 'Flash',
    6. From Tools menu select 'ESP8266 Sketch Data Upload' See pic 3 top of image,
    7. Once upload is complete. Arduino IDE message window will show 100% upload. See pic 3 bottom of image.

    .

    Note 1 : If an error message such as the one in Pic 4 occurs indicating 'SPIFFS Upload failed!'. Try unplugging/re-plugging your device's USB to serial adapter (FTDI) and repeating steps 1...7.

    Note 2 : SPIFFS content can be uploaded independently of programme code.

    Note 3 : If 'Flash Size' is changed, then programme code and SPIFFS will need to be reloaded.

    .

    STEP 5: How to Test Your SPIFFS and See It in Action

    To see a working example of SPIFFs carryout the following;

    1. Download the 'SPIFFsUsage.ino' sketch below,
    2. Unzip it and drop it into your Arduino sketches directory
      • Mine is here; C:\Users\Win 7\Documents\Arduino\My Progs
      • You will note there is a sub-directory named 'data' within which is a text filenamed 'testfile.txt'
    3. Select the flash geometry of your target system and the code space/SPIFFs size split you require (Tools->Flash Size),
    4. Ensure the serial monitor dialogue box is closed,
    5. Upload the text file to your ESP8266 device as described above in Step 4,
    6. Open the serial monitor dialogue box and set the baud rate to 115200,
    7. Upload 'SPIFFsUsage.ino' to ESP8266 device.

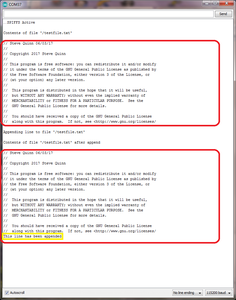
    Once you have completed the upload, the code will execute and your serial monitor dialogue will display text as in pic 1 above.

    It serves to show the contents of 'testfile.txt';

    1. Has been successfully uploaded,
    2. Located in the file system,
    3. Opened for read,
    4. Read until the end of file has been reached,
    5. Closed,
    6. Opened for append,
    7. A single line written to the file,
    8. The file has been re-read, displaying the recently appended line to the end of the file.

    .

    Note : If the ESP8266 is powered down or reset, upon each successive execution a new line is automatically appended and displayed.

    STEP 6: Conclusion

    Use of SPIFFS is a great way to store infrequently changing data though it should not be considered for applications requiring many write accesses as it will eventually cause flash to fail. A typical worked example of how long flash is likely to last is given here.

    Using the on-board filing system could save on I/O count where SPI SD card functionality is being considered for an I/O constrained device such as the ESP8266-01 where it is a very simple way to add secondary store without the need for 4 /I/O lines.

    STEP 7: References Used

    34 Comments

    This doesn't work any more. the IDE has changed and the plugin can't find esptool anymore. The location is hardcoded in the jar file.

    This is the first result for uploading to SPIFFS. You should remove it. it's obsolete.

    Also, several of your links are dead.
    FIrst I downloaded the file ESP8266FS-0.2.0.zip. After unzipping I found the following:
    ls
    bin LICENSE.txt make.shREADME.md screenshot.png src

    There's no [home_dir]\Arduino\tools\ESP8266FS\tool\esp8266fs.jar), jar file in here.
    Running the make.sh script failed to find the requested paths, so I used locate (running on linux) to find them. Turns out they are in ~/arduino/lib/ which is probably arduino-1.10. So I copied make.sh and modified it to hardcode the paths. It compiled OK but didn't generate a jar file so I ran
    jar cvf esp8266fs.jar *.class
    from ~/Documents/Arduino/tools/arduino-esp8266fs-plugin/bin/com/esp8266/mkspiffs
    I now have a jar file.
    Here's what the ls ~/sketchbook/tools file tree looks like: and my Tools list. Yes I restarted Arduino multiple times.
    I upload binary code to SPI flash by using your method.
    how can I make ESP8266(nodemcu) run the code that I uploaded to SPI flash??
    The procedures in step 4 ...

    5. Prepare the ESP8266 device for upload;

    1. Hold down 'Flash',
    2. Press 'Reset'
    3. 'Flash' Release,

    Are they also required for ESP32? (I did not know that).

    Thanks for the tutorial; very useful tips.
    On a nodeMCU 1.0 (ESP-12E), it seems to work without the need to press the buttons.
    - Arduino IDE 1.8.12
    - ESP8266FS version 0.50
    - Connected with usb cable

    Thanks for the clear instructions.
    Hi sacp,

    That's because the device has an on-board CH340g (or other USB to 3v3 serial converter) which handles the pulsing via the RTS and DTR lines as I mention in the comment to dancopy below.

    Regards
    SteveQuinn
    I didn't directly associate. Maybe I just read it very late in the night.
    Thanks for coming back and clarify.

    Best regards
    Sergio
    To be honest the whole auto download thing is a bit sketchy.
    In the past I have purchased boards fitted with FTDI, CH340s and CP2102s etc. some work out of the box and some need a little encouragement (bigger cap adding).
    The only thing I can say is, I've never had any issues with mandrolic process.
    Hi dancopy,
    It depends on how you 'wire up' your ESP32. If you adopt a minimal approach you will need flash and reset buttons. Though I have seen auto mode switching by using the RTS and DTR lines on an FTDI.
    So far I've only experimented with the raw ESP32 so have been pressing the F/R combo by hand.
    You'll also need a different uploader.
    I recently went through a compatability exercise details below (my Arduino IDE was too old to support the ESP32);

    Arduino IDE : v1.8.5
    Boards Mngr ESP8266 by ESP8266 Community : v2.4.2
    Boards Mngr ESP32 by espressif systems : v1.0.2
    SPIFFS ESP8266 arduino-esp8266fs-plugin : v0.4.0
    SPIFFS ESP32 arduino-esp32fs-plugin : v1.0

    Get SPIFFS ESP8266FS Plugins here (arduino-esp8266fs-plugin)
    https://github.com/esp8266/arduino-esp8266fs-plugi...
    Get SPIFFS ESP32FS Plugins here (arduino-esp32fs-plugin)
    https://github.com/me-no-dev/arduino-esp32fs-plugi...
    For Arduino IDE v1.8.5
    Insall here;
    C:\Program Files (x86)\Arduino\tools\ESP8266FS\tool

    I also tested both ESP8266 and ESP32 spiffs equivalent solutions (they are slightly different in implementation) by way of creating generic IoT devices to be used in my series on IoT.
    If you're interested the source for both are here;
    https://github.com/SteveQuinn1/Generic_IoT_Framework_ESP32
    https://github.com/SteveQuinn1/Generic_IoT_Framework_ESP8266

    I hope this helps

    Regards
    SteveQuinn
    Many thanks SteveQuinn
    I had not seen his message;
    I'll take a look
    Well done. The jar file should already be present when you have installed the ESP8266 boards. Should you get an error message in (e.g. version 1.9.0) like "SPIFFS Error:esptool not found" then that is likely due to the move from the obsolete esptool-ck.exe to the supported esptool.py upload tool. The error means that the application has no idea how to use esptool.py. upgraders from pre 2.5.1 will need to update the ESP8266FS tool to 0.4.0 or later. The version 4 file needs to go to {home_dir}/Arduino/tools/ESP8266FS/tool/esp8266fs.jar
    This is an excellent IBLE. But your tip was extremely helpful. I wasn't able to get the tool working in my Arduino 1.8.0 IDE. Upgrading to version 0.4.0 definitely helped!
    I've managed to upload the file. Now I've to see if I can read it back.

    thanks much for the excellent tip!
    Check out the reply to dancopy below regarding compatibility.

    Hi,
    I
    am using SPIFF in esp8266. But when I am not able to get the data once
    my device has been powered off. Is my assumption right that SPIFF data
    can be retained after power off. Below is my code:-
    #include <ESP8266WiFi.h>
    #include <FS.h>

    const char* filename = "/samplefile.txt";

    void setup()
    {
    int i;
    delay(1000);
    Serial.begin(115200);
    Serial.println();
    File f;

    if (SPIFFS.begin())
    {
    Serial.println("SPIFFS Initialize....ok");
    }
    else
    {
    Serial.println("SPIFFS Initialization...failed");
    }

    if (SPIFFS.format())
    {
    Serial.println("File System Formated");
    }
    else
    {
    Serial.println("File System Formatting Error");
    }

    if (SPIFFS.exists(filename))
    {
    Serial.println("File exist");
    f = SPIFFS.open(filename, "a+");
    if (!f)
    {
    Serial.println("file open failed");
    }
    else
    {
    Serial.println("Writing Data to File2");
    f.print("This is written in file2\n");
    }
    }

    else if (!(SPIFFS.exists(filename)))
    {
    Serial.println("File does not exist");
    File f = SPIFFS.open(filename, "w");
    if (!f)
    {
    Serial.println("file open failed");
    }
    else
    {
    //Write data to file
    Serial.println("Writing Data to File2");
    f.print("This is written in file1\r\n");
    }

    }
    f.close();

    if (SPIFFS.exists(filename))
    Serial.println("File exist2");

    f = SPIFFS.open(filename, "r");

    Serial.println("---------------------------------------");
    for (i = 0; i < f.size(); i++) //Read upto complete file size
    {
    Serial.print((char)f.read());
    }
    Serial.println("---------------------------------------");
    f.close();
    Serial.println("File Closed");
    }

    void loop()
    {
    delay(500);

    }

    Please help with this. All the help is highly appreciated.

    It's probably because you are calling SPIFFS.format(), each time you re-apply power.

    Making this call will wipe the flash filing system.

    Hi,
    Is this data gets saved in non volatile memory. Can I access the previous file after I have switched off the data

    Hi NeerajM36

    The hint is in the name 'SPI Flash Filing System'

    Yes it persists after a power cycle.

    Regards

    SteveQuinn

    Useless for me. I expected to be able to check the actual size of the flash chip on my board. But Chip ID displays 2048 Bytes and ESP8266 Sketch data upload gives an error.

    Hmmm, perhaps if your comment had been polite I would have been inclined to help.

    Works fine for me and many others by all accounts.

    Good luck with the debugging.

    I'm sorry, I didn't mean to insult you. I ordered on Aliexpress the memory chips Winbond 25Q32BVSIG to upgrade the Sonoff Basic up to 4GB. But seller sent the chips marked SST25VF64C (8GB) and I was looking for a way to check the operation and the real memory size. ESP.getFlashChipRealSize() returns 2048 bytes and 'ESP8266 Sketch Data Upload' gives an 'out of memory' error.

    Therefore, I believe your method allows you to check the operation of the original chip with real characteristics. It's not good for my case. But I had already found a way to check the real size and it turned out that my chips were a relabeled fake with a real size of 4GB. I wrote a program using FS.h which creates a files of 100 kB in SPIFFS until it give an error "cannot create file". This shows the approximate memory size. I'm sorry again, good luck.

    More Comments