Introduction: Using Raspberry Pi, Evaluate Humidity and Temperature With SI7006


Being an enthusiast for Raspberry Pi, we thought of some more spectacular experiments with it.
In this campaign, we will be measuring temperature and humidity that needs to be controlled, using a Raspberry Pi and SI7006, Humidity and Temperature sensor. So let's have a look on this journey to build a system to measure the moisture.
Step 1: Imperative Apparatus We Need


Without knowing exact parts, their value and where on earth to get them, it's really annoying. Don’t worry. We have that sorted that for you. Once you get your hands on all of the parts, the project will be as quick as Bolt in the 100m sprint.
1. Raspberry Pi
The first step was obtaining a Raspberry Pi board. The Raspberry Pi is a single-board Linux based computer. This general purpose mini PC whose little size, capabilities and low price make it viable for use in basic PC operations, modern applications like IoT, Home Automation, Smart Cities and much more.
2. I2C Shield for Raspberry Pi
In our opinion, the only thing the Raspberry Pi 2 and Pi 3 are truly lacking is an I²C port. The INPI2(I2C adapter) provides the Raspberry Pi 2/3 an I²C port for use with multiple I²C devices. It's available on DCUBE Store.
3. SI7006 Humidity and Temperature Sensor
The Si7006 I²C Humidity and Temperature Sensor is a monolithic CMOS IC integrating humidity and temperature sensor element, an analog-to-digital converter, signal processing, calibration data, and an I²C Interface. We purchased this sensor from DCUBE Store.
4. I2C Connecting Cable
We had the I²C connecting cable available at DCUBE Store.
5. Micro USB cable
The least complicated, but most stringent in terms of power requirement is the Raspberry Pi! The easiest way to power the Raspberry Pi is via the Micro USB cable.
6 . Ethernet(LAN) Cable/ USB WiFi Dongle
"be strong" I whispered to my wifi signal.
Get your Raspberry Pi connected with an Ethernet(LAN) cable and plug it into your network router. Alternative, look for a WiFi adapter and use one of the USB ports to access the wireless network. It's a smart choice, easy, small and cheap !
7. HDMI Cable/Remote Access
With HDMI cable on board, you can hook it up to a digital TV or to a Monitor. Want to save money! Raspberry Pi can be remotely accessed using different methods like-SSH and Access over the Internet. You can use the PuTTY open source software.
Money often costs too much.
Step 2: Making Hardware Connections


In general, the circuit is pretty straight forward. Make the circuit as per the schematic shown. The layout is relatively simple, and you should have no problems.
In our circumspection, we revised some basics of electronics just to refurbish our memory for hardware and software. We wanted to draw up a simple electronics schematic for this project. Electronic schematics are like a blueprint for electronics. Draw up a blueprint and follow the design carefully. For further research in electronics, YouTube might hold your interest(this is key!).
Raspberry Pi and I2C Shield Connection
First of all take the Raspberry Pi and place the I²C Shield on it. Press the Shield gently. When you know what you're doing, it's a piece of cake. (See the pic above).
Sensor and Raspberry Pi Connection
Take the sensor and connect the I²C Cable to it. For best performance of this cable, please remember I²C Output ALWAYS connects to the I²C Input. The same should be done for the Raspberry Pi with the I²C shield mounted over it.
The big advantage of using the I²C Shield/Adapter and the connecting cables is that we have no wiring issues that can cause frustration and be time-consuming to fix, especially when you are not sure where to begin troubleshooting. Its a plug and play option (This is plug, unplug and play. It’s so simple to use, it’s unbelievable).
Note : The brown wire should always follow the Ground (GND) connection between the output of one device and the input of another device.
Networking is important
To make our project a success, we need an internet connection for our Raspberry Pi. For this, you have options like connecting an Ethernet(LAN) cable with the home network. Also, as an alternative but convenient way is to use a WiFi adapter. Sometimes for this, you need a driver to make it work. So prefer the one with Linux in the description.
Powering of the Circuit
Plug in the Micro USB cable into the power jack of Raspberry Pi. Power it on and we're off.
With great power comes huge electricity bill !
Connection to Screen
We can either have the HDMI cable connected to a new monitor/TV or we can we be a little bit artistic to make a remotely connected Raspberry Pi which is economical using remote access tools like-SSH and PuTTY.
Remember, even Batman has to downsize in this economy.
Step 3: Python Programming Raspberry Pi

You can view the Python Code for the Raspberry Pi and SI7006 Sensor on our Github repository.
Before getting on to the program, make sure you read the instructions given in the Readme file and Setup your Raspberry Pi according to it. It will only take a moment if you get it out of the way first.
Humidity is the amount of water vapor in the air. Water vapor is the gaseous phase of water and is invisible. Humidity indicates the likelihood of precipitation, dew, or fog. Relative humidity (abbreviated RH) is the ratio of the partial pressure of water vapor to the equilibrium vapor pressure of water at a given temperature. Relative humidity depends on temperature and the pressure of the system of interest.
Below is the python code and you can clone and edit the code in any way you prefer.
# Distributed with a free-will license.
# Use it any way you want, profit or free, provided it fits in the licenses of its associated works. # SI7006-A20 # This code is designed to work with the SI7006-A20_I2CS I2C Mini Module available from ControlEverything.com. # https://www.controleverything.com/content/Humidity?sku=SI7006-A20_I2CS#tabs-0-product_tabset-2import smbus import time
# Get I2C bus bus = smbus.SMBus(1)
# SI7006_A20 address, 0x40(64) # 0xF5(245) Select Relative Humidity NO HOLD MASTER mode bus.write_byte(0x40, 0xF5)
time.sleep(0.5)
# SI7006_A20 address, 0x40(64) # Read data back, 2 bytes, Humidity MSB first data0 = bus.read_byte(0x40) data1 = bus.read_byte(0x40)
# Convert the data humidity = (125.0 * (data0 * 256.0 + data1) / 65536.0) - 6.0
# SI7006_A20 address, 0x40(64) # 0xF3(243) Select temperature NO HOLD MASTER mode bus.write_byte(0x40, 0xF3)
time.sleep(0.5)
# SI7006_A20 address, 0x40(64) # Read data back, 2 bytes, Temperature MSB first data0 = bus.read_byte(0x40) data1 = bus.read_byte(0x40)
# Convert the data cTemp = (175.72 * (data0 * 256.0 + data1) / 65536.0) - 46.85 fTemp = cTemp * 1.8 + 32
# Output data to screen print "Relative Humidity is : %.2f %%RH" %humidity print "Temperature in Celsius is : %.2f C" %cTemp print "Temperature in Fahrenheit is : %.2f F" %fTemp
Step 4: Practicality Mode
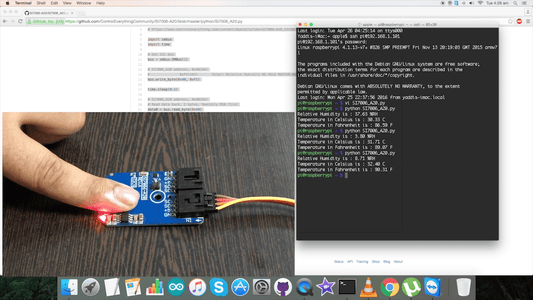
Now, download (or git pull) the code and open it on the Raspberry Pi.
Run the commands to Compile and Upload the code on the terminal and see the output on the Monitor. After few moments, it will screen all the parameters. After making sure that everything works perfectly, you can improvise and move further with the project taking it into more interesting places.
Step 5: Applications and Features
The Si7006 offers an accurate, low-power, factory-calibrated digital solution ideal for measuring humidity, dew point, and temperature, in applications like HVAC/R, Thermostats/Humidistats, Respiratory Therapy, White Goods, Indoor Weather Stations, Micro-Environments/Data Centres, Automotive Climate Control And Defogging, Asset And Goods Tracking And Mobile Phones And Tablets.
For e.g. How do I like my eggs ? Umm, in a cake !
You can build a project Student Classroom Incubator, an apparatus that is used for environmental conditions, such as temperature and humidity that needs to be controlled, using a Raspberry Pi and SI7006-A20. Hatching eggs in the classroom ! It will be a gratifying and informative science project and also the first hand on experience for students to view life form in its basic. The Student Classroom Incubator is a pretty quick project to build. The following should make for a fun and successful experience for you and your students. Let’s start with the perfect equipment before we hatch eggs with the young minds.
Step 6: Conclusion
Trust this undertaking rouses further experimentation. If you've been wondering to look into the world of the Raspberry Pi, then you can amaze yourself by making used of the electronics basics, coding, designing, soldering and what not. In this process, there might be some projects that may be easy, while some may test you, challenge you. For your convenience, we have an interesting video tutorial on YouTube which might open doors for your ideas. But you can make a way and perfect it by modifying and making a creation of yours. Have Fun and explore more!
You Can Never Expect The View To Change If You Keep Looking Out Of The Same Window...


