

Introduction: Vacuum Tube USB Memory Stick - Quite Impractical But Cool


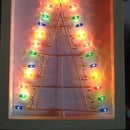
I wanted to give a try to the "conversion" of an old vacuum tube into a glowing USB Memory stick.
Though impractical, I find it cool and a nice accessory to start conversations at the local hackerspace.
Supplies

Here's what's needed:
- An old Vacuum tube, preferably a small one.
- A slim USB drive. The key-shaped Jaster ones are great since they are cheap and have activty led solder pads available.
- A 220 Ohms resistor
- An ultra bright red led (I've used a scavenged RGB Led, using only the red one).
- A bright yellow led
- A bit of very thin copper wire
- A 3D printer for the base
- A bit of 1mm brass wire
Step 1: Print the Base and Bottom Cover
Print the base and bottom cover.
You may need to adjust the model size to your actual tube size.


Step 2: Open the USB Drive and Cut It to Shape
Open the USB drive using a sharp "opener tool". The two sides are stuck together.
Use a dremmel with a cutting disk to cut the USB drive to fit in the base.
Step 3: Solder the Yellow Led

The yellow Led is soldered on the 2 solder pads located at the end of the USB drive, with the right polarity.
This is an activity led that blinks (turns off) when data is being transfered, and is on when no data is being transfered.
Take care, these pads are very fragile and break very easily (I broke 2 of them).
So first cut and bend the led leads so that it fits in the base, a little below the tube's bottom.
I stuck the led to the USB drive and then soldered a bit of thin copper wire between the solder pads and the Led leads.
Plug the drive in and check that the LED works as expected.
Step 4: Solder the Red Led


Solder the red led.
Here again I've shaped the led leads and stuck the LED onto the USB drive using a bit of hot glue.
Connect the anode to USB +5V via a 220 Ohms resistor, and connect the cathode to GND.
It's safe to test that the leds are working as expected before assembling the base.
Step 5: Assemble the Base


The assembly of the base is straightforward.
The usb drive is suck on the bottom cover using super-glue.
The tube is then stuck on the base using super-glue
Step 6: Add the Brass Harness
I wanted to give it some kind of steam-punk look, as well as protect the tube from shocks, to I bent a bit of 1mm brass wire to shape and stuck it in place using a bit of super-glue.
I had to drill the holes in the base using a 1.2mm bit since 3d printing was not accurate enough for these small holes.


