Introduction: Voice Home Automation
Step 1: Setup Amazon Echo Dot
- Download the Amazon Alexa App onto any device (cell phone, etc.).
- If you don't already have an Amazon account, create one.
- Login to Amazon Alexa App and hit begin setup.
- Choose the Echo Dot when the "Choose a Device" screen pops up.
- Choose language preference and hit continue.
- Make sure Echo Dot is plugged in and now hit the connect to wi-fi button on your device.
- Once theoragen ring appears on the Echo Dot, hit the continue button on your device.
- Now you will select the Amazon-XXX wi-fi to connect to the Dot in your device settings.
- Once your device is connected to the Dot, go back into the Alexa App and select the wi-fi network that the Dot should use once setup is done.
- Your Echo Dot will tell you it is ready when the setup it complete.
- Select No Speakers once the prompt on your device pops up.
- Select and confirm that you are the user and hit Later to allow Amazon to use your contacts.
- Skip inputting your phone number.
- Watch intro video and continue on to practice saying commands to access basic Alexa skills.
- Now you are ready to start creating and using Alexa Skills.
Step 2: Creating an Alexa Skill
- Go to your browser and google Amazon Alexa Skills.
- Click on the first link, which will bring you to Amazon's Website. Login using your Amazon account information.
- Now google Alexa Skills Kit and then click on the design tab underneath the Alexa Skills Kit- Build For Voice with Amazon.
- Fill out information needed and it will bring you to a page that says, "Get Started With Alexa".
- Click Get Started under the Alexa Skills Kit box.
- Click create a skill

- Name it and hit next

- Choose Custom and then create skill.

- The next several steps will show how to go through the process of creating invocations, utterances, intents, etc. Skip to step 16 if you do not care about seeing how each individual intent is built. Click on the invocation tab to the left of the screen. Choose an invocation name (this is what the phrase you will say to Alexa to initiate your skill). We chose "voice home".

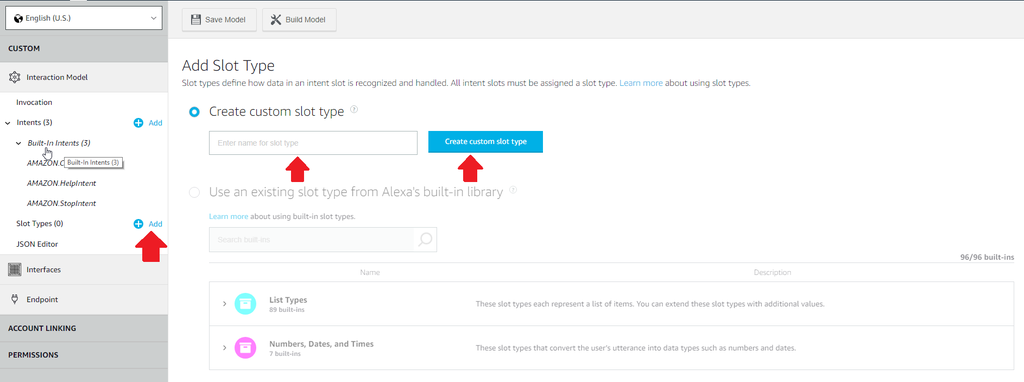
- Next click on the add button next to slot types in the left hand menu. Input a name for your custom slot type. Click create custom slot type.
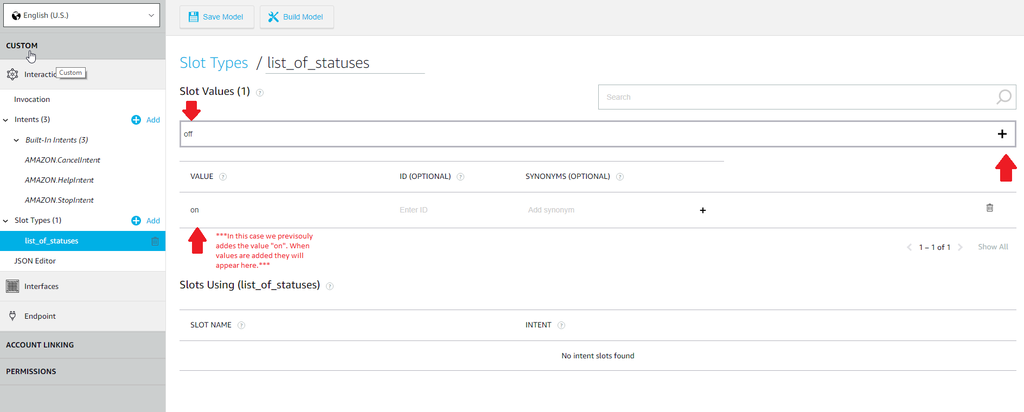
- Under slot value, add values for the custom slot type you created (ex. if your custom slot type were "list_of _statuses" referring to a light, then you would input "on" for a slot value and "off" for another). Click plus sign to add each individual value.
- Next click on Intents in the left hand menu. Click the add intent button and chose an intent name (this is what Alexa will refer to when you say the associated utterance phrase). Click create custom intent.
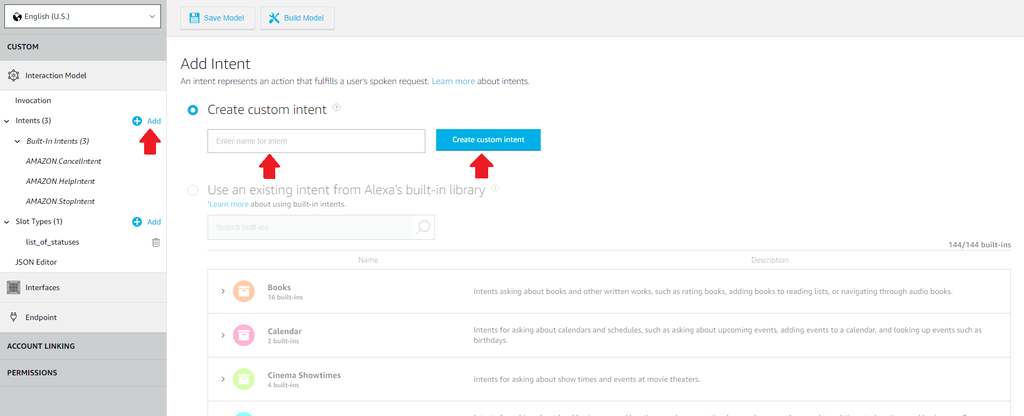
- Under Intent Slots (underneath utterances), add a name where it says create a new slot. Click the plus sign next to the name to add it.
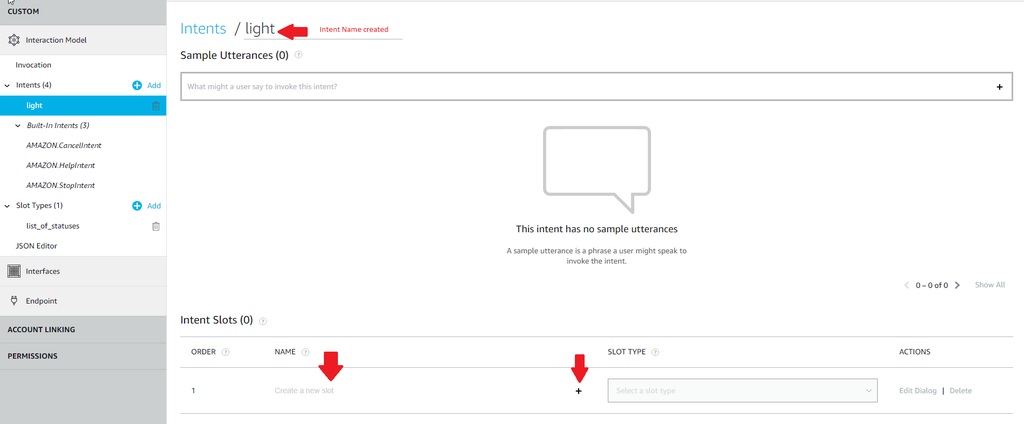
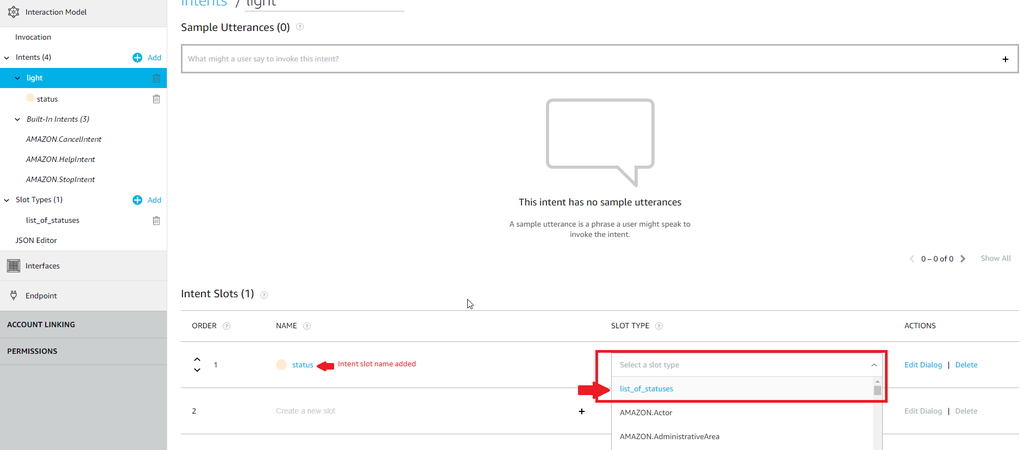
- Now select the slot type you created from the drop down menu.
- Now choose an utterance phrase (back up above slot types, this is the phrase that you would say to Alexa to invoke the intent. The utterance phrase can include the intent slot name inside of curly brackets. For example: turn on light {slot name}).

- *******Steps 9-15 show how to create one intent and utterance phrase that includes a slot type. For our specific project, in the file attached (intents.txt) there are a set of predefined intents, utterances, and slot types that can be used and edited to fit your specific home). Click on JSON editor and paste file contents over content currently inside of editor. Click on Build Model at the top of the page.*****

Attachments
Step 3: Creating a Lambda Function
- Google "Amazon AWS" and click on first link to bring you to Amazon AWS website.
- Create a user account (it will be different from your Amazon account created before).
- Login to your newly created account and click on AWS Management Console under my account drop down.
- Under AWS services search bar, search for "Lambda" and hit enter.
- Click create a function.

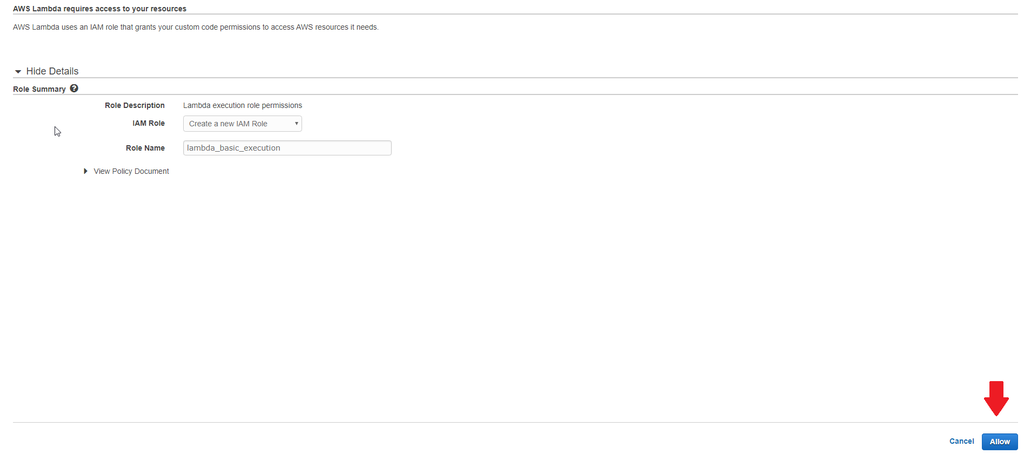
- Give your Lambda function a name. Make sure that under the runtime drop down menu, you have Node.js 6.10 selected. Under Role, select Create a custom Role.
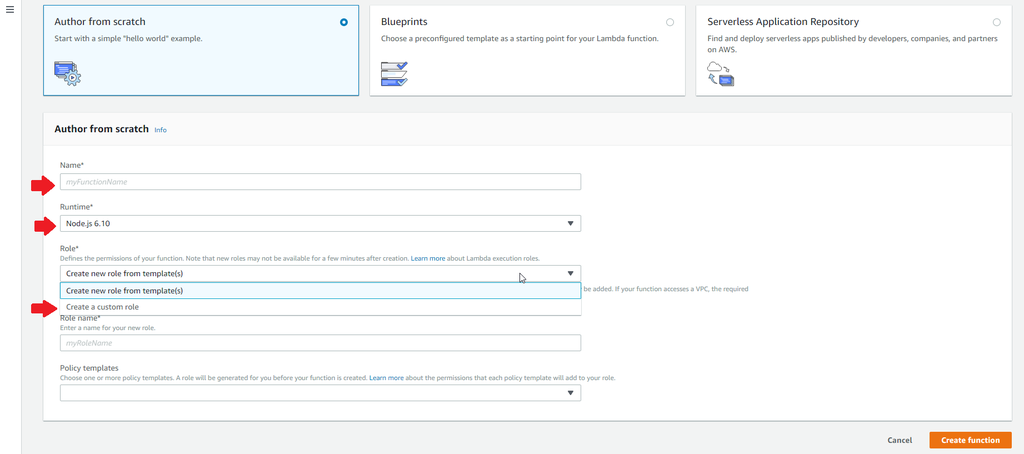
- A new screen will pop up, select allow.
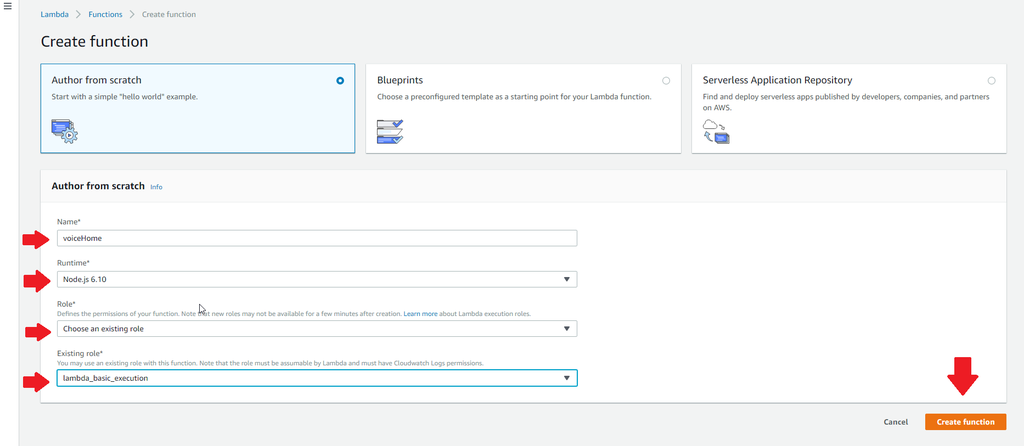
- Refresh the browser once you are returned to the screen you were previously on. Under Role, make sure "choose an existing role" is selected. Under existing role, choose "lambda_basic_execution" from the drop down list. Click create a function.
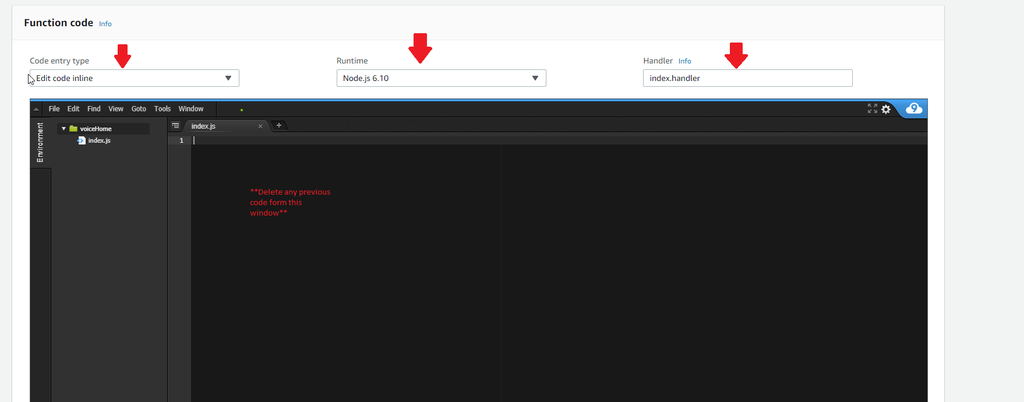
- Scroll down the page and under the Function Code area, ensure that code entry type is set to "edit code inline", runtime should be "Node.js 6.10", and the Handler should be "index.handler". Remove any previous code shown in this section and copy and paste the code from Lambda.txt in the attached file at the bottom of this section.
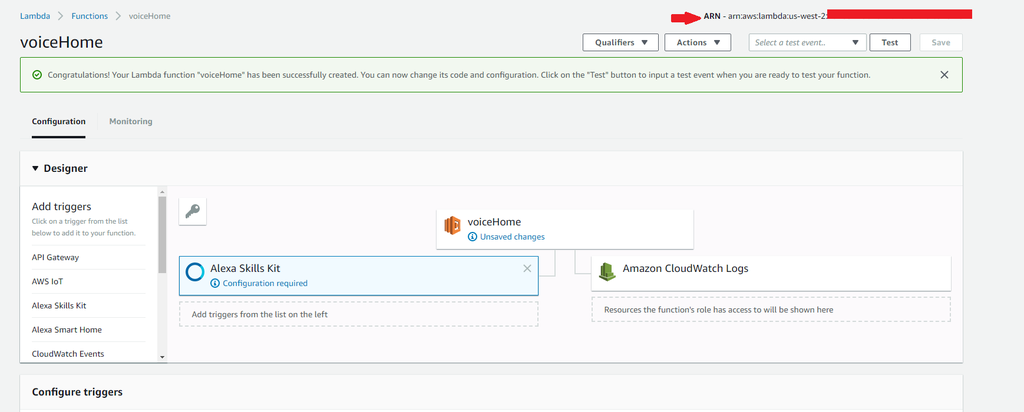
- At top of screen on the left hand side, in the add triggers menu, click on Alexa Skills Kit. At the bottom of the page you will see an empty skill ID field.

- Return to Alexa skills kit and at the top right of the screen, under "Your Alexa Consoles" click on Skills.

- Find the skill you created and click on view skill ID. Copy your skill ID.

- Return back to AWS Lambda screen and paste the skill ID in the empty skill ID field from step 11. Click add at the bottom of the screen and then save at the top of the screen.

- At top of screen on right side, there will be a ARN number. Copy this number and return to the Alexa Skills Kit page.
- Once on the Alexa Skills Kit Page, open your skill by clicking on edit and scroll to the bottom of the page. On the left hand menu click on Endpoint.

- Scroll back to the top of the page and select AWS Lambda ARN. Paste the copied ARN number in the default Region. Click Save Endpoints at the top of the screen.

Attachments
Step 4: Creating Internet of Things
- Click on the services drop down menu from the top of the AWS Lambda screen. There will appear a search bar, in this search bar type "AWS IoT".
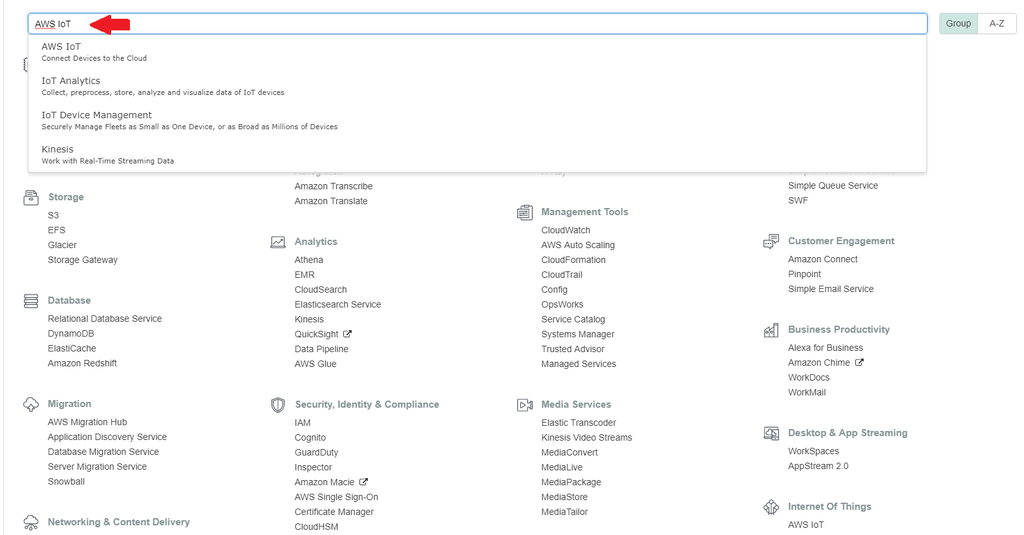
- Click get started once you select AWS IoT from the populated fields.

- In the left hand menu, click on manage. Then click on Register a thing.
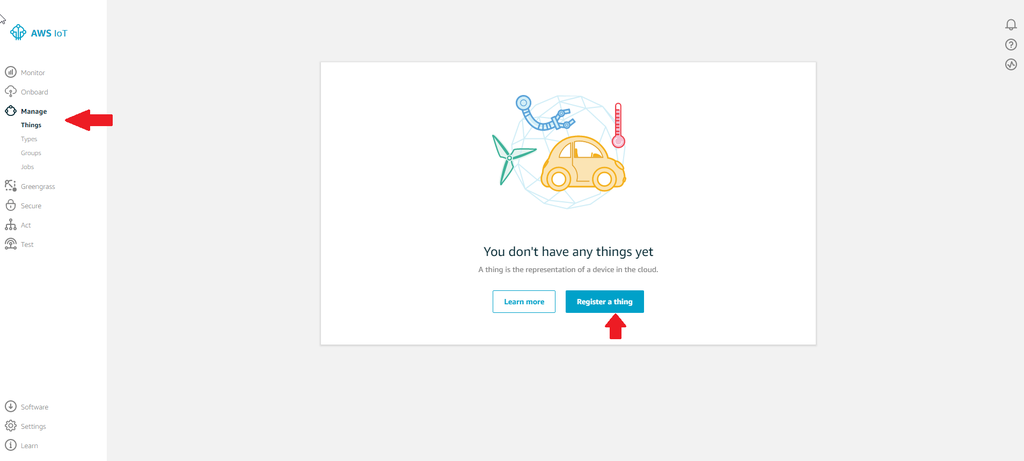
- Click create a single thing.

- Create a thing name and then scroll to the bottom of the screen and hit next.

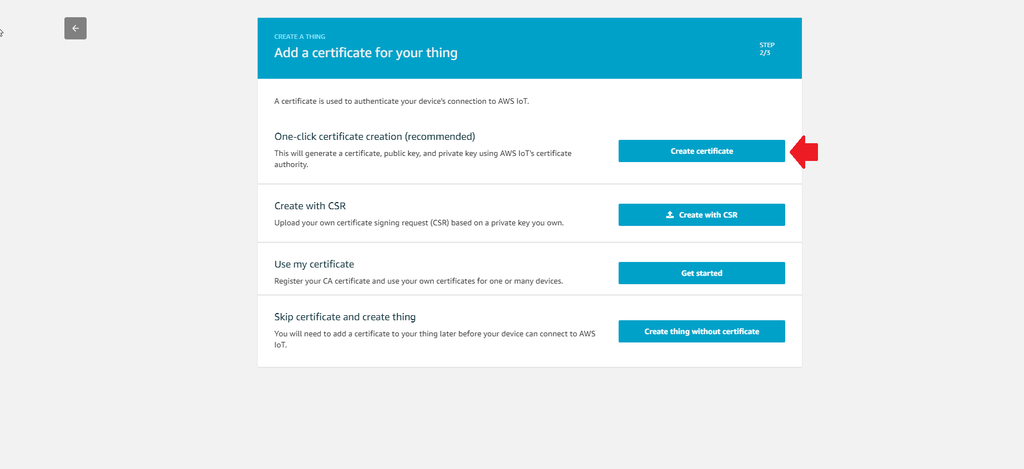
- Click create a certificate.
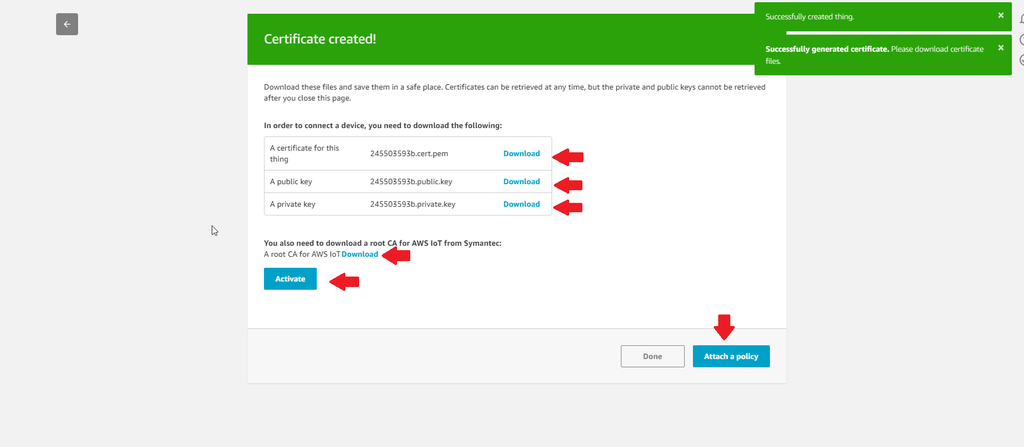
- Download generated certificate files for later use. Download root CA file also. The RootCA file will pop up in a browser. Copy the text in this file and save into a file called rootCA.crt. You will have a cert file, and a public and private key also downloaded. Change the name of your cert file to YourThingName.cert.pem (ex. if I named my thing RaspPI, my file would be called RaspPi.cert.pem). Change the public and private key file to YourThingName.private.key (or public.key). Return to browser and click Activate and then Attach a Policy.
- Click Register Thing.
- Under AWS IoT menu on left hand side, click on secure and then policies. Click Create a Policy.
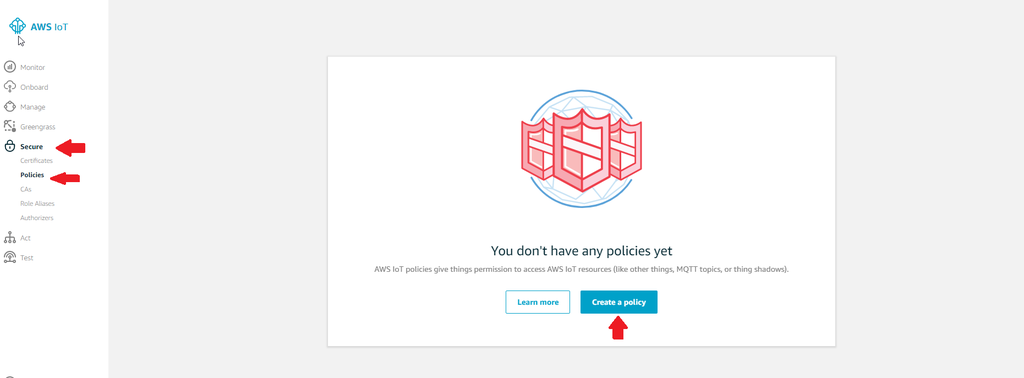
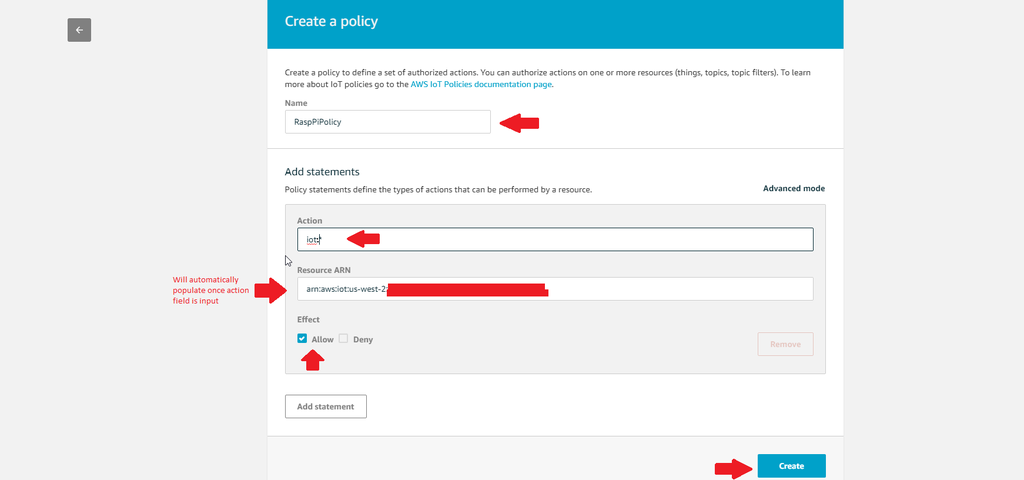
- Enter a name for the policy. Under action enter iot:*. Resource ARN will automatically populate once action has been entered. Under effect click the allow check box and then click create.
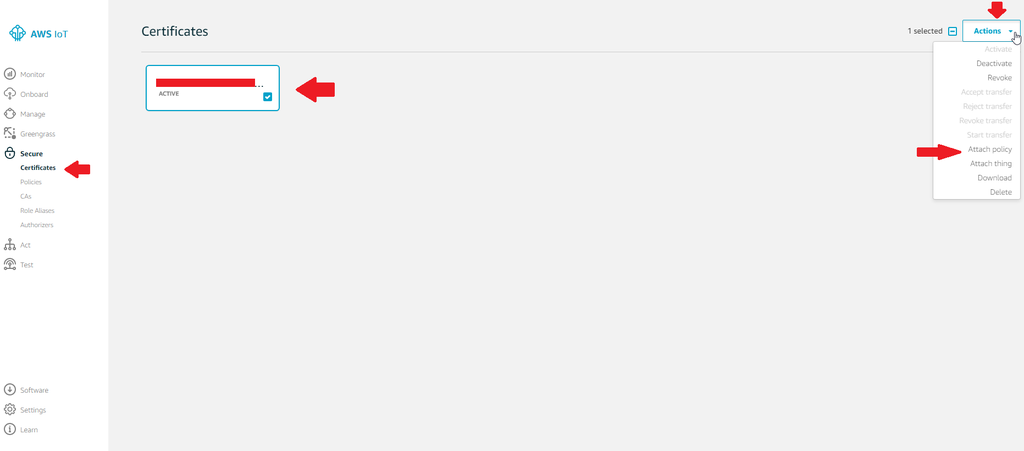
- Under the AWS IoT menu on the left hand side of the screen, under secure, click on certificates. Click on the active certificate and then under actions click on attach policy.
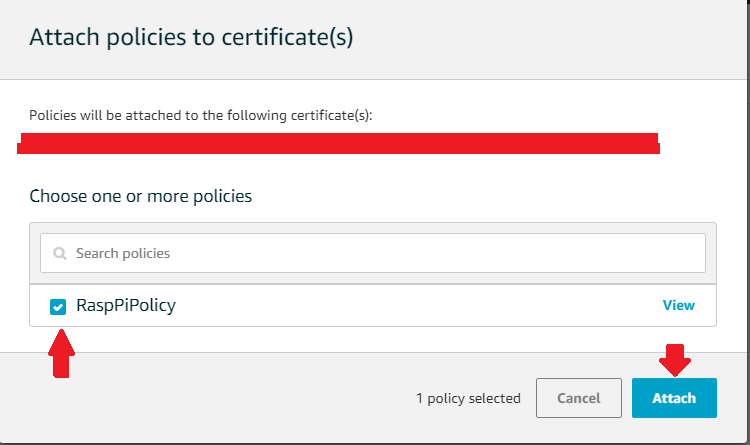
- Select the policy you created. Click on attach.
- Under AWS IoT menu on the left hand side, click on manage. Then click on the name of the thing you made.
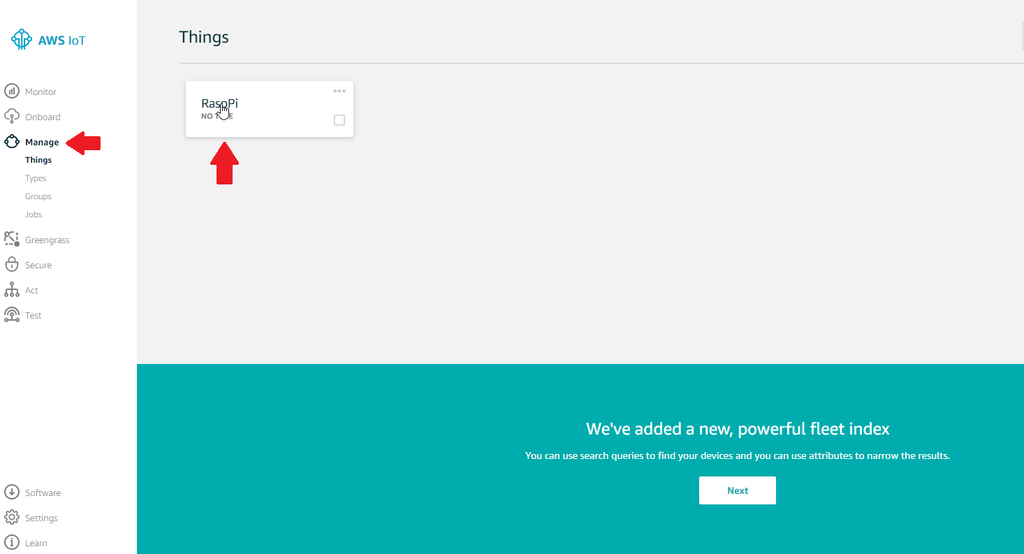
- Click on interact in the left hand menu. Under the HTTPS header, copy the address shown inside here.
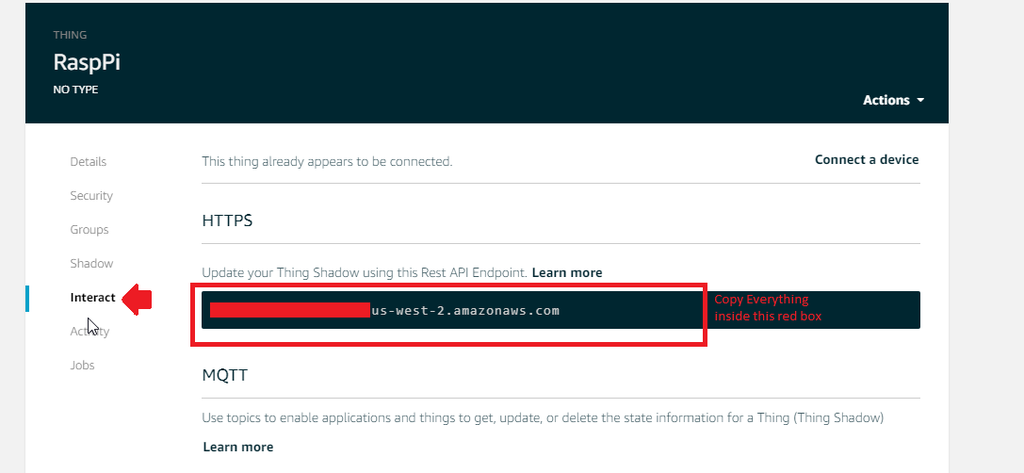
- Return to you AWS Lambda function by clicking on service in the top left of the screen. Click on Lambda.

- Select your Lambda function name created earlier to edit the parameters.

- In the function code, line 7 at the Broker_Endpoint, replace the part in quotations with the address you copied.

- In the function Code, line 9 at the Broker_Region, replace the part in quotations with your region. It should look similar to this: "us-west-2". (This should also be shown in the Broker_Endpoint address you copied). In the function code, line 11 at IoT_Thing_Name, replace the part in quotations with your thing name you created.
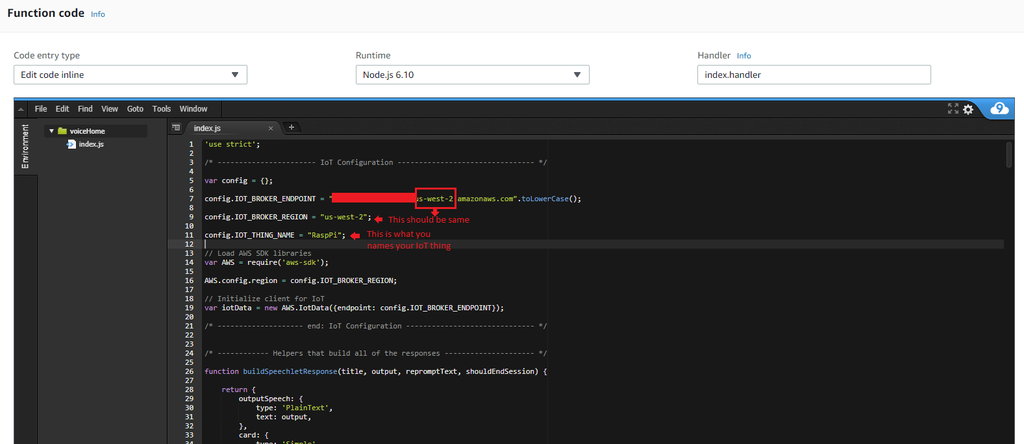
- Click Save in the top right corner.
- Under AWS IoT menu on left hand side, select manage and then select your thing name.

- In the left hand menu, click on shadow, and then click edit.
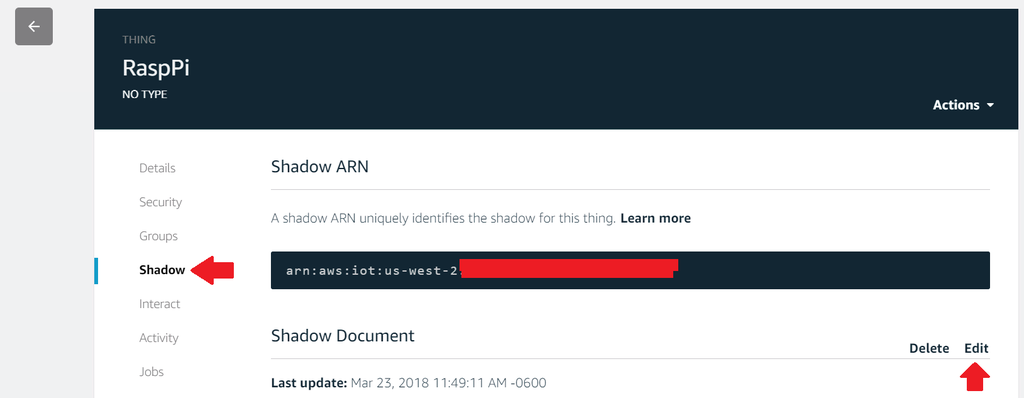
- In the shadow state area, delete all previous code here and copy and paste the code from the attached file shadow.txt located at the bottom of this section. Save once pasted.

- Go back to the AWS IoT menu and click on secure from the menu. Click on policies underneath secure. Click on the policy name.

- Scroll down to the bottom and hit edit policy document.

- In the code box, under resource, remove everything between quotations and replace it with "*". Click save as new version.

Attachments
Step 5: IAM Permissions
- Under AWS services drop down menu in top left corner, search for and select IAM.
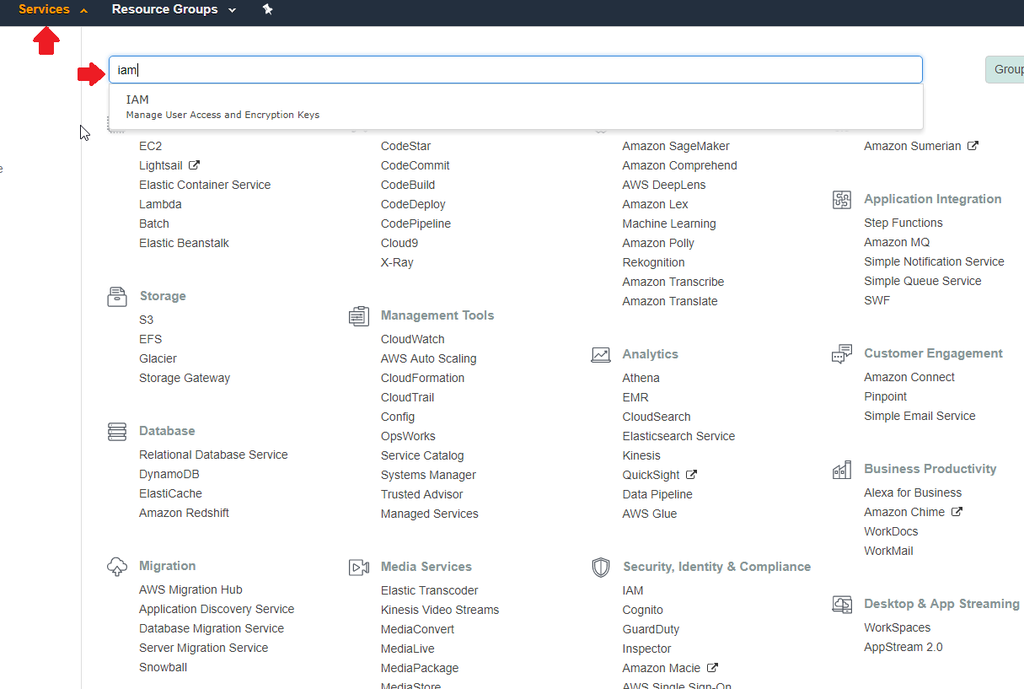
- Select Roles in left hand menu. Click on your role name, lambda_basic_execution.

- Click on the drop down arrow next to policy name.

- Click edit policy.

- Click add additional permissions.

- Select choose a service and then search for and select IoT.
- Select Actions, Under Manual Sections, select "All IoT actions".
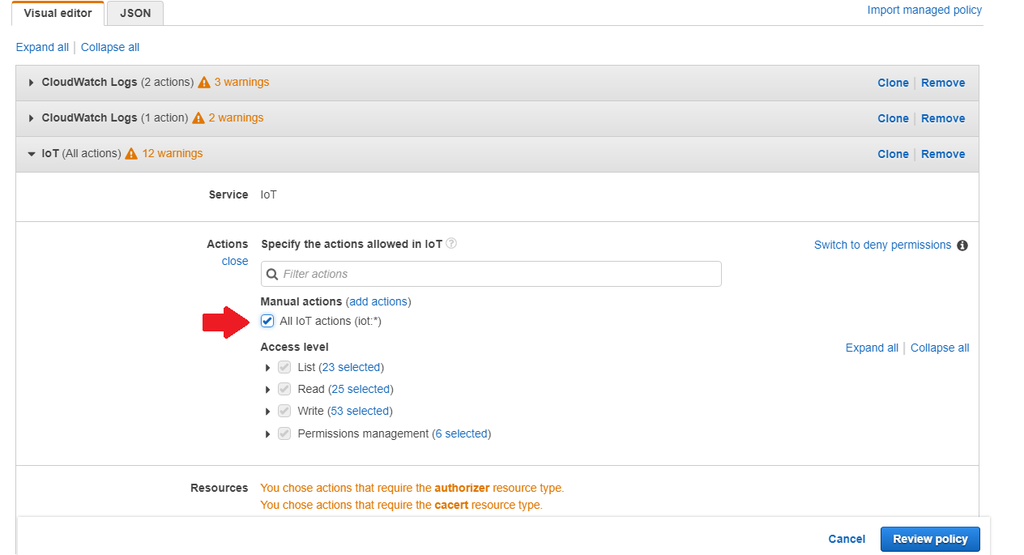
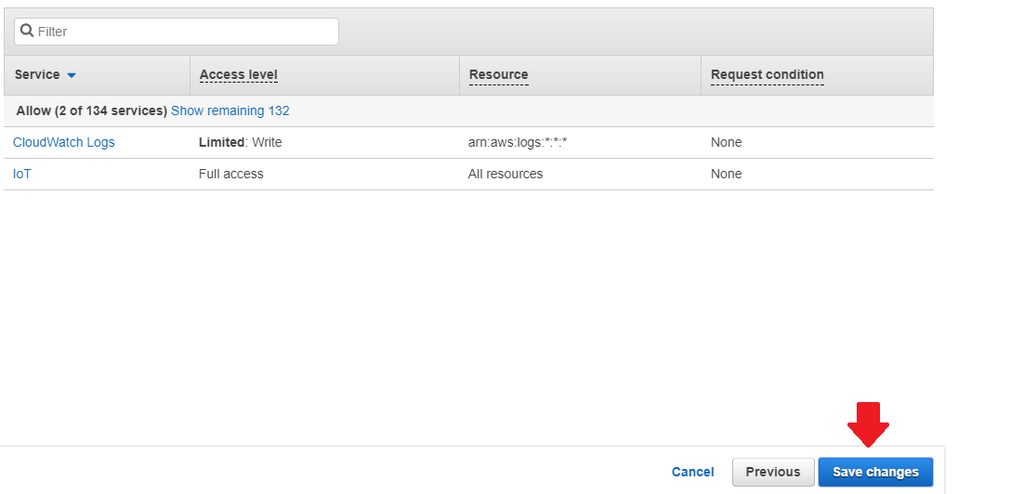
- Click on Resources and click on "All Resources". Click on Review Policy.

- Click on Save Changes.
Step 6: Enabling Your Skill on the Alexa App
- Open your Alexa App on the device you downloaded it on previously.
- Click on the menu button in the top left corner of the app.

- Select the skills tab.

- Select the your skills section at the top right of the app.

- Select the "All Skills" tab in the app.

- Select your Skill you created.

- Enable skill.

Step 7: Using Raspberry Pi3 As IoT
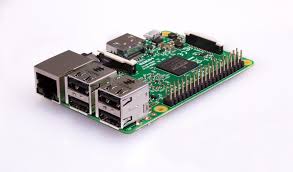
- Make sure your Pi is already setup before starting. There are Instructables to show you how to do this.
- Download the folder named "Pi MQTT server" to the Pi from the following web address:
- Move the downloaded IoT certification files (from the IoT section of Instructable) to the "Pi MQTT server" folder downloaded on the Pi.
- Copy your endpoint address by going into AWS IoT console.
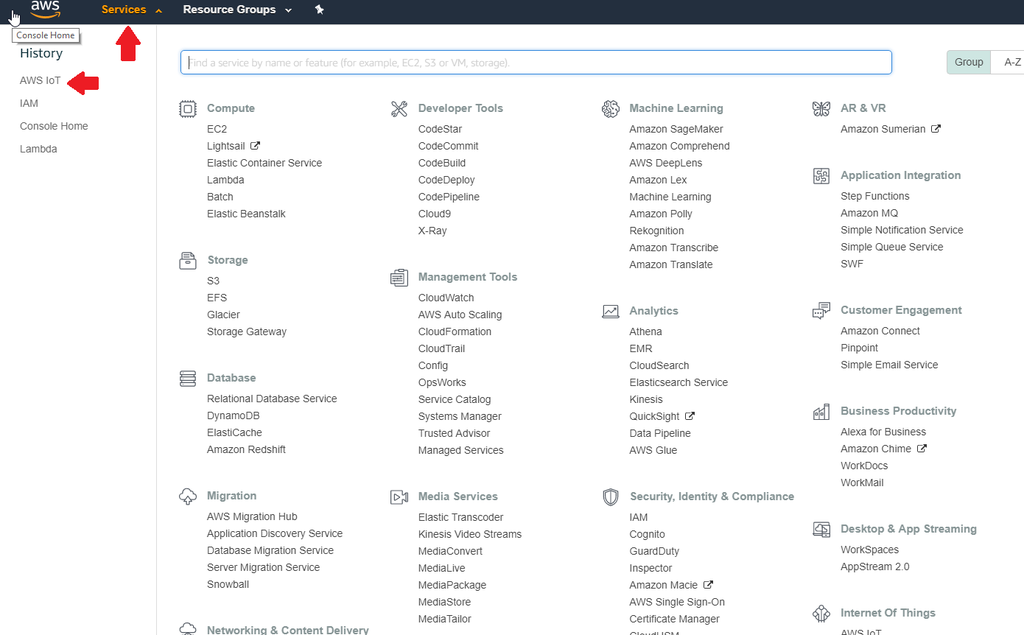
- Under the manage tab in the left hand menu, click on the Name of your "thing”.

- Click on Interact in left hand menu.Copy address from HTTPS section.

- Open the command terminal on your Pi. Navigate to the "Pi MQTT server" folder. Enter the following as a terminal command (making changes in the command where noted):
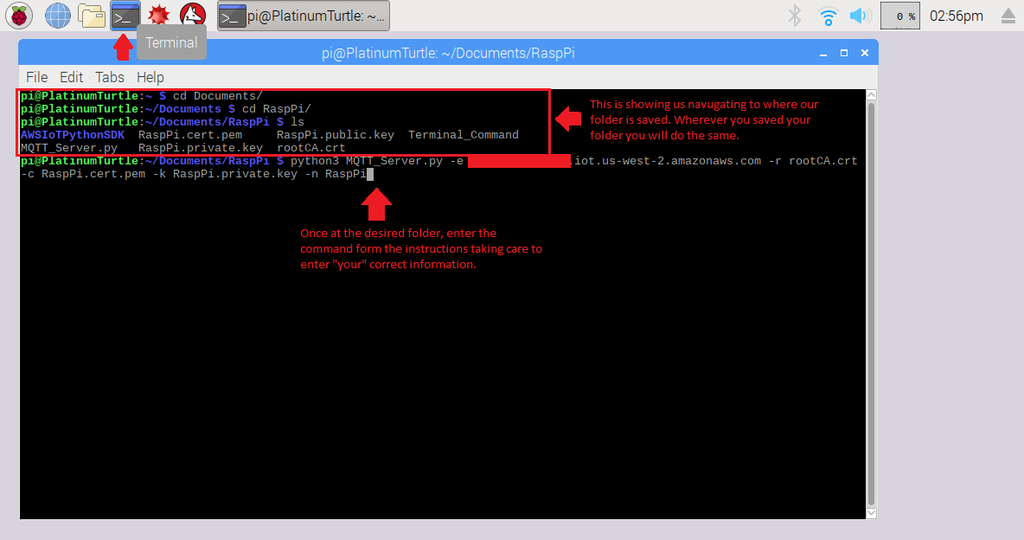
- Hit Enter. You are now ready to give Alexa commands for your automated home. For example: "Turn on Kitchen Light".
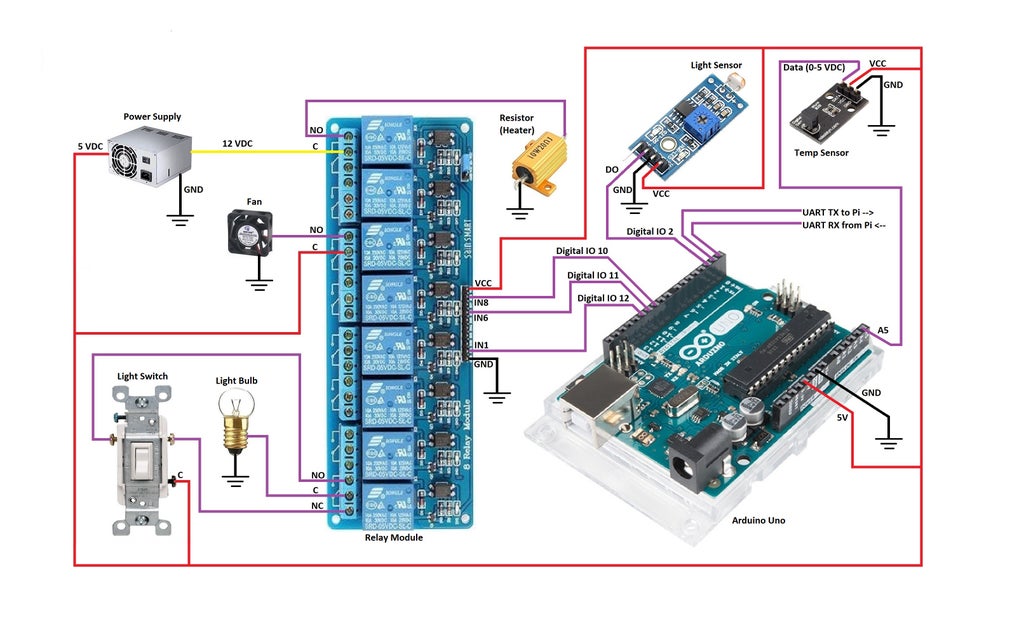
Step 8: Hardware Setup (Steps for Wiring One Room; Refer to Wiring Diagram)
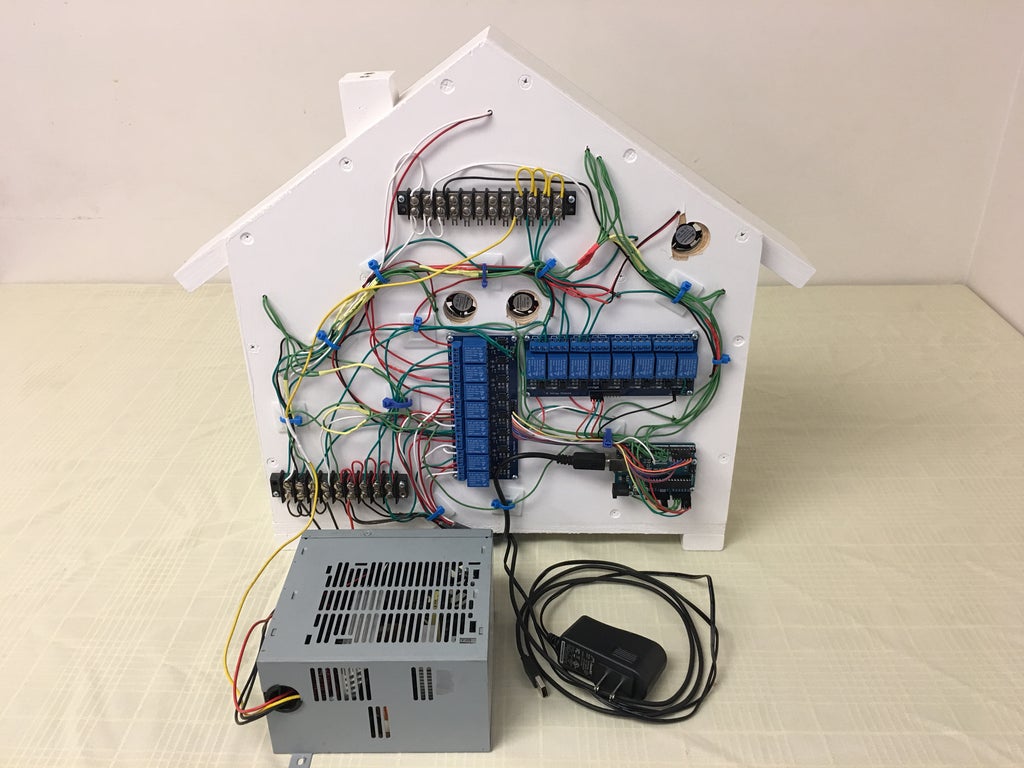
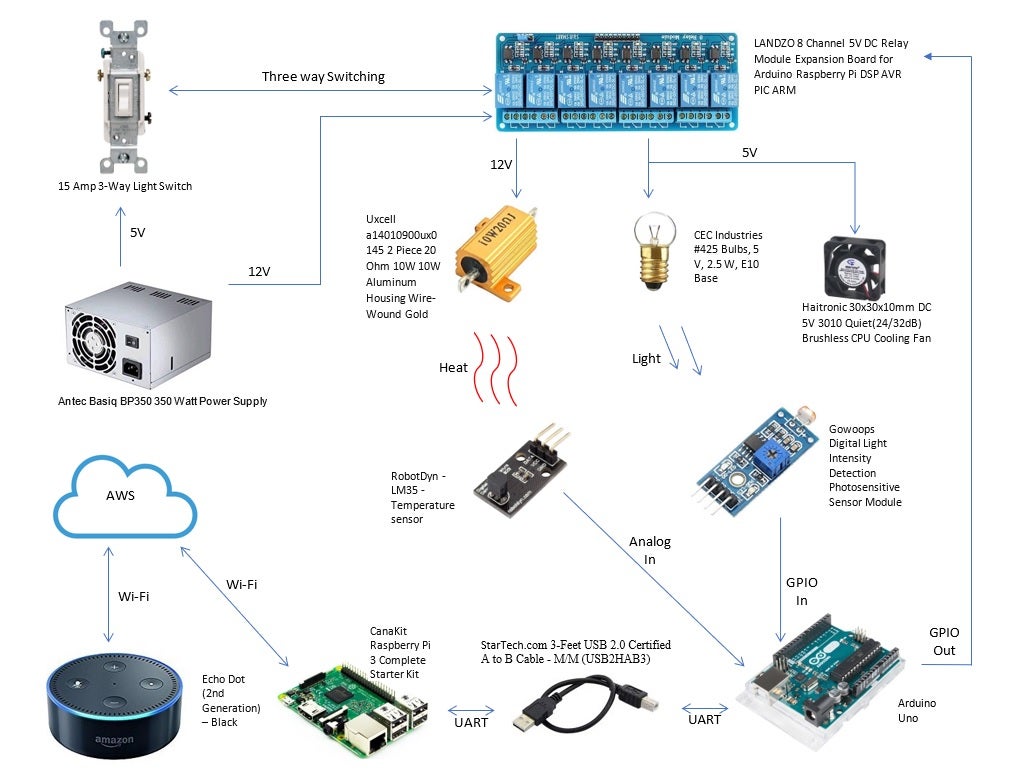
- Connect GND from the power supply to the Arduino, fan, light, resistor, temp sensor, light sensor and relay board.
- Connect 5 volts from the power supply to the Arduino 5V, light sensor VCC, temp sensor VCC, relay board VCC, relay board relay 6 common terminal (C), and light switch common terminal (C).
- Connect relay board relay 6 NO terminal to the other side of the fan.
- Connect 12 volts from the power supply to the relay board relay 8 common terminal.
- Connect relay board relay 8 NO terminal to the other side of the resistor.
- Connect relay board relay 1 NO termi nal to one of the remaining two switch terminals of the light switch.
- Connect relay board relay 1 NC terminal to the one remaining switch terminal of the light switch.
- Connect light sensor DO to the Arduino digital IO 2.
- Connect temp sensor Data to the Ard uino A5.
- Connect Arduino digital IO 12 to the relay board IN1.
- Connect Arduino digital IO 11 to the relay board IN6.
- Connect Arduino digital IO 10 to the relay board IN8.
- Connect USB cable from Raspberry Pi3 to Arduino (there are Instuctables to show this serial connection setup).
Step 9: Arduino Software
- The Arduino code used can be found at this following git address:
- The code is in the Light_Temp_MPI_V4 folder. Load it onto your Arduino.
- Now you are ready to test your Automated Voice Home system!


