Introduction: WWVB Simulator
This STM32CubeIDE project simulates the WWVB signal broadcast from the National Institute of Standards and Technology (NIST) in Fort Collins Colorado. This signal is used by many clocks to update the time, usually at night.
For more information on WWVB see the WWVB Wikipedia page here.
Inspiration:
I live in northern New Hampshire, and according to the NIST coverage map, I should be able to reliably receive the WWVB signal at night. I own several WWVB “Atomic“ clocks. Generally these clocks work quite well, but for more than two weeks in December 2023 my clocks were not updating. While Googling information on WWVB I came across two pages where the authors built a WWVB simulator using an ATtiny MCU. One project was more of a proof of concept, and the other (later) project was nearly complete, including an enclosure. My project is based on the 2nd one that uses a GPS module as the very accurate time source. I didn’t use either project’s software or hardware.
Use:
Place the project’s antenna very close to the clock you want to update. Just let the project run through the night and by morning the clock will update just as if it received the actual WWVB signal. For a quicker update, temporarily remove the power to the clock. Most clocks immediately try to update when power is restored.
Another use of this project would be if you want to write your own code to decode the WWVB signal from a WWVB receiver. Depending on where you live, your WWVB receiver may not work well during the day. Your WWVB receiver should easily pickup the simulator’s signal when the antennas are placed close together. And unlike the real WWVB, you control the time being broadcast. You can simulate any time or date by using a USB to TTL module in place of the GPS module. Just send a fake NMEA RMC message with the desired time and date. This allows you to test various events such as the change to daylight savings time.
And finally the most drastic use would be to replace the WWVB receiver inside your clock with this project and simply use GPS satellite time to update your clock directly. Most clocks have a separate WWVB receiver board that outputs the demodulated AM WWVB signal. This project has a debugging output on pin B0 that is a cleaner version of the demodulated signal most WWVB receivers pass to the clock’s mcu. (See the implementation example at the end of this instructable.)
Supplies
Note that other than WeAct Studio, the links are for reference only. I highly recommend the BluePill+ from WeAct Studio.
- WeAct Studio STM32F103CBT6 BluePill+ module
Note that this project will work with a no-name BluePill module but I found that the no-name BluePill module’s RTC crystals are generally inaccurate. This project relies heavily on timing. The WeAct BluePill+ uses better quality crystals, and WeAct appears to have followed the STMicroelectronics guidelines for placement and load capacitors.
- STLink V2 clone OR authentic STLink V3 programmer/debugger
Note that the V2 clone is easier to connect and is also much cheaper. For my authentic STLink V3 I had to make an adapter cable. The quality of the STLink V2 clones vary quite a bit between sellers, and even from the same seller. Of the 6 that I’ve purchased over the last year, 2 were DOA. The difference was the mcu. The DOA V2s contained a STM32F103CBT6 no-name mcu (literally, no manufacturer name.) I swapped them out with Geehey chips, flashed them, and they work fine.
- u-blox NEO-6M GPS module with antenna
Note: Some NEO-6M GPS modules sold on AliExpress are counterfeit even though they have a u-blox sticker on the receiver canister. If you look at the first few lines of serial data sent from the counterfeit module when powered on, the model number of the actual manufacturer is listed. All four of the GPS modules I purchased from the above link were real u-blox NEO-6M GPS modules. Maybe I just got lucky. From another seller on AliExpress where I purchased two modules, one was fake, and the other real… In the SAME order.
The problem with counterfeit modules is they don’t accept any of the proprietary u-blox commands. Other than that my counterfeit module seems to work OK. In any case, this project doesn’t use any of the u-box proprietary commands, although it may in the future.
- WWVB Receiver (only used for the antenna)
- 6V to 12V 1A Wall Transformer with a 5.5x2.1 DC plug
- Optional: Any low gauge wire (22 to 28 awg) with a ground shield to connect the antenna.
Step 1: How It Works
On startup, and on the half hour, the WWVB simulator’s time is updated from the serial stream coming from the GPS module.
One of the STM32’s timers outputs a ~60kHz 50% duty cycle PWM signal that serves as the AM carrier, the signal that drives the antenna. The antenna radiates, at most, about 10cm. It’s incredibly weak, but that’s OK.
On every even minute, a new 60 byte structure is initialized that represents the current time as defined by the NIST. Each byte in this structure represents one bit of transmitted data. The bit can be a 0, 1, or a marker. It takes one second to transmit one bit. The length of time that the AM carrier is present determines whether the bit is a 0, 1, or a marker. Markers are used by the clock to know when a new 60 second block of data is starting and to validate the data received.
When updating the time, your clock will generally try to receive at least two consecutive 60 bit data frames. The NIST recommends receiving 5 or 6 frames, and then using common data of the frames to determine the valid time. I noticed that my clock always displays the updated time in under 3 minutes. Because my clock is only sampling two frames, once or twice a year the time and/or date will be wildly off.
More detail:
After initialization, the code is entirely interrupt driven. The main loop does nothing. The time spent in each of the interrupt callbacks is relatively short.
There are 3 interrupt callbacks: 1 second, 10th of a second, and USART receive completed.
The 1 second callback:
- once a minute it initializes the next 60 bit time frame.
- on the half hour it initiates updating the time from the GPS module:
- the GPS module is optionally turned on.
- the one byte USART receive interrupt is renewed.
- every second it cues up the next bit in the 60 bit frame being broadcast.
- every second it resets the 10th of a second timer so that it syncs with this 1 second callback.
- every second it turns off the AM carrier to mark the start of a new bit.
The 10th of a second callback:
- determines how long the AM carrier is absent for the current bit being transmitted. If the number of 10ths matches the AM carrier off duration of the bit being transmitted, the AM carrier is turned on.
The USART receive completed (one byte):
- if the byte received isn’t a line termination character, the byte is tacked onto the line input buffer.
- if the byte received is a carriage return, the line is terminated and parsed.
- if the line isn’t the NMEA RMC message containing the time & date, it’s ignored.
- if the RMC message is valid:
- the time is updated
- the GPS module is optionally powered down.
- the next GPS update is scheduled for the next half hour mark.
- the one byte USART receive interrupt is not renewed (causing this callback to go quiet.)
Mixed in with all of the callbacks are changes to the states of several pins for status and debugging:
- PB2, which is connected to the blue LED on the BluePill+, is turned on whenever the GPS module successfully returns the time. The LED is turned off while waiting for the GPS module to return/update the time.
- PB0, follows the AM modulation: 0 when the carrier is off, 1 when the carrier is on.
- PB1, turned on for 1/10th second every 60 seconds to mark the start of a frame
- PB10, inverse of PB2. Optionally used to turn on an N-channel MOSFET used to control power to the GPS module. If not used, the GPS module is left running.
Step 2: Build the Cables
The GPS module comes without cables or connectors. I added a 4 pin XH2.54 90 degree connector so that I can easily swap out the GPS module as needed. The cable therefore has a 4 pin female XH2.54 connector on one end and individual female Dupont connectors on the other.

For the antenna I use a WWVB receiver module. Rather than disconnect the antenna from the module, I just glom onto the antenna connection (the antenna pad closest to the center of the board) and the GND connection. The wire used is UL 2547 multi conductor audio wire that has a ground shield (e.g. headphone wire.) On the other end I attached female Dupont connectors with heat shrink tubing used to insulate the bare GND wire.

I generally make cables with female connectors for breadboarding and use 15mm breakaway headers with equal pin lengths to connect the female connectors to the breadboard. This way if I have to leave a connector disconnected you don’t have a bare pin floating around.

Step 3: Assemble the Project
Assemble the project:
- Insert the BluePill+ module on the breadboard as shown in the picture.
- Insert the breadboard power supply module as shown in the picture.
- Set the jumpers to supply 3.3V to both supply rails on the breadboard.
- Attach jumper wires for power and ground to power the BluePill+ module.
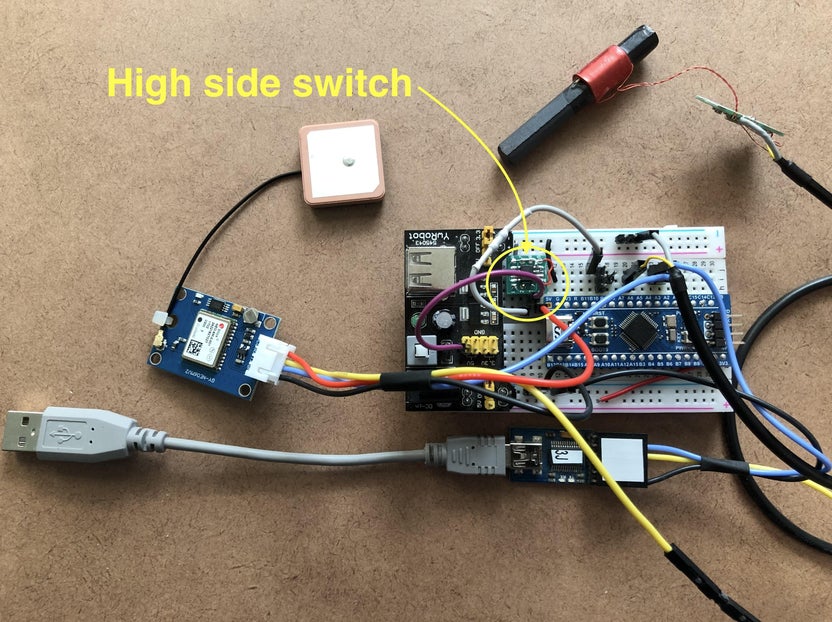
- Connect the GPS module
- GPS VCC to +5V directly to the breadboard power supply header
Optional:

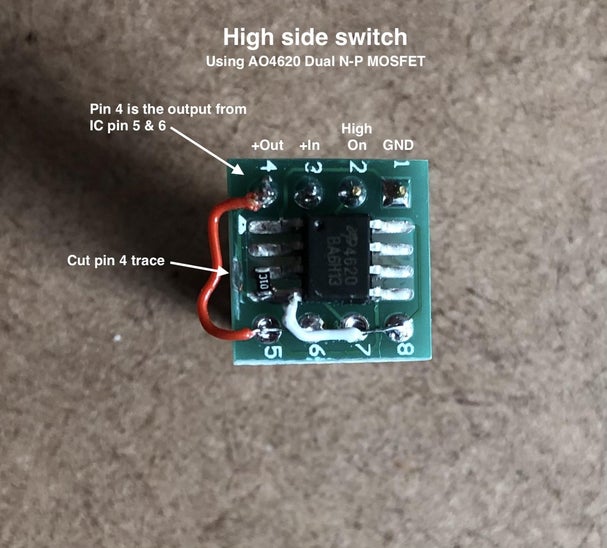
Use a high side switch to control power to the GPS module. Following the schematic, build the switch using an N-channel MOSFET and a P-channel MOSFET. I used an AO4620 IC that has an N-channel and a P-channel MOSFET in a SOP8 package. The AO4620 IC is mounted to a SOP8 to DIP8 adapter board with a 4 pin header only on one side.


Pin B10 on the BluePill+ is connected to a jumper that contains a 220 ohm resistor. The other end connects to pin 2 of the DIP8 adaptor board. GND is connected to pin 1, 5V is connected to pin 3, and pin 4 is connected to VCC on the GPS module.
Step 4: Load Software
This is my first STM32CubeIDE project. Up to this point I’ve been using the Arduino IDE.
Download the WWVB Simulator software from GitHub

If you haven’t done so already, install the STM32CubeIDE, STM32CubeMX, and STM32CubeProgrammer applications on your computer. This can be a frustrating experience depending on the platform. I own a relatively new MacBook M2 Pro. When I installed the STM32CubeProgrammer several months ago, the installer wasn’t working correctly. After a bit of Googling, it was noted that you need to install via a Unix shell (e.g. Terminal app or BBEdit worksheet.) Hopefully installation goes smoothly for you. In my GitHub repository I supply the built project (ELF file), so at a minimum you only need the STM32CubeProgrammer. If you need to make any changes to the code you’ll need the other two apps.
Optional - The STLink V2 clone generally comes with a 20cm 4 conductor wire with single female Dupont connector shells on each end. Using a pin, I take off the single female shells and replace them with a 4 pin and a 2x5 pin shell as shown below. I add white tape to show which end is up.


Using only the ELF file:
- Connect your STLink V2 clone to your BluePill+ module as shown.
- Launch the STM32CubeProgrammer application.
- Press Connect to connect the STLink V2 to the BluePill+
- Press the Open file tab then select the WWVB_Simulator.elf located in the Release folder of the zip you downloaded from GitHub.
- Press Download to download the WWVB_Simulator program to your BluePill+.


If you need to make changes to the WWVB Simulator code then you’ll need to open the WWVB Simulator project in the STM32CubeIDE application. I’m not going to go into any detail of how to use the IDE. There are plenty of tutorials online that cover almost anything you need to do.
Conclusion
I hope you liked this instructable. Send me a message if you have any questions.
Step 5: Implementation Example
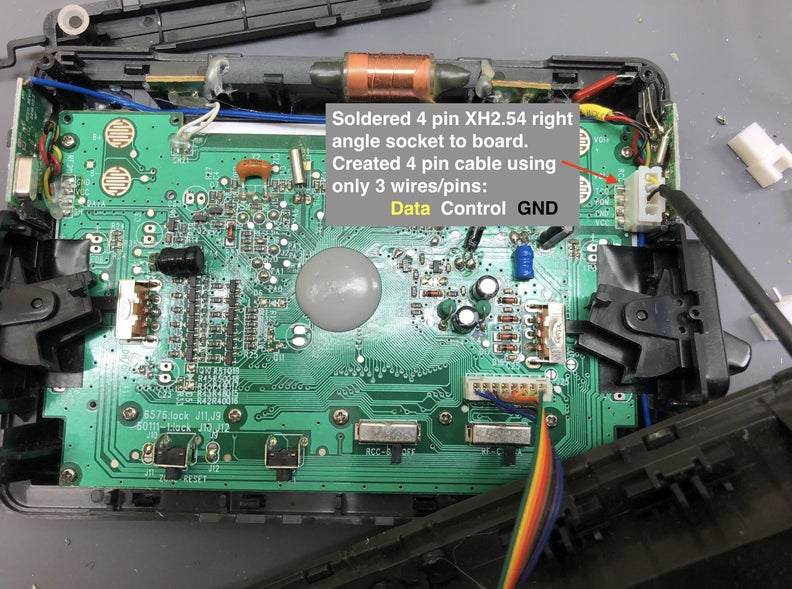
In this example I converted my Acurite clock model 13035W to use GPS as the time source rather than WWVB. This example will also work on model 13024.
This Acurite clock updates/synchronizes its time at midnight. If it’s unsuccessful it will attempt to synchronize again at 1, 2, and 3AM before it gives up for 24 hours.
The conversion simulates the output of the clock's WWVB receiver module. The receiver is connected to the clock main board with 4 wires: GND, 3.3V, data and control. Control is an input to the receiver. When this signal is low the data line is active. When this signal is high the receiver is in an inactive low power standby state.
I made a few minor changes to the WWVB simulator code:
- The PWM timer used to modulate the 50KHz signal previously output on PA6 is no longer used so it and the associated hardware/code was removed.
- The debug signal output on PB0 was inverted and is used as the data line (yellow wire) to the clock.
- A “pin changed” interrupt was added to monitor the control line coming from the clock (PB11 white wire.) The state of this pin determines if the data line is active.
- For debugging, the button labeled “KEY” on the BluePill+ now initiates an update from the GPS board. This is the same update that happens when the BluePill+ is restarted and on the half hour.


I designed a very simple box to house the UPS, BluePill+ and the GPS module.

This example also adds a 5 volt UPS to power the clock for several days if you loose power. I found the UPS module on AliExpress for $2. This UPS module requires two 18650 batteries.


If anyone would like the code changes and/or 3D STL files used in this example, send me a message with your email address.


