Introduction: Whole Wheat Sandwich Bread Recipe
This whole wheat bread recipe is a perfect loaf to cook for the week.
I grew up eating whole wheat bread with sandwiches. I didn't even know about white bread until I went over to a friends house in second grade and had a peanut butter and jelly on a classic white sandwich bread. To this day, if I want a sandwich I prefer it on a whole wheat sliced bread. Something about the flavors of a turkey sandwich on a whole wheat loaf is really just the best!
Be sure to check out even more glutenous goodness in my Bread Class!

Working with a higher percentage of whole wheat flours in this dough is unlike than many other bread recipes. The dough will feel different during kneading and rise differently during our bulk ferment and shaped proofing.
This dough is enriched with shortening, sugar, and milk. Shortening prevents the organization of a super elastic gluten mesh during mixing, the fat physically shortens the strands of gluten created during kneading, resulting in a less elastic and glutinous dough. During baking, the oil helps tenderize the gluten network yielding a softer crumb and extended shelf life.
Step 1: Tools and Ingredients
For this recipe, you will need the following:
Tools
Foodstuffs
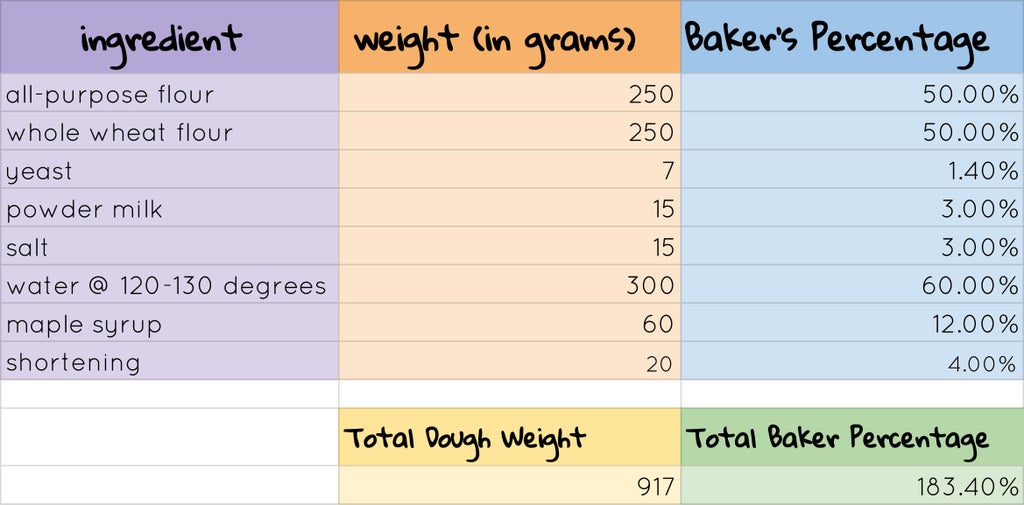
- 1.5 tablespoons or 15 grams dry milk powder
- 15 grams of salt
- 250 grams all-purpose flour
- 250 grams whole wheat flour
- 60 grams maple syrup
- 1 tablespoon or 20 grams oil or shortening
- 1 envelope or 7 grams of instant yeast
- 300 grams 120-130 degree water
If you would like to make this recipe vegan, ditch the milk powder and swap out the water for your favorite vegan nut or seed milk. My go-to is cashew milk or rice milk.

Step 2: Bulk Mix
I tried making this bread with active dry yeast instead of instant yeast, and the bulk ferment rise took forever. Dry active yeast is awesome if you want a more developed flavor profile, but allow a full 3 hours for your bread to double for the bulk ferment if you choose to use that over instant yeast.


In a medium sized bowl, whisk together all the dry ingredients. Mixing the whole wheat flour and all-purpose flour before hydrating ensures that we are getting well-distributed hydration across all of the grains we are using, even if these flours absorb water differently.


In a small saucepan over medium heat and whisk together the water, maple syrup, and oil (or shortening) until the mixture reaches a temperature of 125-135 degrees. A vegan baker friend of mine swears that shortening is better for sandwich breads as opposed to butter, stating it makes the bread fluffier - but, to be honest, I think the difference is slight.


Mix the warm liquid mixture into the dry flour until you have a shaggy dough. Bench rest for 15 minutes before kneading.
By using instant yeast, the dough is able to be quickly hydrated with a higher temperature liquid - this also ensures that our flours are more evenly hydrated. When dough is unevenly hydrated, it can break apart during kneading and you'll have to add more liquid during your knead.


Turn out the dough onto your work surface, and knead the dough until its consistency is uniform - between 5-8 minutes of kneading. Add a little bit of flour, just to prevent the dough from sticking to the work surface.
Step 3: Bulk Ferment
Place your kneaded dough in a bowl that has been coated with spray oil, give the top of your dough ball a quick oil spritz too.
Cover the bowl with a damp towel or loose plastic wrap and let the dough rise in a warm spot for 45 minutes to an hour and half, until it has doubled(ish) in size. This dough looks different than other doughs from this class, it won't completely double but it will certainly expand. You should be able to feel that it is becoming full of air.

Turn out your dough with a bowl scraper, and allow to bench rest under the bowl for 10 minutes, or until visibly relaxed. We especially want the whole wheat flour to relax before forming because the sharp shards of the wheat hull can rip our dough if worked too quickly.


This dough relaxes and oxidizes quickly, don't be alarmed if your flour browns slightly as moisture from the surface of your dough is evaporating into the air.
Step 4: Form
Sprinkle a little flour on the dough, shape it into a rectangle and give the dough a quick pat to de-gas slightly. This dough will feel different than other doughs we have made. It is oily and mealy to the touch and is not nearly as elastic as doughs made with white bread flour since there is considerable less gluten protein in this mixture.


The dough will undergo it's shaped proofing in a loaf pan and needs to be folded to fit and rise appropriately. For a video demonstration of this loaf forming technique, check out the Bread Class.
- Fold the bottom of the dough towards the top and seal one-third of the way down.
- Rotate the dough 90 degrees, and repeat the fold.
- Seal the dough firmly,
- Fold again, this time in half, sealing the seam against the counter shut.
- Tuck in ends, and allow to rest on the counter for five minutes.


Spray a loaf pan with oil, and transfer the dough into the baking pan. give it a good firm press, making sure the dough is evenly distributed inside the pan.

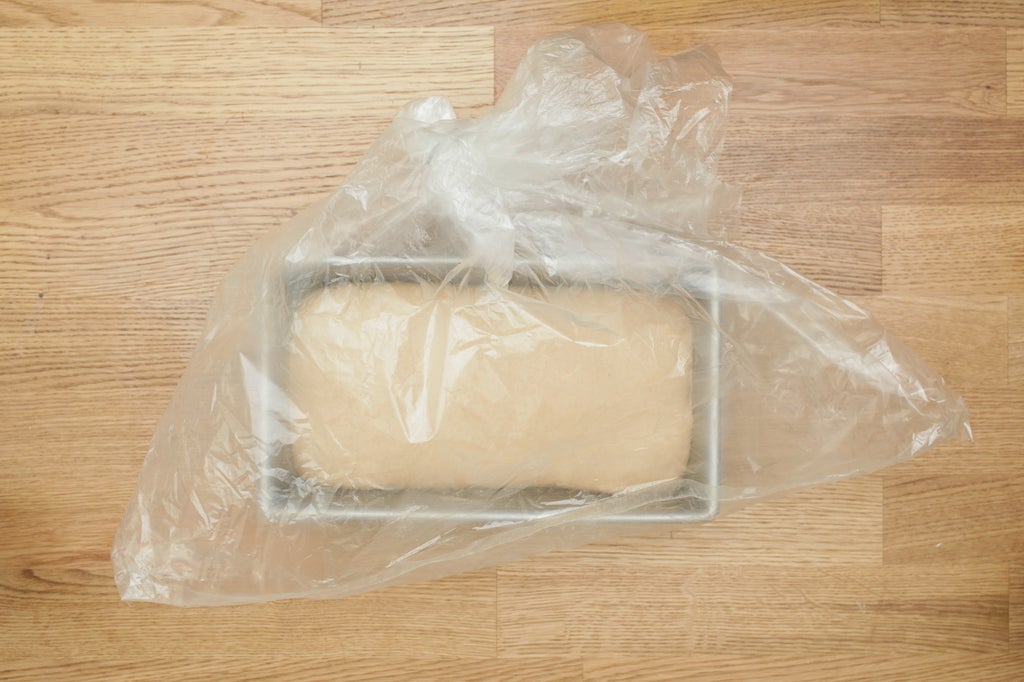
Let the loaf rise a second time until the dough begins to dome over the edge of the pan, this will take about 30-40 minutes in a warm kitchen.

Unless you live in a very humid place, I strongly recommend that you cover this proofing dough with plastic. The whole wheat flour can get really dried out quickly, especially in my dry climate. I usually spritz the top of the loaf with oil and water before sealing into an oven bag to rise.
Step 5: Bake
Heat the oven to 425 degrees Farenheight halfway through the loaf's proofing. A good rule of thumb is to wait til the rise is just shy of the lip of the baking pan.


Uncover and score the top of the loaf with a blade, making multiple cuts. This dough doesn't quite have the same oven spring as many of the other loaves we have made in this class because the oil in the dough impedes the glutens' ability to stretch long. These extra slashes nudge the dough to expand a bit more in the oven.

As soon as the loaves go into the oven, turn down the temperature to 375 degrees and bake for 30-35 minutes. It's hard to tell when loaves with this much whole wheat flour in the dough are done. Finished loaves will be darker than other loaves made in this class, a truly deep golden-brown. You can always be sure your bread is done by taking its internal temperature. A fully baked loaf will have the temperature of about 200 degrees Farenheight.

This loaf went back in the oven for five more minutes until it had an internal temperature of 201 degreees. Drive the thermometer into the center of the loaf to make sure you are getting an accurate reading
When baking is complete, turn out the loaf from the pan and allow to cool on a cooling rack for at least 30 minutes before cutting into the crust. The loaf will have a sweet aroma, distinctly mapley, and the crust is barely firm. If you would like a softer crust for this bake, you can put the wetted towels in the oven again to create a steam bath for the baking dough just like demonstrated in this Baguette Instructable.
Step 6: Slice, Serve and Store.


Because this dough was mixed with a great deal of salt, fat, and sugars, (aka preservatives) this loaf will store in a bag at room temperature for up to two weeks.


Often I'll slice this loaf in half, placing half in to the freezer for later use, and the other half I'll use for a weeks worth of turkey sandwiches for lunch. The roasted turkey and maple flavors go together quite well. Add some good mustard and you're really in business.

You can tinker with the recipe and develop your own flavor profile. I've often thought of turning this into a cinnamon swirl bread, adding a mixture of oil, sugar, and cinnamon to the dough during shaping, coating the rectangle of dough before folding.

For more delicious bread recipes check out this collection, and if you're completely new to the world breadmaking and the wonder of gluten, be sure to enroll in my Bread Class!


