Introduction: Wooden Passive Speaker
In this tutorial, I will be teaching you how I created a passive speaker from wood.
Materials:
- 2x6 plank of wood
- Jigsaw
- Mighter Saw
- Pencil
- Speed Square
- Ruler (30 inch is better)
- Bandsaw
- Sander
- Wood Glue
- Clamps
- Wood Oil (or any finish of your choice)
- *Rag
- *Rubber Gloves
- Painter's Tape
Step 1: The Plan


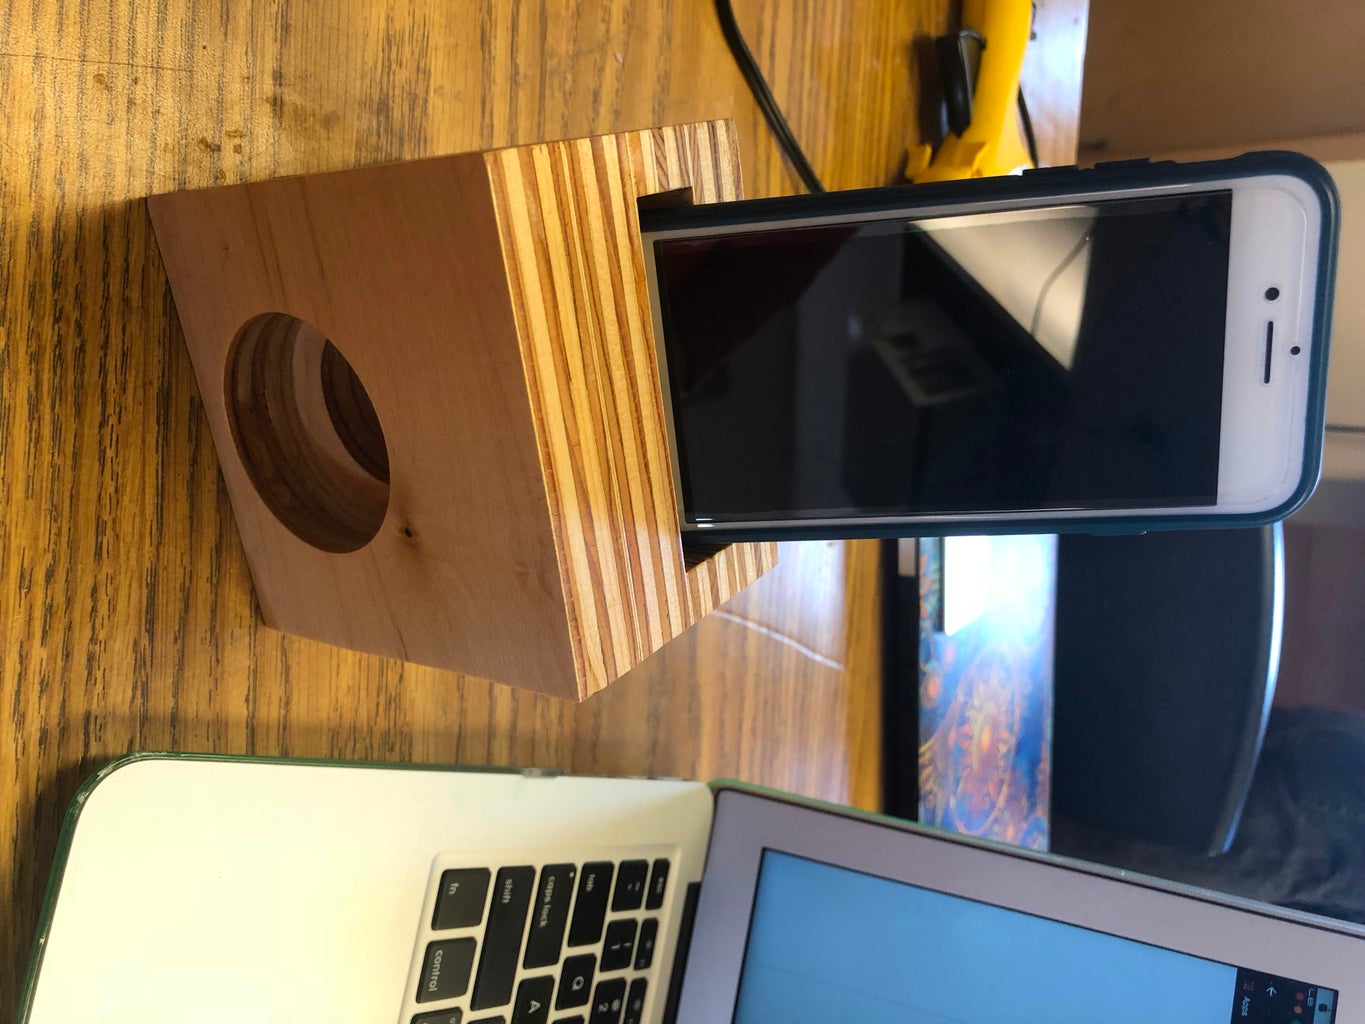
Start by taking the phone you are designing this speaker for and measure the thickness and width of the phone also look at where the sound is coming from and measure the speakers. I designed this speaker for an iPhone SE, however, you can adjust the measurements for any smartphone. (Later in this process I had to change the measurements slightly to fit an iPhone 7 because I got a new phone.)
In this speaker, I used 4 squares of 4"X4" pieces of wood that were 1" thick. I also numbered the pieces 1 thru 4 so that I could get the order right I also wrote on the wood pieces which side was the top to avoid gluing incorrectly later.
I'm not going to list every measurement here but, above, I attached images of the template I created for my speaker. However, note that I later changed layers 1 and 2 to circles for time and frustration purposes. I found that it is very difficult to cut perfect squares in the center of wood and also make it look good.
After creating the plan (make it scale to make it easier to follow when you start to make your final product) use a pencil, a speed square, and ruler to make your lines straight and everything is measured properly. After making your marks on your wood then use a mighter saw to make the big cuts for creating your 4X4 inch squares of wood.
Step 2: Layers 1 and 2


Label all 4 pieces of wood and keep in mind which parts you want to face outwards and how you want the edges to look when it is all put together. Label your 2 prettiest pieces as 1 and 4 because these are the pieces you will see most of. Set aside layers 1, 3, and 4. You won't be doing anything with layer 1 (the back of the speaker).
Take layer 2 and using the template you created, make all of the marks on the wood using a ruler and a speed square. Make sure the lines are straight and exact. Also, make sure to keep that square in the center of the template clearly marked.
Use a band saw to make most of the cuts but for the bottom cut you may not be able to cut with a band saw use a jigsaw. Clamp the wood to the table and cut out the bottom piece. (If the cuts are rough you can sand them smooth)
This was the only step where I had to change the measurements for the iPhone 7, however, I didn't measure how much I cut off in order for my phone to fit in. I think it was about 2-3 mm on each of the cuts that affected the width of the holes.
Step 3: Layers 3 and 4


For layers 3 and 4 I ended up changing my design to be more timely and easy to make. I changed it from the rectangles on the templates to a 2" and 1.5" drill press bits. While the rectangles sounded a lot better, they were much to difficult to make them look nice and even. If you have the right tools I recommend the original template for the best sounding music and volume if you have the right tools.
In the edited version I simply marked my wood to make the circles be about the middle (I don't mind if the circles aren't perfectly aligned) and then I marked a line about 1/4" from the bottom of the wood for layer 1 an about 1/2" from the bottom on layer 2. Then I simply used the drill press to drill holes all the way through the wood pieces.
Step 4: Glueing
For the gluing process, I used a wood glue and a small piece of scrap wood to spread the glue thinly and evenly across each wood piece.
Sand all the pieces slightly where they were cut to make them nice and smooth. Stack all of the wood pieces in the order of 1-4 will at the sides facing the proper direction and make sure everything is even and the way you want the speaker to look. Then using the method I mentioned above spread the glue on each of the pieces and start gluing them together. Don't forget the small little rectangle piece of wood on layer 2! Then take some clamps and clamp your pieces together overnight.
Tip: If you want to avoid marks on your wood from the claps put a little piece of painter's tape between the wood and the clamp.
Step 5: Finishing


Remove the clamps and using a mighter saw cut off all the uneven edges make sure not to cut off too much though! Then Using a fine sandpaper and a palm sander smooth out all the sides and corners to make the speaker splinter free. Then If you want to add an oil wood finish using a rag and rubber gloves and rub the oil into the wood on all sides.
Then you are finished! Enjoy your speaker!


