Introduction: Historic Wooden Toothing Plane Restoration


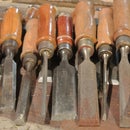

I have a set of heritage wooden planes but it wasn't complete until I found this toothing plane that fit my other planes nearly perfectly online. If you wonder what a toothing plane is - It's in principle the same as a normal plane but the iron is cut into fine teeth at the tip.
It's used for veneering to create a larger gluing surface or when you get tear out with a normal plane. Some people even abuse it as scrub plane as it's relatively easy to push through wood even if the blade is set deep but that's not what it is meant for.
The blade is usually mounted very upright. This makes it rather a scraping than a cutting plane.
To restore such a plane you will need
- Sanding paper of 80, 120 and 240 grit (plus 400 and 600 if you like it really smooth)
- Diamond, oil or water sharpening stones of about 100 (if your blade condition is really bad), 400, 1000 and 3000 grit (or a glass plate and sanding paper)
- Kettle boiled linseed oil or any other varnish
- Ballistol or similar oil
- Drill
- Copper brush bit
Step 1: Sanding the Sole


Before you begin you need to take the plane apart. Use a wooden or plastic hammer and hit on the plane's top. Wedge and iron will get loose then.
The first thing to look for is the sole. Is it out of level, does it have deep scratches or is the mouth too wide? Fortunately mine was pretty fine so there was no need to put a new sole on.
For the main sanding I glued abrasive paper of 80, 120 and 240 grit to an old piece of counter top. You can use double sided tape but this creates small steps if the stripes are not put really close to each other. So spray adhesive may be the better choice here.
I used a combination square to check if the sole is in level with the rest of the body and found that one side was a bit tilted. So I needed to be aware of this fact when I took care of the sole.
The first sanding was done on 80 grit. Make sure to hold the body straight and control of the sole is still levelled from time to time. High spots show up as brighter wood and you want the sole to have one colour all over in the end. It's okay to have some low spots at the sides though as you will create a bevel there later anyway.
It's pretty common to have a low spot a the mouth. If removing it would mean taking down too much wood from the rest of the sole you can insert a patch there.
Continue on 120 and 240 grit. If you can't identify if you are sanding evenly you can make pencil marks on the sole.
When you are done so far you usually have very sharp edges on the bottom. These can catch on wood and leave scratches when you work with the plane. So you lift the plane slightly up on one side and grind a bevel all around the bottom. One way to do achieve a very consistent result is put the plane on a ruler with one side.
You can also round the back of the mouth with a small file for the same reason. The mouth's front needs to stay sharp though to keep the wood down as close to the blade as possible.
Step 2: Sanding the Body


I didn't like the dark colour and so I decided to simply sand it off. This also removed the paint stains and allowed me to straighten the tilted side.
Sometimes the handle of these wooden planes is loose. Removing it completely makes sanding a bit easier and it can be glued in with epoxy afterwards. Mine still sit pretty solid and so I decided to keep it this way and pay for it with some more fiddly hand sanding.
The wood smelled a bit moist so it may not have been stored in a dry space but it was in good condition.
After the first pass I repeated the same procedure with 120 and 240 grit and did the same to the wedge.
Finally I washed away the sanding dust with soaking wet cloth and set the plane to dry for a while.
Step 3: Rust Removal and Iron Sharpening


While the wood was drying I had time to get my hands on the iron.
The icon was rusty and covered with dirt. You can use chemicals to get it off but I don't like the handling. The method that works best for me is using a drill with a copper plates steel brush.
It's important to wear safety glasses though as removed pieces fly off and can easily hit your eye!
After getting the blade clean I could see that it was a brand product from Kirschen.
Step 4: Finish the Wood

The wood had dried now and so it was time to get it finished. Loose fibre ends created a fluffy surface and I used 400 grit sanding paper to remove them. The result is already really smooth.
I then used a cloth to rub kettle boiled linseed oil (KLB) on the wood. The smell is really nice and it lets the original colours of the wood pop with a shine of honey. It could soak up quite a bit. Just make sure to remove any excess before you let it try. Otherwise it gets sticky.
I use rubber gloves as the modern version of KLB contains adhesives that aren't the best for your skin. Also don't forget to drop the used cloth into water. It may self-ignite otherwise!
Step 5: Flat Back for a Sharp Edge


The iron generally was in good shape but somebody put a lousy wavy edge on it that I needed to remove. That meant removing a lot of material and so I started on a really coarse 100 grit diamond stone.
Instead of using sharpening stones you can also use wet condition sanding paper and put it on a glass plate if you want to give sharpening a try first before investing lots of money in sharpening stones. I personally started with water stones but I sharpen a lot of blades that are in bad condition which wears them down really quickly.
I found that diamond stones are not as aggressive after a while but they a usable for a much longer time. So I replaced my coarse water stones with diamond stoned as they got worn out. Also note that water and oil stones need to be levelled from time to time. Otherwise you can't create a precise edge. I put my stones in a dedicated holder but a wet towel can prevent slipping as well.
Water stones need to be suck in water for about ten minutes before you begin, oil stones just need some drops of oil and diamond stones a bit of soapy water. I also use soap water to re-moisten my water stones as it helps to deal with oil on the blades if you didn't remove it properly. It can be a good idea to wear rubber gloves for this job as well as it can get really dirty.
For a sharp edge you first need to get the back flat but I needed to go for a compromise between a shiny blade and removing too much of the teeth. So I didn't remove all the low spots but was able to get the tip clear and this is what counts. Note that normally you would just hammer the back into the end grain of hardwood to remove the burr after sharpening. Thanks to DanielH207 for pointing this out. Anyway in this case the teeth already were of very irregular shape and I wanted to harmonize them. I was careful enough to not remove too much material so that the iron still works fine.
I went from 100 over 400 and 1000 to 3000 grit. This is quite some work but usually you only have to do it once in a tool's lifetime. The whole sharpening process actually took so long that I could apply the two additional coats of KLB to the plane. Although the surface was already really smooth I did another sanding with 600 grit between the coats. I simply like how slick the plane feels when working with it then.
Never remove the slurry that builds up when you use oil and water stones as this is what actually sharpens the stone. Just add water or oil - depending on what you use - when the stone gets dry.
Step 6: Getting the Blade Sharp


I then set the blade on the stone at about 30° with the tilted side facing down. When I push it forward the tip is slightly lifted up. This creates a bevelled edge. A honing guide may create one that is absolutely flat but I have never noticed anything bad about this camber. If any I have the impression that it is more durable.
Starting on 100 grit again shiny areas showed that material was taken off very unevenly to to the bad sharpening job of the previous owner. So I needed to concentrate on holding the blade really straight. You can use a sharpy to mark the blade if you have difficulties to see where you remove material.
You again need to go over all stones but at 1000 grit I had built up such a big burr that I needed to remove it with a few strokes on the back again.
After 3000 grit I rubbed some polishing abrasive on my strop. That's basically a piece of leather glued to scrap wood. Then I give the tilted side some dozen firm strokes to really polish it. The back then just gets a single long stroke to remove the burr.
I still had some low spots at the sides of the blade but I was satisfied with the result this way as this is not a precision too and future sharpenings will do the rest. To keep rust away from the iron I treat it with Ballistol oil but nearly any other oil will do the job just fine. You don't really need much. One trick is to use an oily rag that you keep in a closed can and simply add a few drops of oil once in a while.
Step 7: Assembly ... Finally!


To get everything back together I put the plane on a flat surface, slide in the iron so that the teeth point to the front and insert the wedge. When I then tap in the wedge with a wooden hammer it usually already sets the blade to my desired depth.
You need to control if the blade sits straight by looking along the sole. You can adjust it by hitting the blade sideways with a hammer. You can use a steel hammer if you like. Even if the top mushrooms out there is still plenty of room for the wedge to lock the iron correctly.
If you want a deeper cut hit the iron directly on the top and if you want less hit the body on the top or the back. Note that in the latter case the wedge loosens as well and needs to be tightened again.
I am really satisfied with the restoration. The grain of the wood came out very nice, you can even read the old owners mark now, I discovered the blade's brand and most important it's sharp again and it's a joy to work with the plane.