

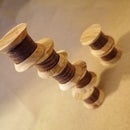
Introduction: 5 Part Lidded Box


So you want to make an awesome 5 part lidded box.
Who could blame you they're awesome.
Well here is how you do it.
You will need some wood, A lathe and some wood turning tools.
I would also recommend some face protection like a visor and maybe something to take the dust out of the air or at least stop it getting into your lungs, like a dust mask. Not having these things will not stop you from making but they are strongly recommended.
If you have made it this far then kudos to you.. treat your self to a star ★
Step 1: Find the Center of a Chunk of Wood an Make a Dimple There

Find the center of a chunk of wood.
The center can be found by drawing a line from each corner where they and intersect - that's your mark.
Make a dimple there. I like to make a dimple in the center. It makes it easier to find the mark on the lathe later.
I used a compass point because the compass was attached to my pencil but you could use anything within reason.
Step 2: Put the Wood Between Centers

You know those dents you made in the wood?
Use them to locate where to put the wood between the lathes drive center and rotating center (that's the one attached to the tail stock).
Step 3: Use a Ruffing Gouge to Make It Nice an Round

Use a ruffing gouge, or what ever you feel comfortable with, to turn the wood round.
Step 4: Make a Chucking Point

A chucking point is cool guy technical terminology, it means use something like a skew or a parting tool to make something that your chuck can grab onto. Normally you will know roughly how big this should be by looking at your chuck jaws and working out at what point it makes a circle. The circle is best because it allows the work to be held evenly. If your chucking point is too big you're only likely to be holding the work with parts of the jaws and too small you wont be holding the work at all.
Step 5: Use the Chucking Paint to Hold the Wood in the Chuck

If you're happy with your chucking point then put it in the chuck and admire the work you have done so far.
Good isn't it?
Step 6: Make the Bottom Part of the Lid

This is a little complicated but don't worry I know you can do it..
We want another chucking point which will also be used as part of the bottom of the lid. Once you have cut this make a little bowl shape. It's not needed but it makes the box a little more classy and if there's anything a wood turner is - its classy.
Step 7: Turn It Around an Chuck Up Again

You know that chucking point you just made? This is its chance to shine. Let it do its job, turn the wood around and chuck up from this point..
Simple and might I add your doing an ace job - keep up the good work and we will have this done in no time.
Step 8: Make a Shap

OK you're doing great.
Turn a kind of ogee shape like a bell curve.
You could go nuts and make any shape you like but if you want your box to look like mine this is the way to go.
Try to make the top part thick as it will help with the next couple of steps
Step 9: Take It Off the Lathe an Measure It

Take it off the lathe an measure it. I used a caliper but if your feeling inventive go nuts.
Step 10: Use the Distance You Measured and Work Out How Deep You Can Drill Into It Without Ruining Everything

Use the distance you measured and work out how deep you can drill into it without ruining everything.
Step 11: Put the Drill Bit Into a Jacobs Chuck in Your Tail Stock an Drill to the Point You Want

Put the drill bit into a Jacobs chuck in your tail stock and drill to the point you want.
Step 12: Swap Out Your Chuck Jaws

I like to use the right tool for the job. You could use bigger jaws but pin jaws work better, so swap out to the pin jaws.
Step 13: Turn Some Wood Down to a Size You Like and Make a Spigot to Fit Into the Hole You Just Drilled

Turn some wood down to a size you like and make a spigot to fit into the hole you just drilled.
The spigot might take a little trial and error to get it just right. Don't worry about it, keep offering the lid to the spigot until it fits just right.
Step 14: Make a Pretty Shape for the Top Part of Your Box

Make a pretty shape.
I like this tear drop shape with a bit of detail on top but go nuts - you're the boss.
Step 15: Find the Centre

Grab another block of wood and then you know what to do.
Step 16: Make It Round and Give It a Chucking Point


Make it round an give it a chucking point.
Step 17: Use a Forcner Bit and Drill to the Depth You Want

Grab that wonderful Jacobs chuck and a set of forcner bits..
Its easier to start with a small drill bit and work your way to a big one. It means that you don't have to shift as much material at once.
But there is no hard and fast rule for this.
What ever works for you.
I used a forcner bit which was a little smaller than my chucking pint.. The specific measurements will be different depending on if you use metric or imperial an what you have available to you.
Drill to the depth you want your box to be.
Step 18: Cut a Little Ledge in the Top and Bottom

Cut a little ledge in the top and bottom.
This will help you to make a neat job when attaching the top and bottom of the box.
Step 19: Cut the Tube Loose

This is a part with the potential to go wrong.
Some people will lightly hold the work in order to catch it once it is set free.
I used a skew but you could use a parting tool. Make sure you retain the shelf you cut earlier and let the middle part of your box free.
Step 20: Get Some More Wood

I used the band saw to cut a blank for the top rim and bottom of the box. You can use any wood handy of the appropriate size.
Step 21: Turn It Round

Turn it round.
Step 22: Make a Chucking Point and Mark How Wide You Want Your Base and Top Rim

Make a chucking point and mark how wide you want your base and top rim.
It's important to measure the width of the tube and add a little to it, If its less than the with of the tube this isn't going to work.
Then chuck it up.
Step 23: Using the Tube As Reference Cut a Channel Into Your Base to Hold the Tube.

I like to use a parting tool or an old chisel to do work like this.
(Remember tools that are not designed for the lathe might not be appropriate and may develop stress fractures and become dangerous)
Offer the tool up the wood to cut a groove, check that the groove against the tube you have cut to see how much more you should cut until you have a nice snug fit.
Remember how you did this because we will be doing it again soon.
Step 24: Make a Nice Dish Shape in the Center Taking Care Not to Destroy the Work You Have Just Done

Make a nice dish shape in the center taking care not to destroy the work you have just done.
You don't have to do this but again but it makes for a more elegant box.
Step 25: Shape the Sides of the Base of Your Box

Shape the sides of the base of your box.
Using a spindle gouge or what ever you feel comfortable with.
Step 26: Chuck It Up Part It Off and Finish Off the Bottom

Chuck it up and part it off and finish off the bottom.
I like to finish the bottoms of my turnings with a slight concave and some details but this is a place where you can be as fancy or plain as you want to be.
Step 27: Carve Out a Nice Snug Insert for the Tube

Carve out a nice snug insert for the tube.
Step 28: Use the Forcner Bit to Hollow Out the Top Rim of the Box.

Use the forcner bit to hollow out the top rim of the box.
Its important not to drill too deep or you will risk damaging your drill bit.
Step 29: Chuck the Rim Up From the Side You Have Been Working on and Carve Into It Until You Have a Space for the Top

Chuck the rim up from the side you have been working on and carve into it until you have a space for the top.
Step 30: Lay Out the Parts You Have Made Before Assembling.


Lay out the parts you have made before assembling.
You might want to have some wood glue handy to make sure the bottom and rim are fixed permanently to the bod and the lid and finial are attached permanently.

Participated in the
Formlabs Contest

Participated in the
First Time Author Challenge

Participated in the
Wood Contest


