

Introduction: A Tiny Telescope Observatory


If you're an amateur astronomer who loves spending time out in your backyard with your telescope, one of the easiest ways to increase your time under the stars is build an observatory for your telescope. More than anything else you can do, it makes using your telescope easy. Your telescope lives in the observatory, completely set-up and calibrated. You can pop open the observatory and observe the Moon for 10 minutes before the kids go to bed just as easily as you can spend an entire Friday night observing the Cosmos, from dusk until dawn. You can observe until you're so tired your eyes won't stay open, then you close the observatory up and you're in bed in less than 5 minutes.
If you browse amateur observatories on the internet, you know there are stunning examples. Many are classic domes that scream observatory when you see them. Many have roll-off roofs, so the observatory masquerades in the backyard as an ordinary shed. Some are built on housetops and some are built on stilts to see above trees. Some are spartan and utilitarian, and many are lavish with amenities and decorations. There are as many ideas and implementations for observatories as there are amateurs who have built them.
Like many amateurs, I dream of having a large spacious observatory (of the roll-off roof variety), but after a scan of my local building codes and looking at the permitting process, and after many long evenings of planning and working out costs in a spreadsheet, I decided a big lavish observatory was probably still many years in my future.
I was, however, faced with a pressing problem: I like to observe, and in the Rocky Mountains there is a LOT of snow to contend with for much of the year. Shoveling an observing area and setting up and tearing down the telescope in the cold was going to be a severe detriment to observing. So I devised a plan to have a Tiny Observatory. I was inspired by Dennis di Cicco's Doghouse Observatory, which he described in Sky & Telescope (June 2000, page 125). di Cicco said he built his original small observatory as a stop-gap while he planned for a bigger one, but it worked so well he observed in it for nearly a decade. Having spent many wonderful nights in my own small observatory, I see exactly what he meant.
The observatory described in this Instructable is called "Star Gully Observatory" (a joke, because I always wanted to call my planned big observatory "Starlight Basin Observatory"). This particular design is of a variety known as a "fliptop" or "clamshell." It was built on the cheap, in a single weekend.
Step 1: Plans & Materials


The key points in designing and constructing the observatory were:
- It had to be less than the footprint (100 square feet) that required permitting
- It had to store my telescope completely set-up, so I didn't have to do any assembly to observe
- As cheap and as simple to construct as possible; if necessary it could be taken down and moved
I wanted the observatory to be modular, by which I meant it should come apart into components, and then 1 or 2 people can carry them around. Why would I want that? I was anticipating that if I ever had to move, I could take it with me rather than starting from scratch again.
Compared with the detailed planning that I had already done for a larger observatory, Star Gully was surprisingly designed on a couple of sheets of paper. The size was fixed by the floor, which was 8 ft x 8 ft, easily constructed from two full sheets of wood butted together. The walls were short, simple stud frames skinned with single sheets of wood (I used OSB -- oriented strand board -- as it was much cheaper than plywood). The roof panels were similar stud frames skinned with sheets of wood, but then covered with corrugated plastic garden roofing. There was no permanent foundation -- the observatory sat on cinder blocks laid down beds of pea gravel.
All the materials were purchased in a single Lowes run for about $500, and fit in the back of my pickup. The bill of materials was:
- 2 sheets 5/8" OSB (for the floor)
- 8 sheets 1/4" OSB (for the walls and roof)
- 8 cinder blocks
- 52 2x3x8 studs
- 9 2x6x8 studs (for floor)
- 10 Joist hangers
- 8 plastic corrugated garden roof panels
- Roll of Tyvek
- 8 door hinges
- 2 gate hinges
- padlock and hasp
- 4 pipe flanges
- 4 6" pipe lengths, threaded both ends
- 4 pipe caps
- Olympic Counterweights (4 x 25lb, 8 x 10lb)
- 4 treated 2x6x8 (for counterweights)
- 100 feet braided 3/8" polypropylene rope
- 4 cinching rope hooks
- 4 eye bolts (lag screw ends)
- 2 ratcheting tie-down straps
- flashing and drip edge
- paint
Step 2: Walls -- East & West


Throughout the 3 days it took me to build this observatory, I had a lot of help from my then 4 year old daughter. Nothing like practical experience to make her into a DIY master herself. :-)
The side walls face the eastern and western horizons, and are the walls the roof is connected to. I wanted them low, so I could point the telescope down as far toward the horizon as possible, so they are just 36" tall.
It was cheaper to buy 2x3 studs than 2x4, and since interior space was a premium, I couldn't think of any practical reason not to use the smaller wood. The frame is simply a top and bottom rail, with studs holding them together (end-screwed through the top and bottom rail with drywall screws) on 16" centers. The skin is just 1/4" OSB sheet, screwed into the studs.
I wanted the observatory to be modular, so I lapped the wall skin on the sides with the frame on the north and south ends of the observatory. You can see in the pictures the skin of the wall hangs out over both ends by 2.5 inches (the width of a 2x3), to overlap with the end frames.
Step 3: Walls -- North & South


The north and south walls define the shape of the roof. Since the roof opens, when it is closed it simply rests on the north and south walls.
The base of the frames of the north and south walls are just 8 foot lengths of 2x3. On 16-inch centers, there are vertical studs, cut to the length that followed the profile I wanted for the roof (sloped at 30 degrees from the horizontal). Each of the verical studs was cut with a bevel on the top, so it would mount flush with the capping stud that formed the top edge of the wall and that the roof actually rests on.
These two walls ended up being slightly taller than 4 feet at the center, so I couldn’t use a horizontal sheet of OSB to skin them. Instead, I cut a single sheet diagonally across the center and skinned the ends with the pieces oriented vertically. There is a seam down the middle, but it is over the double stud at the center of each wall, so it still has plenty of support and doesn’t leave a gap for wind or weather to get through.
The north wall has the main door I use to access the observatory in the center. The door is 32”x32”, big enough to easily crawl through, but most importantly large enough to fit the telescope through!
Step 4: Foundation


The foundation is floating — I didn’t want to have anything permanent in the ground. The overall size of the observatory is small (only 8 foot to a side), so I elected to only have corner points for the foundation, with the span between the corners supported by the structural integrity of the joists (vertical 2x6’s).
At the corner locations, I dug small pits down about 18 inches and filled them with pea gravel. The intent here was to keep the foundation blocks off the ground, and isolated from frost heaving and ground settling. I laid two cinder blocks on each gravel bed, with the holes facing up. The frame then sits on top of the blocks, supporting the observatory at each corner.
The site is slightly sloped, so this is the stage where leveling happens. The uphill pits (east side) are slightly deeper, so the floor frame sits level when it is on all four sets of blocks.
Step 5: Floor Frame


The footprint of the observatory was chosen to be 8x8 so I could make it out of two pieces of OSB sheet butted against one another without having to cut them. Overall it’s a bit smaller than perfect given the size of my scope (see “Observatory Cutoffs” below), but the advantages for building simplicity outweighed those annoyances.
The frame is 8x8, so the end rails were left at purchased length, and the other seven joists that connect the ends were cut down by 3 inches (the width of two 2x6’s) to 7ft 9in. To provide plenty of support and rigidity (you won’t want the telescope bouncing around when you move around in the observatory), the joists were put on 16-inch centers.
The two outside joists were end-screwed into the end caps using decking screws. The other 5 joists were mounted in joist hangers, then end screwed into the end caps using decking screws. The entire assembly can be picked up and moved by two people.
To provide a bit of protection from moisture, as well as a layer of trapped air (insulative, I hope — it can get cold standing at the telescope at night!), I covered the bottom of the frame with Tyvek, and then flipped it over onto the foundation blocks.
The top was skinned in two sheets of 5/8 OSB, screwed down into the joists, which makes it very rigid and stable.
Step 6: Mounting the Walls


With the floor framed out, the next step was to put the walls in place. I started with the south wall, supporting it with an external brace while I put decking screws down through the lower rail of the wall into the joists in the floor frame. The rest of the walls went up the same way, proceeding counter-clockwise: east, north, then west.
As noted above, the east and west walls were designed so the skin of the walls laps over the frame of the north and south walls. I screwed the walls down into the floor joists, but then put additional screws through the lap into the adjoining walls. The final structure was quite rigid.
The corners were each covered with a vertical strip of L shaped flashing to prevent weather from driving water or snow into the seam between the wood (sorry, I didn't get a picture of that, but if you look at the full observatory pix, you'll see the dark flashing running up each corner).
Step 7: Roof


The roof frame is just like the side frames — a base and a cap rail, each 8 feet long, with vertical studs end screwed into them on 16 inch centers. The roof angles up at 30 degrees from the horizontal. The studs were cut to a length of 4 feet 4.5 inches, giving a total length for the roof side of 4 feet 7.5 inches.
The surface of the roof was a skin of 1/4 inch OSB, covered in a layer to Tyvek for extra moisture protection. The side edges and edges near the ground were faced with drip edge to guide water away from the roof and toward the ground.
The outermost exposed surface is corrugated plastic garden roof panels — they were cheaper than aluminum roofing, and easy to cut and work with. They sold pre-cut “wavy” wood supports to underlay the roofing surface, so I put a run of this at the top, center, and bottom of the roofline, to close off the hollows underneath the corrugation. On the topside, I put an additional piece of the wavy wood upside down on the outside to make a flat edge that I could mount the ridge cap to.
At the locations where the plastic roof panels would overlap, I put vertical strips of lathe to match the height of the wavy support wood that runs horizontally under the roof panels. This provides a solid point to screw into to fasten the roof panels to the surface.
To secure the plastic roof panels to the roof super-structure, I used short lagbolts with rubber gaskets (sold near the panels, for this purpose). Additionally, at the locations where the panels overlap, I ran a bead of silicone caulk under the outer panel, to seal the gap between the two and help keep the edges down.
Step 8: Attaching the Roof


Each side of the roof sections are held in place by four heavy duty door hinges on the east and west walls. To secure the roof, I first attached the hinges to the observatory walls, then laid the roof section in place in the “closed” position. There is plenty of friction between the 2x3 surfaces that one person can hold the roof section in place while a second person folds the hinges up and screws them into the lower rail of the roof section.
Depsite being large and bulky, the roof sections are not heavy, and can easily be popped up and pivoted on the hinges by a single person standing inside the observatory.
With both roof sections in place, a ridge cap is fastened over the seam where they meet at the peak of the roof. The ridge cap is fastened ONLY to the east roof section, so it moves out of the way when the east section is lifted open. The east section must be opened first, and closed last, so the ridge cap ends up in the correct, protective position.
Step 9: Door


I put a single door in the north wall. It's a simple affair, constructed with 2x3 frame and a single center stud, skinned with 1/4" OSB like the observatory walls. I did a little fancy woodwork on the front, which provided a bit of thickness to mount a pair of gate hinges. The door is held shut by friction when I'm in the observatory; to secure it when the observatory is buttoned up, I used a simple security hasp and a padlock.
Step 10: Counterweights


The counterweight system was a late addition to the design. I had originally intended to simply lift the roof panels up and down from inside the observatory, but in the end I couldn't get enough leverage to do it. I considered many different ways of lifting from the inside or outside, but they all really added to the hassle of opening up the observatory -- I wanted something simple.
Eventually I started thinking about counterweights, and this system was simple and elegant. The basic idea is the same as a see-saw (for those of you who remember your physics class, this is about balancing "torques" around the pivot point, which in this case is the hinges). I estimated the weight of each roof panel (quick and dirty, using the dimensions of the panels and the density of wood), and figured that a total of 90 pounds of weight could be used to make the roof panels pivot easily if the weights hung 2 feet out beyond the hingeline.
I made long rails to hold the counterweights out of 2x6 lengths, and bolted them directly into the outer face of the 2x3 rails that make the outer edge of the roof frame. This worked perfect in the end because the rails covered the interface between the roof and the walls (effectively sealing it against the weather), and when the roof rotated up and open, the rail holding the counterweight was on the outside of the walls, allowing the roof to fully open! I probably couldn't have planned it that well if I had tried!
For weights, I got Olympic counterweights to put 45 lbs total at each corner. I mounted the counterweights on 2" pipe fittings. First, I bolted a flange into the rail, and inserted a 6 inch length of 2" diameter pipe threaded at both ends. The counterweights slip onto the length of pipe, and a solid cap goes on the outer threads to hold them securely in place.
Step 11: Ropes


In order to open and close the roof, and support it when it was open, I used a simple rope system. I can push the roof open by hand, pivot it past vertical, then lower it slowly by holding onto the ropes. When it is time to shut the observatory, I simply pull on the ropes, and pivot the walls to vertical and lower them into their closed position.
I mounted an eyebolt at the end of each of the roof rails near the peak (4 bolts total), and two eyebolts near the peak on the north and south walls (4 bolts total). I threaded lengths of 3/8" braided polypropylene rope through the eyebolts, so when the roof panels were folded open, the taut rope loop stretched from the eyebolt on the roof peak to the eyebolt on the wall peak. In the pictures you can see I used a plastic hook that has a friction channel that allowed me to change the length of the loop if needed (though in practice I never used this feature -- I could have tied the rope in a permanent loop through the eyebolts).
When the roof was closed, I used the same set of eyebolts and hooked a ratcheting tie down strap (red in the photo) through them to cinch the roof down and shut; a preventative measure against wind trying to lift the observatory roof up when the structure was closed.
Step 12: Interior & Amenities


In the interior, I put down foam interlocking flooring to make standing a bit more comfortable, provide a bit of insulation from the cold, and to protect dropped equipment.
Space is very tight, so there was no space to have a table to put star charts or my notes down, but the folded down roof panels were vast flat areas I could utilize! I put thin plywood panels across the joists on both sides to serve as simple tables. It was an effective and workable solution. The hollows to the sides of the panels, between the roof joists, also provided useful trapped spaces to keep things safe and out of the way (snacks, coffee cups, and so on).
Over the door, I screwed in a plastic cup to keep a permanent supply of writing utensils near at hand, as well as a thermometer.
Step 13: Observatory Cut-offs


The observatory is more or less exactly the right size for the telescope to sit in its horizontal stored position diagonally with the roof closed. When the roof opens up, the scope can pivot upward and get to most of the sky. However, in the cardinal directions, as the scope pivots down toward the horizon it eventually hits the walls, preventing it from going any lower. The limit to where the telescope can point is usually called an "observatory cut-off." The cut-offs are short in the east and west directions, but much higher (along the peaks) in the north and south directions.
Exactly where the cut-offs are and how high is a matter of choice. For me, high north and south cut-offs was the optimal configuration because there are “light domes” (a large area of the sky that is washed out from city light pollution) both due north and due south, making it unlikely that I would observe much in either of those directions. Toward the north, I made sure that the roof was low enough that I could still use the telescope to see Polaris, the North Star; in the northern sky, if you wait long enough, everything eventually rotates up in the sky above Polaris, so as a result I didn’t really lose access to anything in the sky to my north.
To the east and west, everything will eventually rotate up high enough to clear the observatory cut-off in those directions.
Step 14: Complete!


The day the observatory was completed, it went through a snowstorm -- no joke! Not a skiff of snow inside, inspiring confidence that it would, indeed, protect the telescope from the elements.
Opening up and starting to observe takes less than two minutes. You release the two ratchet-down straps, fold out the east roof panel, fold out the west roof panel, and you're ready to observe!
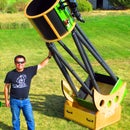
Step 15: Beauty Shots


I hope you enjoyed this Instructable and are inspired to try and build your own tiny observatory. It makes observing easy and pleasurable any night, for any amount of time. Thanks for reading along; here are a few beauty shots of the observatory I've taken over the years.

Second Prize in the
Tiny Home Contest


