

Introduction: All-in-One Raspberry Pi Getting Started Guide


Raspberry Pi, one of the most ingenious invention for makers and hackers. Before we get started into the nitty gritty details of getting it setup, we first must ponder over the question that what the Raspberry Pi actually is?
Raspberry Pi is a linux based single board computer in a small form factor capable of fast processing (compared to Arduino) and able to interact with the physical word through inputs and outputs. It has built in hardware for USB, HDMI, Ethernet etc providing great connectivity options and ease of use.
In this instructable i will focussing on the very basics including the following:
- Understanding the Pi
- Building a sturdy base
- Setting up the Pi
- Installing NOOBS
- Wifi Setup
- Picamera Guide
If you found my ible helpful or up to the mark, please vote for me.
Step 1: About the Pi

The Raspberry Pi is the size of a credit card. It is developed by the Raspberry Foundation in UK. The first Pi series was commercially launched in 2012 after which the design was improved and upgraded in the following years.
There are two distinct and popular designs, Model A and Model B. Both have different versions with different Specifications but the design and features are common in all the version.
Above all the Pi is ridiculously cheap. Starting from a mere $20 and going up to $45 according to the version, it truly is a dream come true for makers on a budget.
General Specifications:
700 Mhz or 900 Mhz ARM Processor
256 MB or 512 MB or 1 GB Ram
Dual Core Videocore GPU
SD Card or MicroSD Card slot
2 to 4 USB Ports
HDMI Port
Micro USB Power Jack
3.5 Audio Jack
10/100 Ethernet Jack
There are some key interfaces i will talk about:
- GPIO Connector
- USB Ports
- HDMI Port
- Ethernet Port
- Display Port
- Camera Port
- Composite Video Jack
- Power Connector
1. GPIO Connector: The GPIO Connector on the Pi is a male header which can be used to interface hardware with the Pi. It has 8 and above GPIO(General Purpose Input Output) pins on which led's etc can be connected. These pins are very sensitive and can only handle small currents.
2. USB Ports: The Pi has 2 to 4 USB ports. They work the same way as any other USB port and can be used to connect Mouse, Keyboard, Wifi dongle, Flash Drive etc.
3. HDMI Port: The HDMI port is used to connect the Pi to a display. It is pretty straightforward but may require some configuration. I will delve into that later on.
4. Ethernet Port: The ethernet port is used to connect the Pi to an internet connection. Its just plug and play. Although Wifi is much more convenient hence i will tell you about installing that as well.
5. Display Port: The display port is a ribbon connector port used to connect the Pi to its dedicated LCD display which is available in the market.
6. Camera Port: This camera port is also a ribbon connector port used to connect the PI camera to the Pi. I will show you how to do that later on.
7. Composite Video Jack: this is used to connect the Pi to a composite video display. It requires some configuration to it started.
8. Power Jack : The Pi is powered using a Micro USB Adapter of 5V with minimum current capacity of 500 mA but its better to use a good quality mobile charger rated at 1 A for smooth performance.
Step 2: Materials for Getting Started


These are the absolute basics required without which the Pi cant be setup
- Raspberry Pi (Obviously)
- USB Keyboard
- USB Mouse
- HDMI Monitor + HDMI Cable OR VGA Monitor + VGA to HDMI Converter + VGA Cable
- 5V Micro USB Power Adapter
- 8GB or above Micro SD Card
- Card Reader
- Computer with Internet Connection
- Ethernet Cable
These are the addons i will explain in my tutorial
- Wifi Dongle
- Raspberry Pi Camera Module
- Ethernet Cable
Step 3: Base Building


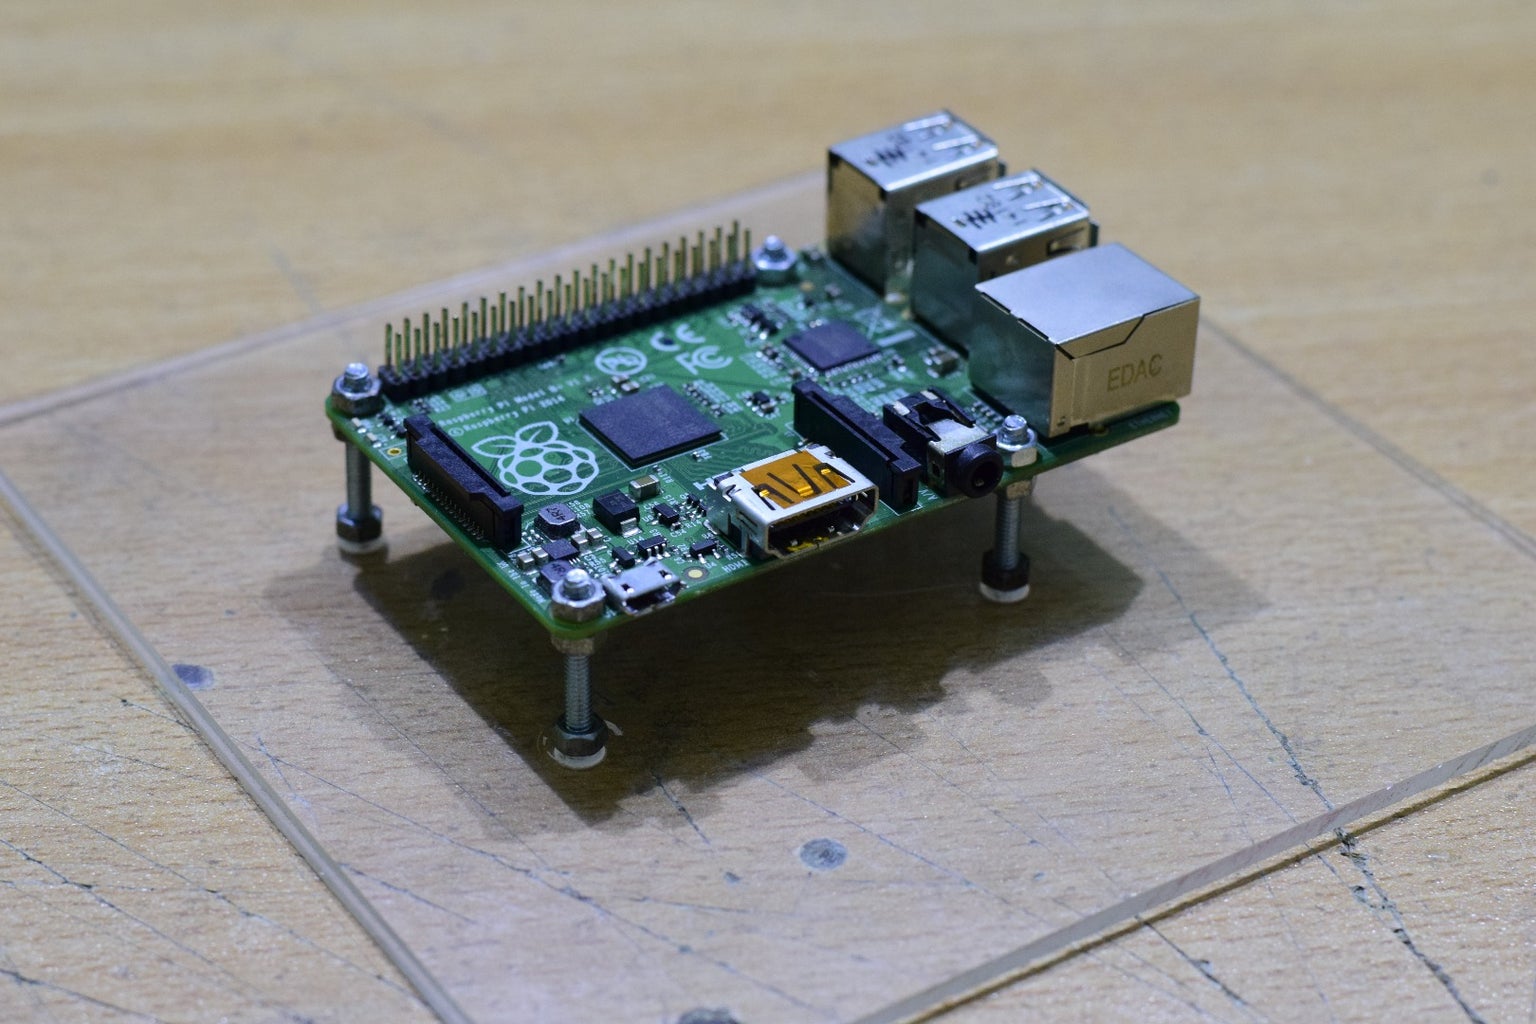
Well at this point I guess you have a Pi in your hand. I mean a Raspberry Pi. :P So the Pi is small and when you connect all the cables it goes out of control. Its hard to keep it at one place. This can be frustrating and dangerous hence before starting to work on it we will mount the Pi on a plexiglass base.
Materials
- Piece of plexiglass
- Screws x 4
- Nuts x 12
To build the base cut the plexiglass if required using the score and snap technique. Mark the center of the plexiglass and place the Pi in the center. Mark the four holes on the base using a sharpie. Drill holes using a drill bit of the right size according to your screws. You may need to run the drill through the holes in the Pi as well. Don't use larger diameter screws as it may damage the Pi. Place the screws in the four holes and nut it down. Then add more nuts a little higher. Place the Pi and add nuts above it to clamp everything down.
Step 4: Installing the NOOBS on SD Card


We will be installing the Linux OS in the SD card.
First of all we will have to download the Linux Distribution named NOOBS (New Out of The Box Software) from the following link
SD card should be 8GB or above. For Model A standard SD Card and for Model B Micro SD Card.
Follow these instructions for proper installation of NOOBS on the SD card
- Format an SD card that is 4GB or larger as FAT. See instructions on how to do this below.
- Download and extract the files from the NOOBS zip file.
- Copy the extracted files onto the SD card that you just formatted so that this file is at the root directory of the SD card. Please note that in some cases it may extract the files into a folder; if this is the case then please copy across the files from inside the folder rather than the folder itself.
- On first boot the "RECOVERY" FAT partition will be automatically resized to a minimum, and a list of OSs that are available to install will be displayed.
Formatting the SD Card
Use the following software to format the SD Card. Install it on your system following the instructions.
Step 5: Making All the Connections


Now you have to set up the Pi. It is all pretty straightforward.
- First connect the USB Keyboard and USB Mouse into the USB ports of the Pi.
- Then connect the HDMI Cable or HDMI to VGA adapter depending on the monitor you are using.
- Next plug in the (Micro) SD Card into its slot. Its contacts will be facing upward when you plug it in while the Pi is upright.
- Lastly connect the power adapter into the power connector.
Step 6: First Boot Up and Installation of Raspbian


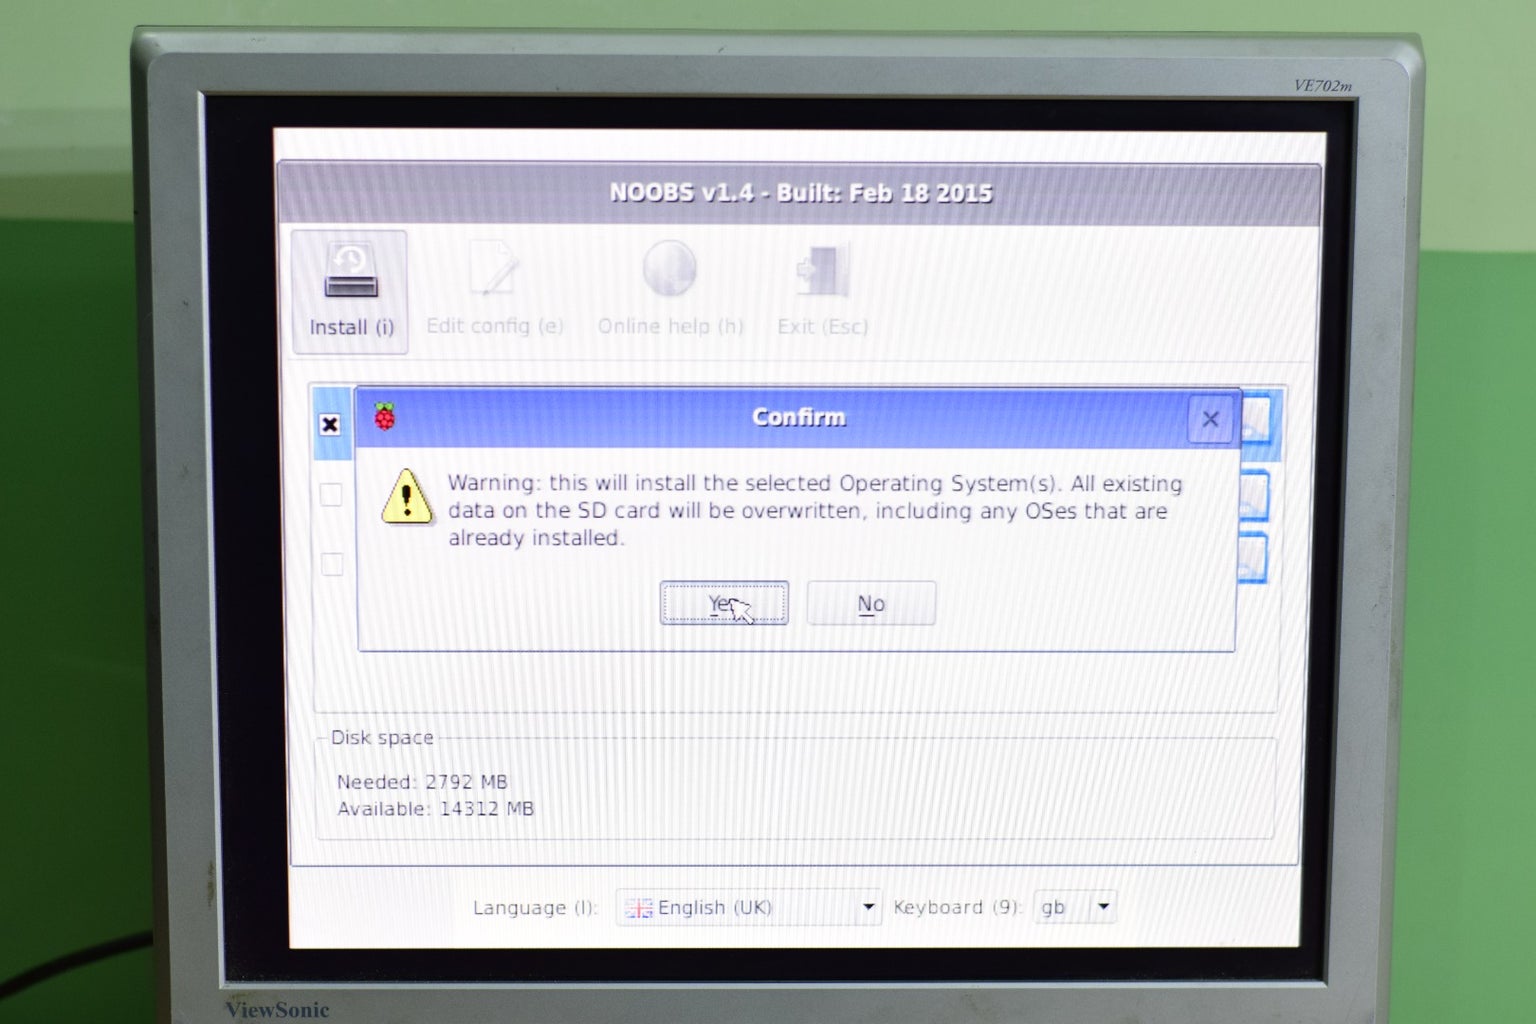


Now the first boot is simple. As the Pi is powered you will see the display showing you a menu of OS to choose from. You will choose the first option which is Raspbian and click on Install. And then Ok on the prompt box. The setup will work its magic and install the OS. So sit back and be patient as it will take about 10 to 15 minutes. You can read the information being displayed on the setup window to get insight into what is Raspbian and how you go about it.
Once installed it will tell you that OS is installed. After that you will click OK and then reboot the Pi by removing the power and reconnecting it. It will boot up and after going through some initialization process it will show the Configuration Setup. There you will select the third option and select Boot to Desktop.
Then again reboot the Pi like before. You may not get booted into the Graphical Interface the first time. If that is the case then Reboot again. I got it in the third try while making this Ible.
So you are done. You have successfully installed Raspbian on you Raspberry Pi
Step 7: Inside the Raspbian

Well I am not much experienced into the details of the Raspbian and how it works. But there are some simple games and softwares pre-installed for you.
The most basic is the command line interface from where you can change your Pi such as activating Outputs or changing settings.
Then there is Python which is used for programming and developing softwares. It has a lot of depth and you can really learn a lot from it. There are like a gazillion tutorials on Instructables which show you how to write softwares and stuff.
There is an internet browser allowing you to browse the internet. You can also connect a flash drive and view stuff from it including documents, images etc.
Go to this link for more info.
Step 8: Connecting Your Pi to the Internet


Well you need to connect your Pi to the internet using ethernet cable before you can proceed to installing the Wifi. But you must be thinking that it is very difficult to connect the Pi to ethernet because your router is located somewhere remote. Well i have a solution for that. This is my very own little hack for this problem and i think you will find it very helpful.
What we are going to do is that we will use our laptop's ethernet port to share our Wifi connection with the Pi. For that you will need to go to Control Panel on you laptop and click on Network and Internet. Then open the Network and Sharing Center. On the left menu click change adapter settings.
Now you will right click your wireless adapter which i assume is connected to a network. Go to the sharing tab and check both the lines. Click Ok to save the settings.
Connect the Pi and your Laptop using a standard ethernet cable and you should see the Pi automatically connecting to the internet.
Now you can proceed to making this connection wireless.
Step 9: Upgrade You Raspbian


Now you will have to upgrade you Raspbian. This is not mandatory but if you want you Pi to function properly, this is a must. Its pretty simple. Once you have connected you Pi to the internet, check your internet connection using the browser.
After confirming that the internet is connected, you will open the terminal and type in the following command
"sudo apt-get update"
and press enter. It will start to work and download all the required updates. Then you will type in the following command
"sudo apt-get upgrade"
and then press y and enter when asked. It will do all the upgrades required. You need to upgrade because in the new version there is a larger support for Wifi dongles. Bugs have been fixed and overall performance is enhanced. So all in all you should not miss this step. After rebooting check the version.
You can check your version with the following command
"uname -a"
It will only show a change once you reboot your Pi.
Step 10: Wifi Setup


First what you need to do is visit this page to see the list of supported Wifi dongles. The list is pretty elaborate but i would recommend you to buy a dongle which is completely compatible and doesn't require additional drivers as those are not easy to install. Also look for a adapter that doesn't require additional powered USB Hub.
I bought the TP Link TL-WN725 with the Realtek RTL8188CUS.
Now that you have upgraded everything installing the dongles should be a breeze. If you havnt it will be next to impossible to figure it out.
So all you have to do it plug in the Dongle and reboot the Pi from the Menu. Once rebooted it will automatically install the drivers and show the available connection when you click on the double computer icon. Select the desired network and connect to it by entering the password. It will connect and now you can browse the internet.
So a bit of history. When i first bought the dongle, it wasn't supported by Raspbian but in the latest upgrades they have added its support and now i can use it very easily.
Step 11: Camera Setup


I recently won a contest on instructables and one of the prizes was the Raspberry Pi Camera so i thought to include it in my ible too. I am only going to show you the basics of getting started with the Pi Camera.
First you have to enable the camera. Open the terminal and type "sudo raspi-config" and press enter. Select the Enable Camera option and select Enable.
Turn off the Pi and connect the camera. Lift the base one the Pi and insert the ribbon with the contacts facing the HDMI side. Push the base back in to fit everything nice and snug.
Turn on the Pi and open Python 2 from the Menu. Type and enter the following comands
"import picamera"
"camera = picamera.PiCamera()"
Then you will see the red light on the camera to go on.
Use this command to preview the camera feed.
"camera.start_preview()"
and this to stop the feed
"camera.stop_preview()"
There are a whole range of commands you can use to change setting and take images. I wont go into their detail but you find them on this link.
Step 12: Concluding Remarks

Well I hope after going through this guide you will have much ease to set up your Pi. Let me remind you that this is for the beginners getting started with the Pi. I just wanted to provide an easy guide to follow to save a lot of time which I spent on figuring out problems in the most basic setup.
Thank you for viewing and do comment any problems or point out any mistakes because like I said, I am not a Pro in the Pi myself.
If you found my ible helpful or up to the mark, please vote for me.

Runner Up in the
Epilog Contest VII

Runner Up in the
Raspberry Pi Contest


