

Introduction: Almost FREE Speed Sled


I shall teach you how to make this super effective nearly free speed sled for training!
Step 1: Stuff You Need (AKA You Need Stuff and Things)

I'll start this 'ible off by saying you need a tire as emphasized by the kewl picture that I got from Google images (like all the other pictures except for the 2 that are the fully completed project...those are all me).
Stuff and things Lori:
-An old beat up free tire (go to your local Craigslist's free stuff section, use your cars donut and replace with AAA or fix-a-flat, steal your neighbors, or you can even buy a new one for $1.8 billion)
-Powahhh drill with drill bit slightly bigger than the U-Bolt's diameter
-1 U-Bolt (not to be confused with a U-Boat...if you don't know what a U-Bolt is do not fret unless on guitar for I will show you!)
-Spare random large size washers
-Tow rope with/without hooks, tow straps, or just really strong rope (not paracord you paracord junkies! paracord has too much stretch unfortunately)
- 3/4"-1" diameter metal pipe, about a foot long and threaded on at least one end
-Spare piece of wood, really thick sturdy plywood, metal plate if you have one (it's going inside the tire so it doesn't have to be huge...just big enough with only the corners covering the tire sidewall when you lay it on top)
-1 metal flange with the same size diameter as your metal pipe (home depot was pretty helpful)
OPTIONAL:
-Some extra nuts (not making a joke...they'll help keep the U-BOLT in place, and your manhood! ok...I'm done lol)
-Flat weights (like for a barbell) either standard 1" diameter or Olympic...doesn't matter (steal them from the 'roid nut across the street and hide in a tree since he can't raise his arms above his head, make some concrete one's like I have seen other people do in their 'ibles, or just buy them legitimately since an average price in store is about $1 per 1 lbs. and they're cheaper on Craigslist)
Step 2: Forcing the Plywood Into the Tire (AKA Use the Force)


Bully the tire until it falls over on it's side to cry...now attack! (I used to be a bullying victim so I can joke about it now but if it happens to you, let an adult know and if they don't listen then tell another adult...it gets better, I promise! Kids are d*ckholes sometimes)
Take your spare plywood sheet or metal plate or piece of wood...it really doesn't need to be fancy, you just have to get it in there like the third picture with the arrows shows you. It has to be under the first sidewall and covering the bottom sidewall for the most part...it doesn't have to be filling in all the gaps because when you add weights, it will push the bottom sidewall flat and that should take care of the issue.
Step 3: Attaching the U-Bolt (AKA U Talking 2 ME!?!)


Snatch up your (holding it by the curved section) U-Bolt, I-Bolt, or alternatively a double U-Bolt (second pic) and mark where the 2 bolt ends meet the rubber of the tread...I made a scratch with a piece of gravel but I suppose you could use white-out, the bit from the drill, or be boring and use a pen.
Grab your handy dandy power drill and put some holes into the spots you just marked, make them big because the rubber will start to close as soon as you remove the drill from the hole.
Push the U-Bolt through the 2 holes and through the tread to the other side. Your U-Bolt should have come with the flat double holed bar washer thingy that is in the picture, slide that on the 2 ends inside the tire (this will help lessen the strain and cut down on the possibility that the U-BOLT tears through the rubber of the tire).
Throw some washers and nuts on that bad boy, tighten them all the way and you're good to go on to the next step!
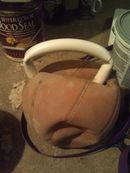
Step 4: Placement of the Pipe and Flange (AKA Laying Down the Pipe...bow Chicka Bow Wow)


Place the flange in the direct middle of the piece of wood...direct middle...not off by even 1 mm! Yeah, this isn't a Michael Bay film...anywhere approaching the middle of the board will be good enough.
Screw it tight in place with your drill or by hand, whatever floats your boat.
Put the threaded end of the pipe into the flange and turn until it won't turn anymore all sexy-like. (I'm having way too much fun with these innuendos...lulz)
Step 5: Attachment of Tow Rope (AKA Towmorrow, Towmorrow! I'll Love Ya Towmorrow! Annie Reference for Those of You Uncultured Swine...lol...peegz!)


Almost done, I promise! You've been a trooper...not a storm trooper, I'm sure you can hit the broadside of a barn.
This is the easiest step to explain, simply clip the tow rope hooks onto the U-Bolt. Alternatively, you can use tough rope or even tow straps and just tie it on but make sure you double, triple, and quadruple knot to the nth power! Maybe even throw in a carabiner that IS rated for climbing if you're using rope just to make it more storage friendly.
Please don't use paracord since it is too stretchy and wouldn't provide a good experience which makes me look like a jerk for having you build the whole thing and then you'd think I suck...plus it would dig into your flesh, not kidding.
Step 6: Add Some Weights or Just Have Fun (AKA Git Yer AHHHNOLD On!)


You can put some flat weights on the pipe either Olympic, or standard, or make your own with cement (yes, there's an instructable on it...I checked). You can also just use it without the weights, sling the rope over your shoulders and run like the wind bullseye!


