Introduction: Arduino Aquaponics: Real-Time-Clock Part I
AA fundamental necessity of any controls system is the ability to track time. As far as we are aware, the Arduino has three methods it can employ:
1. Serial. Repeatedly get the time over the Serial connection.
2. External Hardware. Real-time clocks, like the ChronoDot from Macetech, establish a base time when the Arduino sketch is compiled. When you request the current time in the sketch you actually receive a time based on the time that has elapsed since compilation.
3. Ethernet. Access time using the internet NTP service.
This tutorial set focuses on option 2. In Part I we explain the basics of getting the ChronoDot set up and displaying the current time over serial. You can find more projects using the ChronoDot in our upcoming book, Automating Aquaponics with Arduino.
Edit: For some reason I couldn't edit Part II, so it has been deleted and will be added to this instructable.
The ChronoDot
The ChronoDot is a high precision real-time-clock (RTC) and boasts a number of features needed for Aquaponics. The V2.1 release introduced the DS3231SN chip, which has an industrial temperature range of -40C to +85C and outputs a temperature compensated time - important for aquaponic control systems that reside outdoors in the heat and direct sun.
The ChronoDot includes an onboard battery cell for a CR1632 battery, allowing the clock to keep track of time should the Arduino lose power, regain power and restart. Anyone in aquaponics can appreciate the ability of a control system to automatically reboot and resume operation in the event of a power glitch. The disadvantage of the ChronoDot, and RTCs in general is the inability to handle Daylight Savings Time.
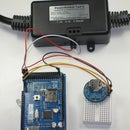
The Environment DAQ can be configured with the ChronoDot using the prototyping area, which is exactly wide enough to handle the RTC (coincidence?).
Step 1: Parts List & Mounting
Parts List
1 x Arduino Uno R3
1 x ChronoDot
4 x Jumper Wires
Mounting
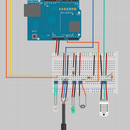
Figure 3 shows the Fritzing diagram to connect the ChronoDot to the Arduino. Mounting to a perf board or breadboard is straightforward with the RTC's male header pins.
Step 2: Arduino Library and Sketch
The sketch for this tutorial shows how to request time from the ChronoDot and display it over Serial. Part II will cover setting toggle times.
RTClib.h
The libraries are needed for the ChronoDot: RTClib.h and Wire (Wire comes with the IDE).
Download the RTClib zip file, extract and if necessary rename to "RTClib" before moving a copy into /arduino-1.0.3/libraries/. Having the correct name is important.
Arduino Sketch
You can find an explanation for each part in the comments.
// Date and time functions using a DS3231 RTC connected via I2C and Wire Lib
#include <Wire.h>
#include "RTClib.h" // Credit: Adafruit
RTC_DS1307 RTC;
void setup() {
// Begin the Serial connection
Serial.begin(9600);
// Instantiate the RTC
Wire.begin();
RTC.begin();
// Check if the RTC is running.
if (! RTC.isrunning()) {
Serial.println("RTC is NOT running");
}
// This section grabs the current datetime and compares it to
// the compilation time. If necessary, the RTC is updated.
DateTime now = RTC.now();
DateTime compiled = DateTime(__DATE__, __TIME__);
if (now.unixtime() < compiled.unixtime()) {
Serial.println("RTC is older than compile time! Updating");
RTC.adjust(DateTime(__DATE__, __TIME__));
}
Serial.println("Setup complete.");
}
void loop() {
// Get the current time
DateTime now = RTC.now();
// Display the current time
Serial.print("Current time: ");
Serial.print(now.year(), DEC);
Serial.print('/');
Serial.print(now.month(), DEC);
Serial.print('/');
Serial.print(now.day(), DEC);
Serial.print(' ');
Serial.print(now.hour(), DEC);
Serial.print(':');
Serial.print(now.minute(), DEC);
Serial.print(':');
Serial.print(now.second(), DEC);
Serial.println();
delay(10000);
}


