

Introduction: Arduino MIDI Drums (Wii Band Hero)+DAW+VST


Hi! This tutorial is about how to modify a Wii console drum kit, the band hero, featuring a snare, 2 toms, 2 cymbals and kick pedal. Also, how to get the sound from the drum kit, with a step by step guide, using a DAW and VST availables for free.
Just keep in mind, this is not a professional drum kit, so treat as such.
This tutorial is based on Evan Kale´s work with a Rockband's drum kit. So if you have one of those, go for his tutorial:
https://www.instructables.com/id/Convert-Rockband-...
You can always make this project by making the drum pads by yourself.
Hardware needed:
-Arduino nano
-Drum kit
-Piezo sensor (for the kick pedal)
-1M resistors x 6
-220R resistor x 1
-MIDI device or PC with souncard midi/game port
-Wires
Software needed:
-DAW (Digital Audio Workstation) We will use Reaper (free trial)
-VST (Virtual Studio Technology) MT Power Drumkit 2 (free)
-ASIO (for latency)
-Edrum midi mapper (optional)
Step 1: Preparing the Drum Kit Circuit


We just work on the module where the gamepad is connected. Once you have opened the module, remove the things we don't need like the analog stick, midi in and the gamepad's connector.There is a photocoupler PC900V, useful if you want to connect the drum kit to a souncard with game/midi port. Cut the tracks(snare,tom1,tom2,crash,hihat,kp,hp and midi out ) as shown on te pictures, to avoid the contact with the internal circuitry. Don't cut the "0V" tracks. (watch the pictures). Remove the layer next to start button to make a common ground for the sensor's resistors and the midi port (output).
Step 2: Modifying the Circuit


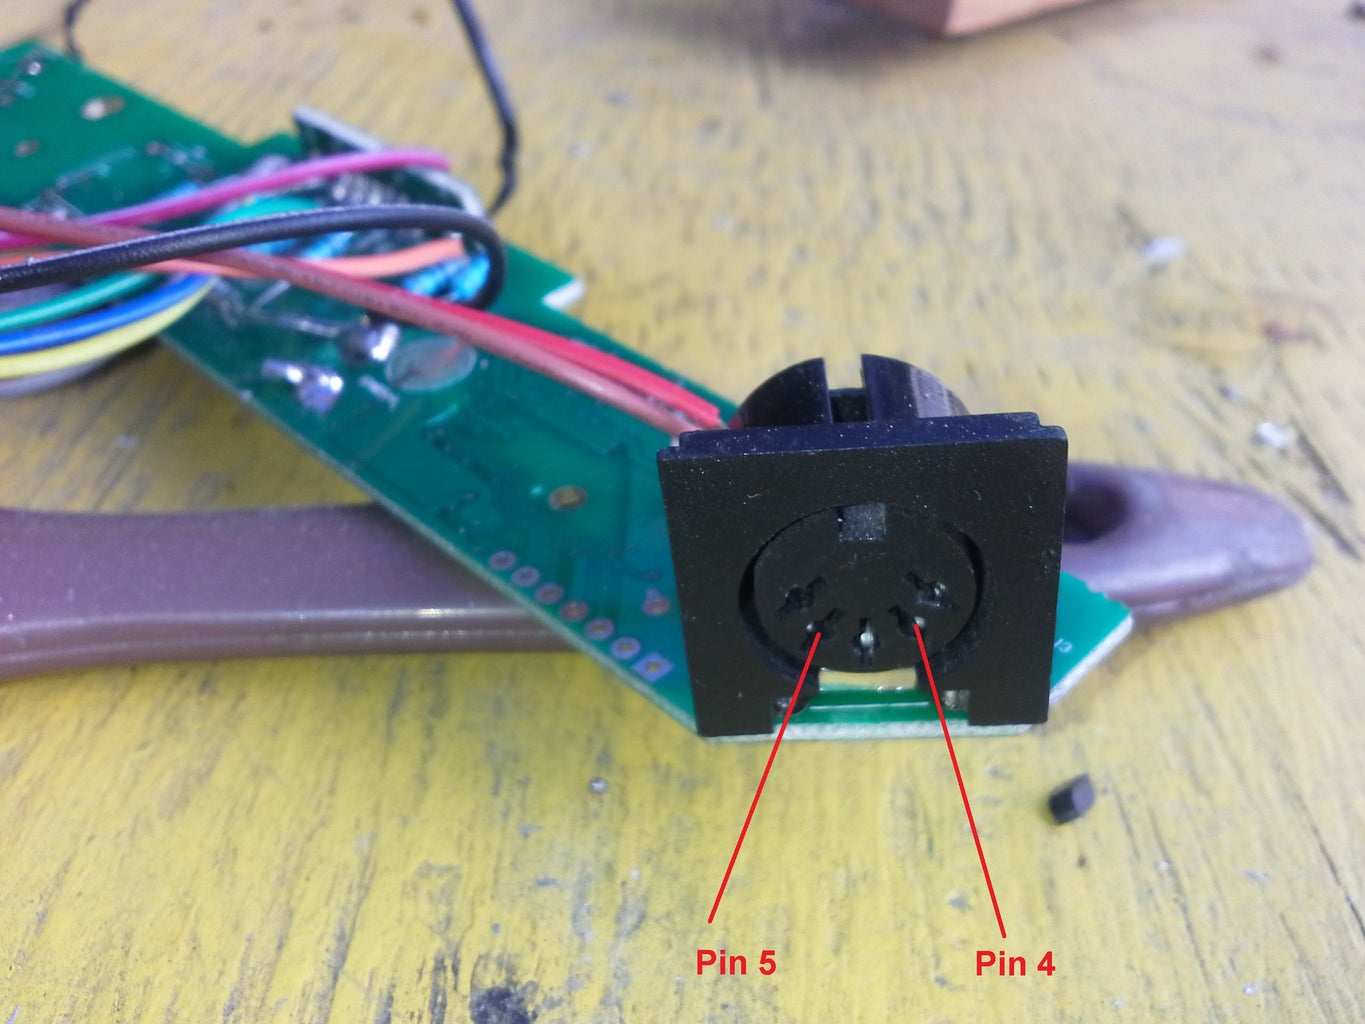
Now you need to solder a 1M resistor between the pad terminal and the common ground,as well as a wire to the pad terminal with a suitable connector for your arduino (i'm using a dupont connector). Wire the midi output as showed on the pictures, the red wire with 220 ohm resistor to arduino 5V and the brown wire to arduino TX. Ignore the short black wire, it was just for testing purposes.
I'm using an arduino nano, to fit it inside the box. Maybe you will get a warning when compile because there is no much memory available, but works fine for me .
Use the schematic to wire from the board to the arduino (HP to A0,Tom2 to A1, etc). You can see the function of every analog pin in the code picture.
PS: For some reason i thought that "KP" was kick pedal but doesn't connect with the only black jack on the rear panel, that's why i used "HP".
Step 3: Modifying the Kick Pedal


Unfortunately, the kick pedal doesn't has a piezo sensor, so we need to fix that. Don't worry, it's easy.
You can buy (really cheap) one or find it on a speaker (used as tweeter). Unscrew the cover and cut the built-in sensor and replace it for the piezo. Glue some rubber material to the cover bottom and fix the piezo.
White wire or plug tip ------> red wire or piezo center
Grey wire or plug sleeve--->black wire or piezo exterior
Step 4: About the MIDI Interface


The signal from the arduino (midi out) Is not audio, so you need a MIDI device. You have at least two options: MIDI to USB converter or use a pc sound card with MIDI interface.
You can buy a MIDI to usb converter on any big online store (you know).The blue one on the pictures is an example. Be careful with some cheap midi usb interfaces,just google "cheap midi to usb" and you will see.
My option was to use an old pc, install win XP sp3 (because the drivers) to use a sound card with midi interface. All the recommended software works on win XP.
You can use the photocoupler from the pcb and make your midi interface. Use the PC900 and make the circuit . The resistors were soldered on the midi port to simplify the circuit.
The data sheet to identify pins:
http://html.alldatasheet.com/html-pdf/43380/SHARP/...
Connect your midi cable for the next step.
Step 5: Testing

Conect the arduino to the pc.You will need that just for power or modify the code and re-upload(Maybe you will have to change the sensibility).
The data is via MIDI , not usb!
Upload the code. The first test, is to hit a pad and you must see the TX led blinks. If nothing happens, adjust the sensibility at the begining of the code and re-upload. Use my settings to begin.
If you want, use edrum midi mapper to make sure your midi device is detected and the system is sending signals. This will make things easier than try to figure out If the DAW or VST is working properly. Watch the video.
Open Edrum midi mapper >midi in and select your midi device
Go to:
Pads->New Generic and double click on the new drum pad.
Click the box with 3 dots in front of "Note"
a message will pop up "Strike a trigger to set note and channel"
So, hit a drum pad and the message will dissapear and the note number will be re assigned.
The arduino code:
Attachments

Step 6: Making Sounds!

Install all the software needed.
For this step, watch the video.It's better than the pictures.Here some general directions:
Reaper is where we'll open the VST
ASIO provide a low-latency and high fidelity interface between a software application and a computer's sound card, will run automatically while Reaper is running
MT power drumkit is a VST or plugin and not an exe program.You need to copy the files (not cut) into the reaper plugins folder. The instructions are on the download page.
Files: MT-PowerDrumKit.dll and MT-PowerDrumKit-Content.pdk
Lauch Reaper. Go to Options-Preferences, a menu will pop up with the options on the left side. Now go to:
Audio->Device->Audio System and select ASIO >OK
Audio->MIDI Devices->MIDI Inputs and select your midi device(must be Enabled) >OK
Plug-ins-> VST->Add and select the path to reaper's plugins > Apply >OK
To open the VST (MT power drumkit 2) go to the tool bar:
Track->Insert Virtual Instrument on new track
Select:MT-PowerDrumkit(MANDA AUDIO)(16 out) and press OK
A message will pop up: Building Routing Confirmation, press Yes
Donate or skip to start with Power Drumkit. Use your mouse to hit the drumkit. If everything works fine you will hear the sounds from the virtual drumkit.
Note:You may need to close and re-open Reaper
Now we need to map the drum pads. Go to settings, you will see different drum gears,select one and hit the pad you want to assign.Repeat for all the drum set and save.
I'm not a drummer or even a musician , so i can't give you a proper demo.


