

Introduction: Arduino, Temp, Humidity, WiFi, MySQL and Highcharts


This is my first Instructable and while it works as is, it is a prototype/proof of concept only.
This solution is one of a number that are required to monitor an indoor pool installation to allow an engineer to offer suggestions as to how we can save on our energy usage. The overall project is being undertaken by a Year 11 Design and Technology class.
Please note the solution is a remix of other builds and ideas.
Specifically, Tim Kang (http://blueflame-software.com/blog/how-to-load-mysql-results-to-highcharts-using-json/) and Marco Schwartz (https://learn.adafruit.com/wifi-weather-station-arduino-cc3000)
If you just want to fiddle with the database and highcharts, go straight to Step 3.
If you just want to build the sensor, Steps 1 and 2
*********
What I used:
1 Arduino UNO
(1 CC3000 WiFi breakout (http://www.adafruit.com/product/1510) and 1 Arduino prototype board
or
1 CC3000 WiFi shield with ufl connector for ext antenna (http://www.adafruit.com/products/1534))
1 antenna - I used https://www.adafruit.com/products/945
1 adapter - I used https://www.adafruit.com/products/852
1 SHT15 Temp, Humidity sensor - I used https://www.adafruit.com/search?q=sht15
1 case - I used https://www.adafruit.com/products/337
rainbow cable, solder and iron, hotglue gun, stacker and break away pins
Wireless compatible computer
Arduino software
MAMP software (WAMP or LAMP depending on your OS of choice)
a text editor - TextWrangler is an excellent choice for the mac
Browser of your choice.
Step 1: Building the Sensor


Mount the Arduino UNO in the case.
Solder the CC3000 WiFi breakout onto the prototype board (note that I had to shorten the break away pins as the whole unit needs to be able to fit into the case)
Mount the sensor into or onto the case (I used hot glue and have mounted the sensor so that it is less likely to become too wet in the indoor pool environment - time will tell if this is the best orientation but it will be easy to remount if required. The SHT15 has a heater element so I guess if the humidity readings are affected by condensation, I should be able to dry the sensor out.)
Mount the antenna (I used an internal tooth lock washer on the underside of the antenna mount to stop the user from turning the fitting when screwing the antenna onto the mount - this is not in the photo)
If you used the adafruit case, break off the covers, clean them up with a utility knife and pop them into position - I hot glued them for greater security.
Step 2: Download the Sketch
download the sketch:
SHT15_CC3000_MySQL.zip
Open in the Arduino IDE, fill in your own information for the wifi and web server.
Upload the sketch to your arduino, open the serial browser, set it to 115200 baud and watch your solution generate the temp and humidity.
Attachments

Step 3: Download and Install MAMP
download and install MAMP:
https://www.mamp.info/en/
WARNING - MAMP 3, non PRO version, ships with the ability to switch between PHP 5.1.6 and 5.5.10 only.
Neither of these work with highcharts. I selected 5.1.6 via the preferences pane then renamed the 5.3.28 folder to 5.1.6 - this is a kludge and I need to find a better solution.
Locate the htdocs folder in Applications, MAMP.
download and copy the sht15_cc3000_mysql folder into the htdocs folder.
Attachments
Step 4: Create Your MySQL Database
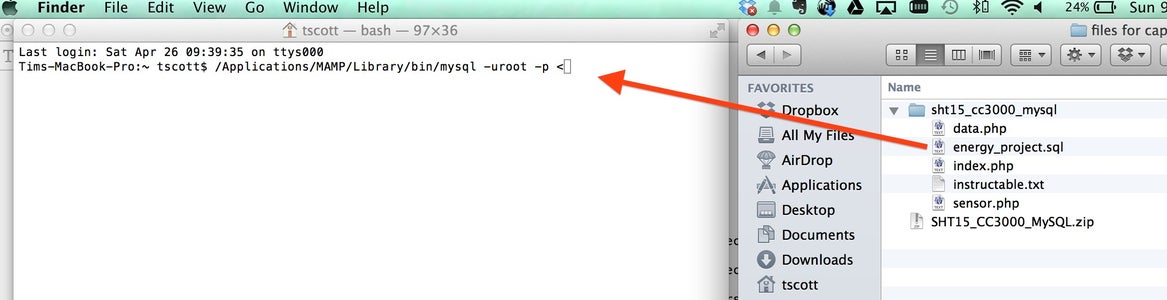
Open a terminal window and copy this text at the prompt:
/Applications/MAMP/Library/bin/mysql -uroot -p <
Now, drag the energy_project.sql file (see the photo above) located in the sht15_cc3000_mysql folder in htdocs over the terminal window - this will paste the path (location) of the energy_project.sql file into the terminal window after the <
Now press return and type root at the password prompt.
Press return and you have created your database.
Step 5: Create the Energy_user for Your Database
In a terminal window, copy this text at the prompt:
/Applications/MAMP/Library/bin/mysql energy_project -uroot -p
Now press return and type root at the password prompt.
copy this text at the prompt and replace the your_password with a password of your choice:
GRANT all ON energy_project.* TO energy_user@localhost IDENTIFIED BY 'your_password';
Press return and you have created a database user called energy_user
type exit at the prompt.
Step 6: Edit the Sensor.php File
edit the sensor.php file in the sht15_cc3000_mysql folder in htdocs.
This is the file that is called by your wifi sensor and it places the temp and humidity data into the database.
You have to set the following line so that the password you have specified for the energy_user is the same:
$result = mysql_connect("localhost", "energy_user", "your_password");
Step 7: Edit the Data.php File
edit the data.php file in the sht15_cc3000_mysql folder in htdocs.
This is the file organises the data in the database into a format that highcharts can understand.
You have to set the following line so that the password you have specified for the energy_user is the same:
$con = mysql_connect("localhost","energy_user", "your_password");
Step 8: Check Out Your Handywork!

If you have created the database correctly and adjusted your_password, you should now be able to test data.php
Make sure that MAMP has been launched
In the browser of your choice on the machine running MAMP, paste in the following URL:
http://localhost:8888/sht15_cc3000_mysql/data.php
You should see my test data.
Now point your browser to:
Point your browser to the following URL:
http://localhost:8888/sht15_cc3000_mysql/
Please remember this is a work in progress - it was strung together to allow my year 11 class to meet their next milestone.

Participated in the
Arduino Contest

Participated in the
Sensors Contest


