

Introduction: Arduino Temperature Monitor and Visual LED Meter


This is a really fun Arduino project that will read the temperature, send it to the Serial Monitor in Arduino IDE and according to the temperature it will adjust the number of LEDs that light up. It is really easy to put together and the programming part does need some skill,but I have provided the code so you can just follow along.For this project you will need these parts:
- Arduino Uno
- Half-Sized solder-less breadboard
- One 7.5 inch long male to male jumper wire
- 14 3.5 inch long male to male jumper wires
- One blue LED
- 8 green LEDs
- Two red LEDs
- 11 560 Ohm Resistors (Green-Blue-Brown-Gold)
- TMP36
And these tools:
- Computer running Windows,OS X or Linux
- USB A to B cable
- Arduino IDE installed
Step 1: Assembiling the LEDs

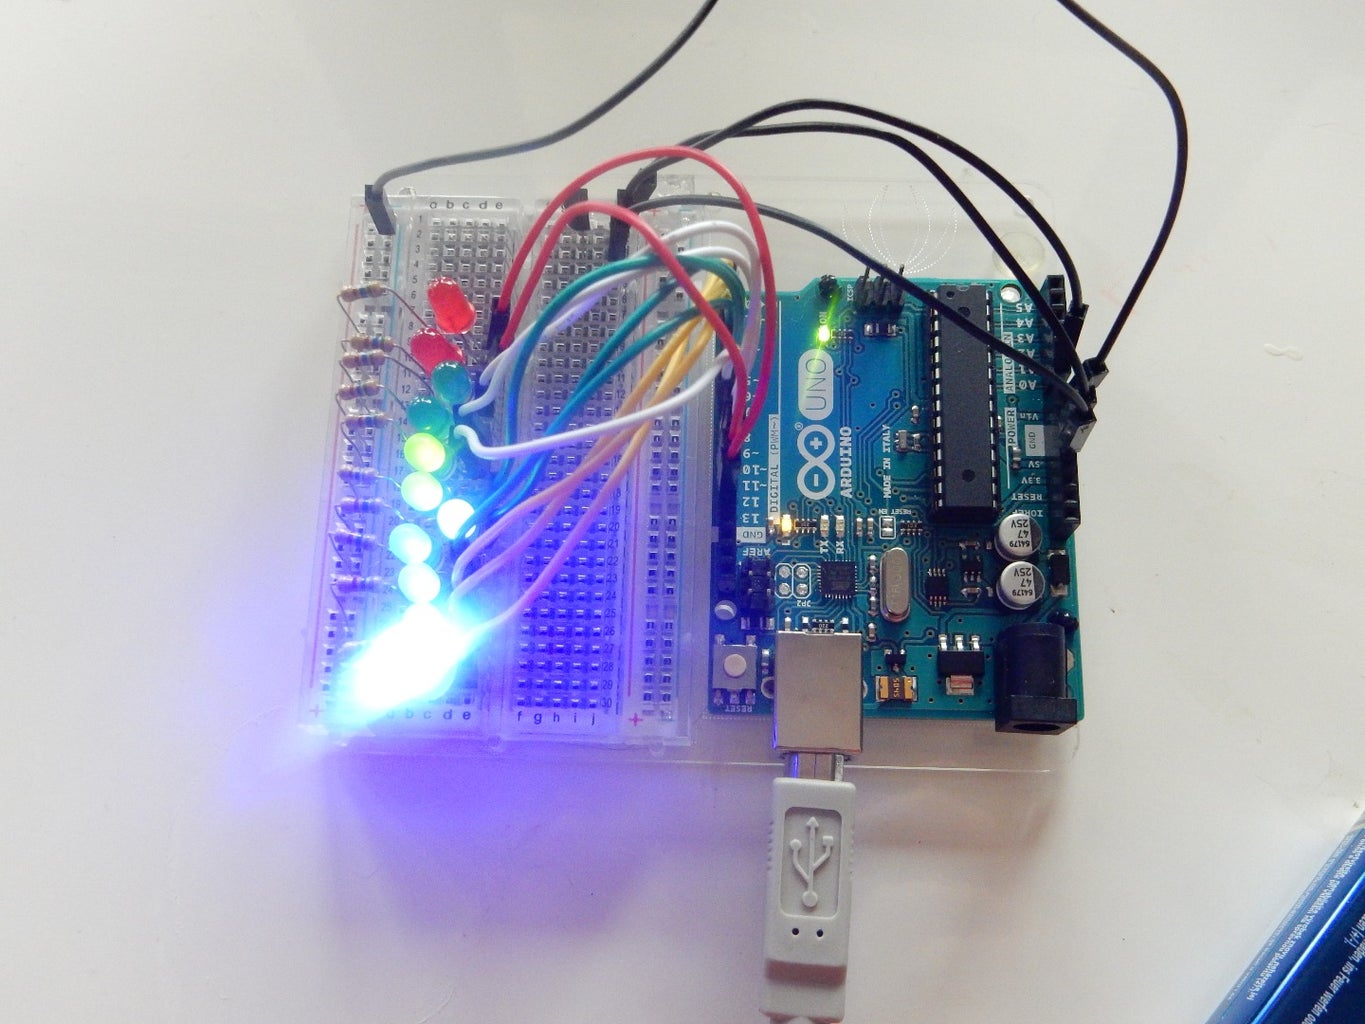
First start by connecting all the 560 Ohm resistors to a rail on the breadboard and the ground rail on the breadboard.Connect the next resistor one rail away(Example: First resistor connected to rail 1 the next it going to be connected to rail 3 and so on...). Next connect the LEDs so that the short leg of the LED is connected to the same rail as the resistor and the long leg to the empty rail right next to it.Connect all the LEDs like this.Finaly connect one jumper wire to the rail with the long leg of the LED.Start with the blue LED and connect it to digital pin 2 on the Arduino Uno.The next is the first green LED. Connect it to digital pin 3.The LEDs should be in this order: 1 blue LED, 8 green LEDs, 2 red LEDs.Now connect the 7.5 inch jumper wire to the groung rail on the breadboard and the GND pin on the Arduino.
Step 2: Testing the LEDs

Before we can finish the project we need to check the LEDs for short circuits.To do this we use a modified Blink sketch (Arduino program) that we change the pin variable to change the LED that lights up.
<p>int led = 2;// you change this number to chat pin you want to turn on</p><p>void setup() {

  pinMode(led, OUTPUT);
}</p><p>void loop() {
  digitalWrite(led, HIGH);

}</p>
Step 3: Connecting the TMP36

The TMP36 has 3 legs.Lay the sensor the round way down so the flat side is facing towards you.Place the TMP36 on the breadboard so each leg is on one rail. Connect a jumper wire to the left leg of the sensor and the other leg to 5v pin on the Arduino.The middle leg is to be connected to analog pin 0 or A0.The right leg is connected to GND pin on the Arduino.Now it's time to test the sensor.Upload this code to your Arduino and open the Serial Monitor by clicking on the magnifying glass in the top right corner of the Arduino IDE when a sketch is loaded.
<p>int temperaturePin = 0;</p><p>void setup()
{
  Serial.begin(9600);

}

void loop()
{
 float temperature = getVoltage(temperaturePin);
 temperature = (temperature - .5) * 100;

 Serial.println(temperature);
 delay(1000);
}</p><p>float getVoltage(int pin){
 return (analogRead(pin) * .004882814);
}</p>
Step 4: Putting It All Together(Finishing YAY!)
So finally we need to upload the final sketch.This sketch will confer the voltage from the TMP36 to Degrees Celsius, print it to the Serial Monitor and then save it as a variable and send it to the if statements.They check which category the temperature falls into and then light up the appropriate number of LEDs. You can always change the number of degrees the LED number change.The code refreshes every 4 seconds.So here is the code and I hope you enjoyed this Instructable!
<p>int temperaturePin = 0;<br>int temp = A0;
int blue1 = 2;
int green1 = 3;
int green2 = 4;
int green3 = 5;
int green4 = 6;
int green5 = 7;
int green6 = 8;
int green7 = 9;
int green8 = 10;
int red1 = 11;
int red2 = 12;</p><p>void setup()
{
  Serial.begin(9600);
    pinMode(blue1, OUTPUT);
  pinMode(green1, OUTPUT);
  pinMode(green2, OUTPUT);
  pinMode(green3, OUTPUT);
  pinMode(green4, OUTPUT);
  pinMode(green5, OUTPUT);
  pinMode(green6, OUTPUT);
  pinMode(green7, OUTPUT);
  pinMode(green8, OUTPUT);
  pinMode(red1, OUTPUT);
  pinMode(red2, OUTPUT);
}

void loop()                     // run over and over again
{
 float temperature = getVoltage(temperaturePin);  //getting the voltage reading from the temperature sensor
 temperature = (temperature - .5) * 100;          //converting from 10 mv per degree wit 500 mV offset
                                                  //to degrees ((volatge - 500mV) times 100)
 Serial.println(temperature);                     //printing the result
 delay(1000);</p><p>  if(temperature>=3.00){digitalWrite(blue1,HIGH);}
  if(temperature>=6.00){digitalWrite(blue1,HIGH);digitalWrite(green1,HIGH);}
  if(temperature>=8.00){digitalWrite(blue1,HIGH);digitalWrite(green1,HIGH);digitalWrite(green2,HIGH);}
  if(temperature>=10.00){digitalWrite(blue1,HIGH);digitalWrite(green1,HIGH);digitalWrite(green2,HIGH);digitalWrite(green3,HIGH);}
  if(temperature>=13.00){digitalWrite(blue1,HIGH);digitalWrite(green1,HIGH);digitalWrite(green2,HIGH);digitalWrite(green3,HIGH);digitalWrite(green4,HIGH);}
  if(temperature>=15.00){digitalWrite(blue1,HIGH);digitalWrite(green1,HIGH);digitalWrite(green2,HIGH);digitalWrite(green3,HIGH);digitalWrite(green4,HIGH);digitalWrite(green5,HIGH);}
  if(temperature>=20.00){digitalWrite(blue1,HIGH);digitalWrite(green1,HIGH);digitalWrite(green2,HIGH);digitalWrite(green3,HIGH);digitalWrite(green4,HIGH);digitalWrite(green5,HIGH);digitalWrite(green6,HIGH);}
  if(temperature>=23.00){digitalWrite(blue1,HIGH);digitalWrite(green1,HIGH);digitalWrite(green2,HIGH);digitalWrite(green3,HIGH);digitalWrite(green4,HIGH);digitalWrite(green5,HIGH);digitalWrite(green6,HIGH);digitalWrite(green7,HIGH);}
  if(temperature>=25.00){digitalWrite(blue1,HIGH);digitalWrite(green1,HIGH);digitalWrite(green2,HIGH);digitalWrite(green3,HIGH);digitalWrite(green4,HIGH);digitalWrite(green5,HIGH);digitalWrite(green6,HIGH);digitalWrite(green7,HIGH);digitalWrite(green8,HIGH);}
  if(temperature>=30.00){digitalWrite(blue1,HIGH);digitalWrite(green1,HIGH);digitalWrite(green2,HIGH);digitalWrite(green3,HIGH);digitalWrite(green4,HIGH);digitalWrite(green5,HIGH);digitalWrite(green6,HIGH);digitalWrite(green7,HIGH);digitalWrite(green8,HIGH);digitalWrite(red1,HIGH);}
  if(temperature>=35.00){digitalWrite(blue1,HIGH);digitalWrite(green1,HIGH);digitalWrite(green2,HIGH);digitalWrite(green3,HIGH);digitalWrite(green4,HIGH);digitalWrite(green5,HIGH);digitalWrite(green6,HIGH);digitalWrite(green7,HIGH);digitalWrite(green8,HIGH);digitalWrite(red1,HIGH);digitalWrite(red2,HIGH);}
  delay(4000);
  digitalWrite(blue1,LOW);
  digitalWrite(green1,LOW);
  digitalWrite(green2,LOW);
  digitalWrite(green3,LOW);
  digitalWrite(green4,LOW);
  digitalWrite(green5,LOW);
  digitalWrite(green6,LOW);
  digitalWrite(green7,LOW);
  digitalWrite(green8,LOW);
  digitalWrite(red1,LOW);
  digitalWrite(red2,LOW);</p><p>}</p><p>
float getVoltage(int pin){
 return (analogRead(pin) * .004882814); //converting from a 0 to 1023 digital range
                                        // to 0 to 5 volts (each 1 reading equals ~ 5 millivolts
}</p>