

Introduction: Arduino Video Game Controller

Do you have an Arduino kit laying around but no clue what to do with it? Perhaps not, but in this Instructable I will show you step by step how to build, code and integrate Arduino into your project. At the moment this guide is only tested with Clickteam Fusion Developer 2.5 but the build and Arduino code steps can be used universally. This guide might get updated for Unreal and Unity in the future.
Step 1: Shopping List
- Arduino Uno or similar
- USB Cable
- (400 point) Breadboard or 1 x perf/strip board
- Arduino compatible wires.
- Various Sensors. I used the following in my example project:
- Panel mount Potentiometer 10K breadboard friendly
- Photoresistor
- Force sensitive resistor
Step 2: Connections
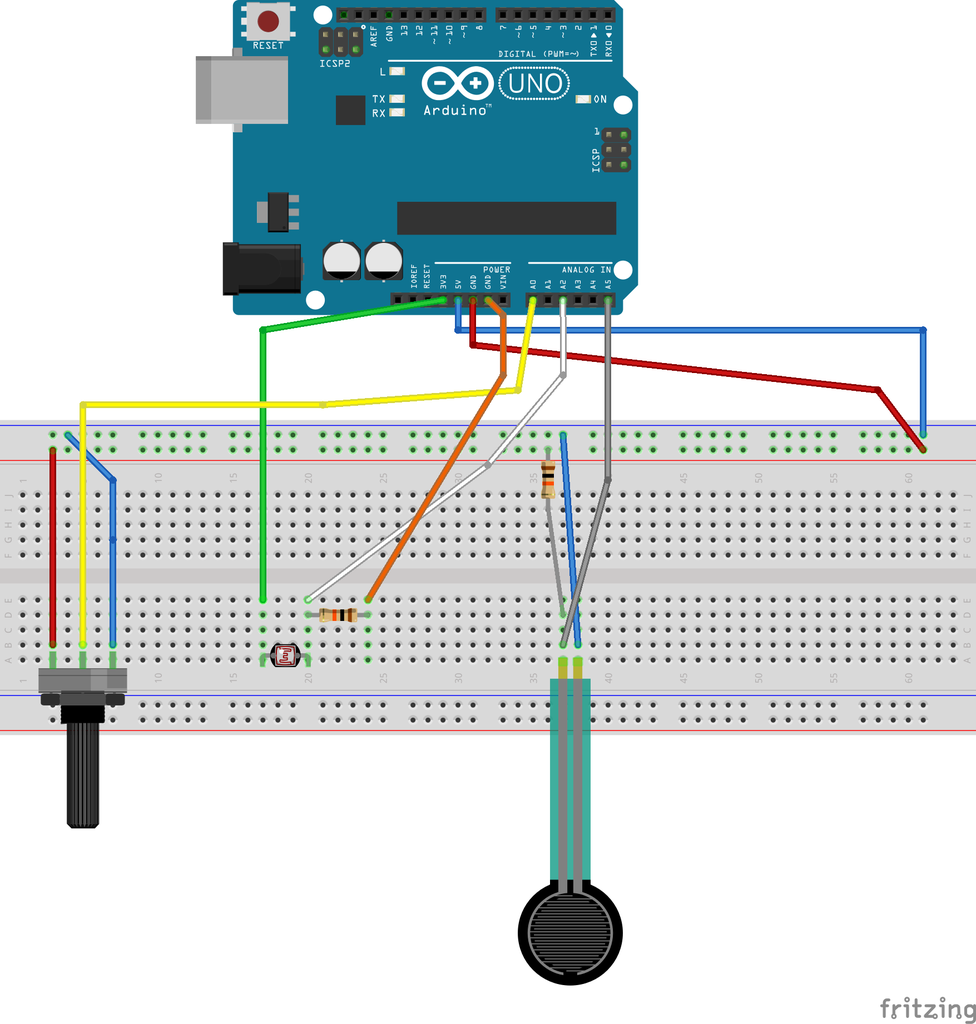
Note: These are only the sensors I have personally used for my project. This means that there are a lot more options out there. Step by step instructions on how to wire those can be found on various sites depending on the sensor.
Step 3: Arduino Code
Copy and upload this code to your Arduino if you wish to use the same kind of sensors as me. Otherwise you can use your own code for your sensors. The only global important thing that is required is that thevariables you want to use in your game engine get printed to the serial monitor or can be read in some other way.
//These are set at the beginning and not changed when the program is running. Like which ANALOG IN the pin uses.

const int potPin = A0;
const int fsrAnalogPin = 5;
const int photocellPin = 2;

//Variables:
//LIGHT SENSOR:
//Light amount variable:
int photocellReading;

//POTENTIOMETER
//Value of Potentiometer
int value;

//PRESSURE SENSOR
//This is the raw data variable from the pressure sensor.
int fsrReading;
//Mapped version of the fsrReading variable
int pressure;

void setup() {
  // put your setup code here, to run once:
  pinMode(potPin, INPUT);
  Serial.begin(9600);
}
void loop() {
// PRESSURE SENSOR
//Here we use the specified fsrAnalogPin to read data from that pin.
  fsrReading = analogRead(fsrAnalogPin);
//Map value 0-1023 to 0-255.
  pressure = map(fsrReading, 0, 1023, 0, 255);
//Check if the pressure is below or over a certain amount printing one of the two. This printed variable is used later in the game engine.
    if (pressure < 70) {
    Serial.print("5");
  }
    if (pressure > 70) {
    Serial.print("6");
  }

// POTENTIOMETER
  value = analogRead(potPin);          //Read and save analog value from potentiometer
  value = map(value, 0, 1023, 0, 360); //Map value 0-1023 to 0-360
//Here we split the 360 into six different segments.
//You can change the amount of segments to a higher amount. Each segment would then have a smaller range. For example 8 segments would have a range of 45 each.(360 / amount of segments)
//If the current value falls into a segment it will print the name of that segment.
  if (value < 60)
  Serial.print("One");
  if (value > 60 and value < 120)
  Serial.print("Two");
  if (value > 120 and value < 180)
  Serial.print("Three");
  if (value > 180 and value < 240)
  Serial.print("Four");
  if (value > 240 and value < 300)
  Serial.print("Five");
  if (value > 300 and value < 375)
  Serial.print("Six");


// LIGHT SENSOR
//Here we once again read and set a variable, in this case photocellReading.
   photocellReading = analogRead(photocellPin);

  //We check the amount of light, with dark and very dark printing a 3 and normal light values printing 4.
  if (photocellReading < 10) {
    Serial.println(" - 3");
  } else if (photocellReading < 200) {
    Serial.println(" - 3 -");
  } else if (photocellReading < 500) {
    Serial.println(" - 4 -");
  }


//The numbers in the Serial:
//The first number is the pressure sensor, 5 is not pressed and 6 is pressed.
//After that is which segment the Potentiometer is currently on.
//And the last number is either a 3 = dark or 4 = light.
Step 4: In the Game Engine: Click Team 2.5
In the Extension Manager find Serial Object and install this.
Place the Serial Object, a counter and a string into your frame. (Right click in the frame - insert object)
In the Event Editor create an event: If Data is waiting: Set alterable String to GetData( "Serial Object" )
This will set the string to any data that is being sent by the Arduino, the string should now look similar to the Serial Monitor.
Create another event Always: Set counter to : Find(string$( "String" ), "4", 0 )
This example will try to find the 4 which equals light as can be seen in the Arduino Code.
If it finds the 4 it will set the counter to 4, if it fails to find the 4 the counter will be -1.
Now you can add a new event to do something with this result:
If counter = -1 : Here you can put what should be happening if it is false, like having an Animation of a lamp being off.
If counter = <> -1 : This means it has found the variable and the counter has been set to whatever that variable might be (as long as it is not -1), here you could make it so the lamp animation switches to being on.
Basically by using counters that are set to either -1 which is false or <>-1 which is true you can make events happen.
