

Introduction: Arduino and LM35 Based Temperature Monitor for Beginners


Introduction
Make your own temperature monitoring system by using Arduino and LM35 analog temperature sensor. This is a very simple DIY project for the Arduino beginners. All the steps and requirements are mentioned in detail below.
Note:- This tutorial is intended for the absolute beginners only. Experienced persons may find many of the steps as not relevant to them.
Step 1: Requirements


Hardware Requirements
1) Any Arduino board with analog input pin. ( Here I used Arduino Uno )
2) LM-35 Temperature sensor ( http://www.ti.com/lit/ds/symlink/lm35.pdf )
3) Breadboard for assembling the sensor set up
4) USB cable as per the Arduino board specification (Arduino Uno uses USB 2.0 Type A <=> Type B cable)
5) Connecting wires
6) External Power Supply - Not required as the Arduino and Sensor draws power from the USB port connected to PC/Laptop
Software Requirements
1) A PC/Laptop ( Mac/Windows/Linux )
2) Arduino Software (Install from https://www.arduino.cc/en/Main/Software as per your PCs Operating system )
Step 2: Make the Hardware Setup Ready

1) Identify the Power and Analog inputs of the Arduino board
2) Understand the Pin configuration of the LM35 temperature sensor
3) Connections are mentioned below
Arduino <=> LM-35
Analog In / A0 <=> Pin 2 /Middle/Data pin
Power / 5v <=> Pin 1
Power / GND <=> Pin 3
4) Connect the Arduino board to the PC using the USB cable
Step 3: Make the Software Setup Ready

1) Install the Arduino IDE/Software mentioned in Step 1/ Software Requirements
2) Connect the Arduino board to the PC/Laptop using USB cable
3) Go to your PC/Laptops Device Manager => Ports and note in which port Arduino is connected
4) In the Arduino IDE, go to Tools => Port and connect to the Port where Arduino is connected
5) In the Arduino IDE, go to Tools => Board. Make sure that the selected board is same as what you use
5) Create a new file in the IDE and write your program there. [ You can refer Step-4 Understanding The Program/Sketch ]
Step 4: Understanding the Program/Sketch
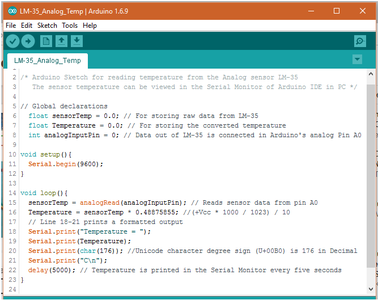
The program is self explanatory as comments are added for each line. The constant [ 0.48875855 ] used for converting the sensor voltage to Degree Celsius is explained in the next step.
The sketch is attached for your reference [ LM-35_Analog_Temp.ino ]
Compile and flash the program in the Arduino board
Attachments

Step 5: The Magic Number 0.48875855 Is Explained
Arduino has an analog-to-digital converter (ADC) that reads the values which are being received in the analog pins (Pins from A0 - A5) and converts them to a number between 0 and 1023.
analogRead() returns a number between 0 and 1023 that is proportional to the amount of voltage being applied to the analog input pin.
Here the voltage applied to the sensor is 5v. The sensor output scales between 0.0 and 5.0.
To scale the numbers between 0.0 and 5.0, divide 5.0 by 1023.0 and multiply that by sensor value :
ie sensor value * (5v/1023) = sensor value * (5000 mv/1023) = sensor value * 4.8875855
The scale factor in LM35 is 10mv /°C
ie sensor value * (4.8875855 / 10) = sensor value * 0.48875855
Please refer to the manuals of Arduino and LM35 for more details
Step 6: Program Execution and Temperature Monitoring
Refer step 4 for the compilation and flashing of the program.
Compile and flash your program in Arduino.
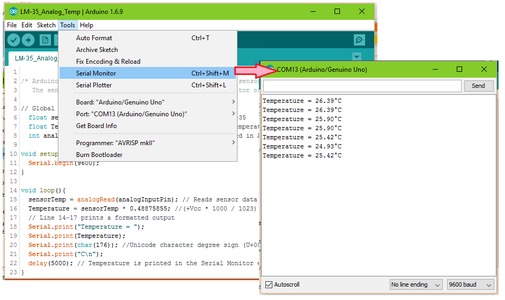
In the Arduino IDE go to Tools => Serial Monitor. This will open up the console for printing the data from Arduino. The measured temperature is displayed here.
Step 7: Debugging / Troubleshooting

The common problems are
1) The Arduino IDE is unable to connect to the Board
Check all the connections physically and select the correct port after referring to device manager in PC
Make sure that the Arduino board selected in Tools => Board is same as the one that you are using
2) Temperature measured is not correct
Cross check your sketch with my sketch
Using a multi-meter measure the voltage between Pin 2 & 3 of the LM35 sensor. This (voltage/10) will be approximately same as the final temperature displayed by Arduino in the Serial Monitor. This way we can verify whether the sensor is working fine or not.
Step 8: Conclusion
Hope you have made your home temperature monitor by this time :-) . You can start your home automation now.
I will be back soon with more fun with Arduino.


