

Introduction: Basic Chain Making Tutorial: Round


More by the author:


About: I've been making jewellery for 22 years and teaching jewellery making classes for 13 years. Recently I've started an online jewellery magazine packed full of free tutorials and interviews with jewellery artist…
The third project my students make is chain. It's usually the project they look forward to the least. But, making chain is an excellent way to improve soldering skills and gain confidence with the torch. Often students think of chain as boring, I disagree; a well designed chain can greatly enhance a pendant or stand on its own. In this basic chain tutorial I'll go through how to: make jump rings, link up, solder and finish a simple round link chain.
I like to think of chain making as "production", there aren't many steps but each step is repeated many times. Go slowly and do the best job possible; it is no fun fixing the same mistake in 100 links!
For the purpose of this tutorial I am using 3 feet of 18 gauge sterling silver round wire and a 9 mm wooden dowel, as a mandrel to wrap the wire around to form jump rings.
Step 1: Annealing the Coil


1 Annealing the coil
Wrap the wire into a tight coil, taking care to "tuck" in the ends. While annealing, the ends of the wire will be very vulnerable to melting, tucking them in will help protect from the flame. First move the cloud of the flame slowly around the entire coil, the first time the coil is annealed, the sterling silver will turn golden (image 1) then blue-black (image 2), at this point concentrate the flame in a smaller section of the coil until the sterling silver turns a dull (not bright) red; move to the next section and repeat until the full coil has, at some point reached a dull red (image 3). When finished the coil should be completely black (image 4). Pickle and rinse. When removed from the pickle, the coil should be white (image 5) not bright silver. If the coil comes out bright silver the metal did not reach annealing temperature; repeat and properly anneal.
It is possible to anneal some sections of the coil and not others; I recommend beginners anneal the coil twice, just to be sure it has been fully annealed.
To learn more about annealing sterling silver and how to pickle, turn to page 46 in the July Creating Linus Jewellery, 2012 issue or click here.
Creating Linus Jewellery is a free on-line magazine packed full of Jewellery making tutorials, interviews and articles. Come visit us at: www.creatinglinus.com
Step 2: The Vice, the Dowel and Straightening the Wire


There are many ways to wrap a jump ring coil, I like to use wood doweling and a vice. Clamp one end of the sterling silver wire, with the doweling in a vice; be sure to do so tightly, the dowel should not move (image 6). If there are "wobbles" in the wire (image 7), there will be wobbles in the jump rings. Straighten the wire by rubbing either fingers or wood dowelling against the wire; bending the wire into a ark will help (images 8 through 11).
Step 3: Wrapping and Packing


The first step in making jump rings is to wrap a jump ring coil. Begin by wrapping the sterling wire around the wood dowel (image 12). Keep in mind that all the links will follow the first link laid down; so if it is angled on the dowel all the links will be angled, which is not desirable. Use a large piece of wood dowel to "pack" the first link down flat (image 13). Continue wrapping and packing (images 14 & 15), until the coil if finished (image 16). Be aggressive and use force when packing the coil, it is ideal to have no spaces between the links.
Step 4: Hard Jump Rings

Wrapping the jump ring coil will cause the sterling silver wire to become work hardened. The next step will be cutting the coil; if the coil is cut while work hardened the jump rings will also be work hardened, making it more difficult to work with them. Remove the coil from the dowel and anneal it; while annealing occasionally rotate the coil with tweezers (image 17). Pickle and rinse.
Step 5: Cutting the Coil


I like to begin by cutting off the end bits of the coil; as they like to poke while sawing(image 18). Secure the coil in a vice. The dowel should be at a slight angle with the coil resting at the top of the dowel (image 19). Hold the saw at a slight angle to the coil and start the cut; hold the coil firmly while pressing the coil downward against the vice, this will help stop the coil from moving during cutting (images 20, 21 & 22).
As the jump rings are cut off the coil, it is tempting to give them a little "wiggle" and break them off the coil. Don't do this; only remove jump rings which are fully cut through (image 23). If you break the jump rings off, the joints will look like a "beaver chewed" through them and much filing will be required to make the joints fit tightly once more.
It is important to keep the coil at the top of the dowel while cutting; re adjust the coil after removing cut jump rings, so the coil is once more at the top (images 24 & 25). When re starting the cut, be sure to snug the saw blade back into the existing cut lines (images 26 & 27). Continue cutting and re adjusting the coil until completely finished cutting the coil (images 28 & 29).
Step 6: Closing Up the Links


When the jump ring is freshly cut the joint will not be in alignment (image 30) and will need to be brought back into alignment. This can be done with pliers and/or fingers. When cutting the link off the coil the saw will remove material; simply twisting the link back into alignment will not be enough to close the link, as there will be a gap (image 31). Whether using fingers or pliers the process is the same and will involve a little "farting and fussing" to get the solder seam properly aligned with no gaps (images 32 & 33). Be sure to check the alignment from the side as well as the top of the jump ring. It is important to be patient at this stage, since once the joint is soldered there is no fixing an unaligned joint (34 & 35).
I prefer to use pliers for this process. My first choice would be flat nose pliers (image 36), second chain nose (image 37) and my never choice would be round nose (38). Round nose pliers will always leave dent marks in the wire, so don't use them. Flat nose pliers (the wider the better), will distribute the pressure, making them less likely to leave dent marks. Chain nose pliers are OK to use, but always hold by the long end (39) and not the point of the pliers (image 40), as the point will also leave dent marks.
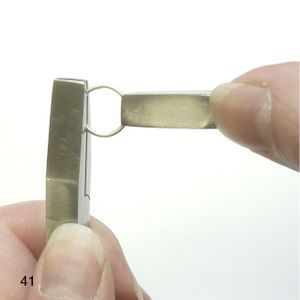
Using two pairs of pliers will make it easier to work with the jump rings. Hold the pliers in the left hand vertical and the plier in the right hand horizontal (image 41). This will make twisting, pushing and tweaking the link easier. To close the gap, twist the link only until the two ends are side by side (not in alignment), push the two ends slightly past each other (image 42) and give the link a twist to bring the joint into alignment. Pushing the ends of the joint just past each other before moving the joint into alignment, will create tension in the jump ring resulting in a spring, which when twisted into alignment will cause the gap to spring closed. If the gap does not close, repeat the process until it does.
To bring the joint into alignment from the side: hold the pliers in the left hand vertical and the pliers in the right hand angled so as to allow the pliers to squeeze down on the joint which needs to move down into alignment with the other joint . Squeeze the joint down just below the first joint (image 43), this will create a spring which will "pop" the joint into alignment (image 44). Repeat if necessary until the joint is aligned.
I prefer to use pliers for this process. My first choice would be flat nose pliers (image 36), second chain nose (image 37) and my never choice would be round nose (38). Round nose pliers will always leave dent marks in the wire, so don't use them. Flat nose pliers (the wider the better), will distribute the pressure, making them less likely to leave dent marks. Chain nose pliers are OK to use, but always hold by the long end (39) and not the point of the pliers (image 40), as the point will also leave dent marks.
Using two pairs of pliers will make it easier to work with the jump rings. Hold the pliers in the left hand vertical and the plier in the right hand horizontal (image 41). This will make twisting, pushing and tweaking the link easier. To close the gap, twist the link only until the two ends are side by side (not in alignment), push the two ends slightly past each other (image 42) and give the link a twist to bring the joint into alignment. Pushing the ends of the joint just past each other before moving the joint into alignment, will create tension in the jump ring resulting in a spring, which when twisted into alignment will cause the gap to spring closed. If the gap does not close, repeat the process until it does.
To bring the joint into alignment from the side: hold the pliers in the left hand vertical and the pliers in the right hand angled so as to allow the pliers to squeeze down on the joint which needs to move down into alignment with the other joint . Squeeze the joint down just below the first joint (image 43), this will create a spring which will "pop" the joint into alignment (image 44). Repeat if necessary until the joint is aligned.
Step 7: How Much Do I Need?


For basic chain making Medium solder can be used for all of the joints. Using as little solder as needed, at this step, will save a lot of filing and emerying later. But, how much is needed? Depending on the thickness of the wire, more or less solder will be needed. Image 45 would be too much and image 46 would be about right. It is good practice to solder a few links, observe, and adjust the size of solder accordingly.
Step 8: Balling Up the Solder and Picking Up the Balls


I prefer to "ball" up my solder before placing. Using the cone of the flame heat the solder until it melts and forms into a ball (images 47, 48 & 49). Use a titanium pick (image 50) to move the solder onto the link by placing the tip of the pick behind the solder to be used (image 51), bring the flame in (image 52) and gently "scoop" the solder onto the pick (image 53).
Step 9: Flowing the Solder


When soldering chain, rather than place the solder on the joint and then flow it, I prefer to flow the solder off the pick. Flux the jump ring (image 54). Heat the link until the flux turns clear (image 55). To flow the solder off the pick, the link will have to be hot enough so when the solder touches the link it will melt instantly, this happens fast and requires some coordination. If need be practice touching the solder to the link, without the torch. The solder will need to touch directly in the middle of the seam (image 56). Heat the link until the silver turns dull red, bring the solder into position (image 57) and touch the solder to the seam - if the link is hot enough the solder will instantly flow (image 58). Pickle and rinse.
This technique will speed up the production of chain, however does require a bit of practice.
This technique will speed up the production of chain, however does require a bit of practice.
Step 10: Linking Up


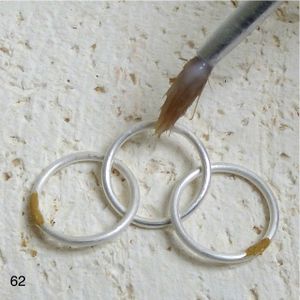

Make 4 or 5 "parcels" of three links. Open a jump ring slide 2 soldered links on and close up the link (image 59). When soldering links where previously soldered links are in close proximity, there is risk of opening previous solder seems; this could result in soldering the links to each other. To minimize the risk, paint yellow ochre on the original solder seems (image 60) and place the links on the solder brick spaced in such a way that the solder does not touch any of the other links (image 61). Flux and solder the link (images 62 & 63). Pickle and rinse.
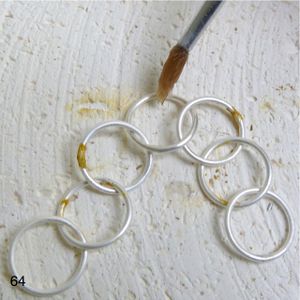
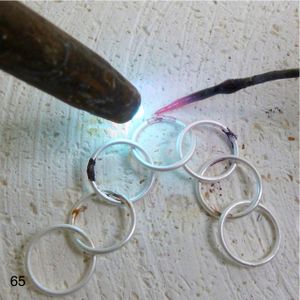
Continue building the chain by taking two parcels of 3 links and join them with a seventh link (images 64 and 65). Then join two parcels of seven with a fifteenth link, and so on until the chain is the desired length.
To learn more about yellow ochre turn to page 70 in the July, 2012 issue of Creating Linus Jewellery or click here. Find more free Jewellery making tutorials at: www.creatinglinus.com
Step 11: Cleaning Up, Files or Emery?


Now that the chain is put together it's time to clean all the extra solder off the seams. Cleaning the extra solder off is done with files and emery (image 66).
If the solder is "globbed" on start with files (images 67 & 68), then move on to emery. If the solder is "just right", with very little extra solder start with emery (images 69 & 70). When finished it is ideal to see no extra solder and for the link to be round and smooth with no lumps or thin spots (image 71). Use 220, 400 and 600 grit emeries.
If the solder is "globbed" on start with files (images 67 & 68), then move on to emery. If the solder is "just right", with very little extra solder start with emery (images 69 & 70). When finished it is ideal to see no extra solder and for the link to be round and smooth with no lumps or thin spots (image 71). Use 220, 400 and 600 grit emeries.
Step 12: Final Polish

No mater what the dumb dumb next to you says, never ever use a rotary polishing machine to polish chain. It is very dangerous to do so, as the chain can become wrapped around the tapered spindle and whip you at high speeds. The best way to polish chain is in a tumbler (image 72). I tumble chain for a minimum of 20 minutes, check and tumble longer if needed.
Before tumbling I added a simple "S" clasp to my chain.
To learn more about Tumbling and how to make an "S" clasp checkout the December, 2012 issue of Creating Linus Jewellery.
Before tumbling I added a simple "S" clasp to my chain.
To learn more about Tumbling and how to make an "S" clasp checkout the December, 2012 issue of Creating Linus Jewellery.
Step 13: Tip 1: Pliers


Tools can and should be altered. The edges of pliers are often rough and sharp Use 220 emery on a stick to smooth and slightly round all edges.
Step 14: Tip 2: the Pick


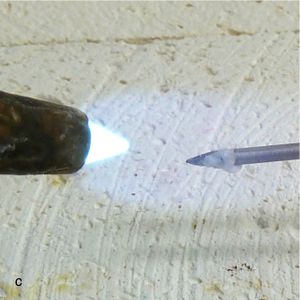

Solder picks are made out of many materials: tungsten, niobium and steel to name a few, but Titanium is my favourite. Titanium is a non reactive metal that can not be soldered, so there is zero chance of soldering the pick to the metal. The first thing I do with a nice new titanium pick (image a) is "treat" it. Dip the tip of the pick in flux (image b) and heat it until the flux goes clear (images c & d). Once flux has gone clear and is reheated, the flux will become sticky; this will help with picking up the solder. Every once and a while it may be necessary to re-treat the pick.
