

Introduction: Building a Simple, Stylish Clothing Rack From Pipe


Using some pipe, a few Kee Klamp fittings, and a basket from IKEA, you can build this simple, stylish clothing rack. Great for areas where space is limited, or when you just need that bit of extra space to hang clothing, coats, or jackets. The lower basket adds flexibility, perfect for hats, mittens, boots, etc.!
Planning, Parts List, Tools, and Cost
The easiest way to plan your project is to (A) measure the available space you have to work with, and (B) purchase your wire basket.
Why? Because your available space will determine your projects height and its depth from the wall, and the width of your wire basket will determine your projects width. From there you can adjust the sizes of the components in your parts list.
The parts list below is based on our project dimensions of 75" x 40" x 16"...
Parts
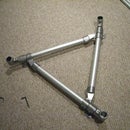
Qty Part Qty Part 4 61-6 - Flange 2 15-6 - 90 degree Elbows 2 10-6 - Slip Tee 2 G100GS12GA - 1" Schedule 40 Steel PIpe - 75 inches 2 G100GS12GA - 1" Schedule 40 Steel PIpe - 16 inches 2 G100GS12GA - 1" Schedule 40 Steel PIpe - 14 inches 1 KOMPLEMENT - Ikea Wire BasketFor simplicity, and if you have enough space, you can simply use our project dimensions.
Tools
- Power Drill and bits
- Screwdriver (Phillips or Slotted, depending on your hardware)
- Wrenches (Sizes depend on your hardware).
Cost
The approximate cost for parts (pipe, fittings, basket) for this clothing rack is $172 not including mounting hardware.
Now that you have your parts and tools, it's time to move on to the first step.
Step 1: Determine Location and Mount Uprights

- Determine the exact location based on the width of your project and it's depth (distance) from the wall. For our clothing rack, the flanges are mounted 16" from the wall and 40" apart, on center.
- Mount 2 of the flanges to your floor. Use whatever attachment hardware makes the most sense based on your flooring material.
- Bolt your upright steel pipes into the floor mounted flanges.
- Slide your Slip Tee fittings onto the uprights and secure them in place at the approximate height you want them. You can always adjust the height later.
Step 2: Mount Wall Flanges and Connect to Uprights

- Bolt the 2 elbows to the short pipe sections that will connect your uprights to the wall.
- Slip the elbows and short pipe s onto the uprights, but do not bolt them yet.
- Mark the exact location where the short pipe sections meet the wall
- Mount your wall flanges to the locations you just marked. Use appropriate mounting hardware based on the wall material.
- Secure the short pipe sections to the wall flanges, and the elbows to the uprights.
Step 3: Attach Wire Basket

- Insert the shortest pipe sections into the Slip Tee fittings you slid onto the uprights in an earlier step. Secure them in place.
- Fit and attach your wire basket to the pipe sections.
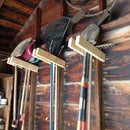
Step 4: Finished Pipe Clothes Rack
Congratulations! Enjoy your new clothing rack, and be sure to show it off to everyone you can!
You can find additional help and more information at simple clothing rack project.
Special thanks to Selber Machen for the photography.

Participated in the
Metal Challenge


