

Introduction: Building My Cedar Strip Canoe


Spring was just starting to arrive in northern Minnesota, and after a long winter, I was getting anxious to get back out into my little wood shop and start another project. Having more time than money on my hands, the project had only two criteria..#1..use up existing wood I already had on hand, and #2..be fairly time consuming, after a long winter, I needed to be out of the house until the nice weather really comes.
I'm assuming that if you are reading this, you are researching how to build a cedar strip canoe. I am guessing you know the basics, and that bieng said, a canoe is way too big of a project for full step by step instructions, but here I hit on the highlights of how I built my canoe. I hope you find some tips you can use on your canoe project.
Step 1: Building My Cedar Strip Canoe


Mostly I think this tutorial is for the first time builder. Just to show that a cedar strip canoe doesn't have to be cedar... grab what you have and build a boat! Wood is a very forgiving to work with for the novice wood worker, Hell, you dont even have to be a wood worker. I had a hand full of boards that have been kicking around for years, most of it was wood that was logged off my girlfriends property 10 years ago, most of it was aspen I believe, but not sure, pure white, soft and bendable...not furniture kind of stuff for sure. I don't know how the canoe idea came, but this wood was perfect. I also had a lot of mountain ash (black ash?) that was also from the property. I had the aspen for the hull and ash for all the trim that required hard wood.. For the hull I ended up using aspen, cedar, pine, mahogany and redwood. The seats and yoke are ash, and the gunnels and decks I did purchase mahogany, just because I was after a specific look by this time.
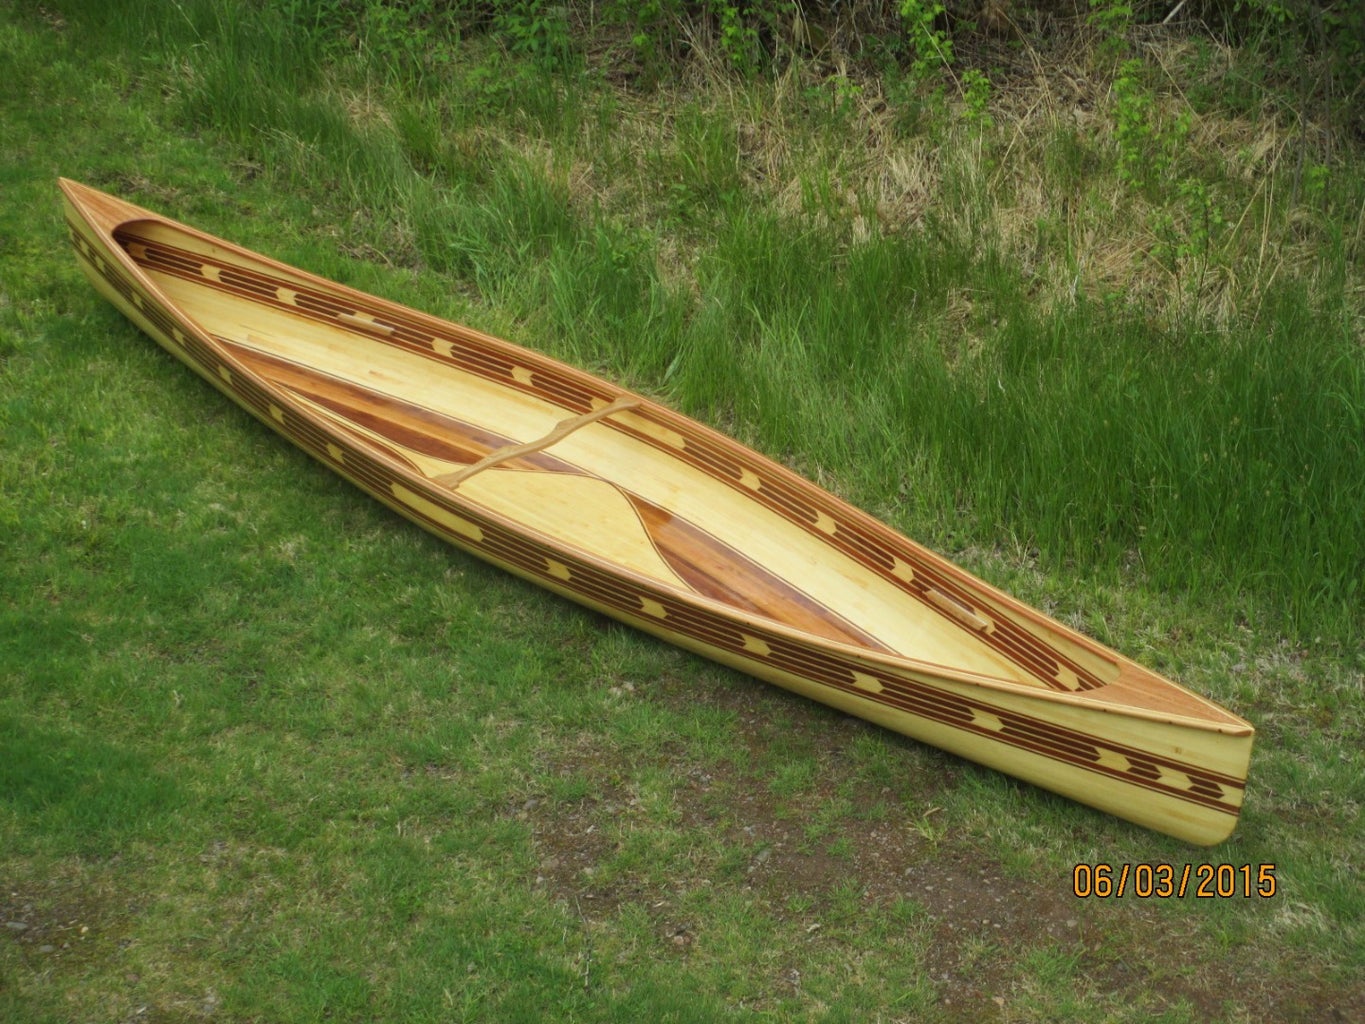
The plans for this canoe came from a Handyman magazine I had been hanging onto since 1991. It's 18' long, 32" beam, almost zero rocker and came in at 60lbs. The total cost was about $500. I'm way happy with the end result of my scrap wood boat
Step 2: Design Work


After stripping all my aspen, it was obvious I wasn't going to have enough for the entire hull. I needed to add some design work on the sides to act as a filler, but it had to look like a purposeful design feature. I just taped the wood strips to my strong back to figure out how much filler I needed. I needed to fill a lot. By the way, all the aspen strips got cove and bead, all the other woods I left square edge, mostly because of the detail in the design work...stay tuned and you will see why later.
I needed to fill about 5" on the sides of the hull, after about a week of playing with scrap wood on the bench, I liked the arrow and stripes. I glued up the arrow on a table before they were applied to the strong back, this was 19' long. It would have been a nightmare to glue all those little pieces to canoe one at a time.
You will notice some pics are inside my shop, some are outside. Presently I'm on my 4th canoe, and I could not imagine not having it mobile. My shop is multi-purpose for one thing, so once in awhile I have to move the canoe out of the way for another project, and number two,,,weather permitting, I try to do sanding outside. in these pic here, its just a beautiful day, despite the mud on the ground.
You will notice I have a strip bent to follow the sheer line, originally I was going to fill in that triangle shape with strips, but opted for an easier way to shape the sheer line. That piece would have been covered by the gunnel, so I left a knot in it, because I bent it up to meet the bottom of the stripe, thats the only knot in the boat.
Step 3: Stripping the Hull


The stripe down the side I believe is actually made up 11 strips of wood that take up about 5". All the 1/4 and 3/4 strips were applied to hull one at a time. Stripping was pretty straight forward. Titebond wood glue, original is fine, no need for the water proof glue, after the fiberglass and epoxy, water will never touch your beautiful wood boat. I run the very first strip perfect horizontal to the full. Be sure to put the cove side up, that gives you a little trough to run your glue bead into without it running all down the boat. I used staples to hold my strips in place until the glue dried. I put them into every station and in between where needed.
Stripping the basic hull went fast, I think it had taken me about a week to get to the bottom of the boat (top of the strong-back). I would run two strips down each side and alternate. When I got to the bottom, I realized I must have been too picky cutting out 'defects' in the wood, I didn't have enough aspen to complete the bottom. The white wood is 10 year old boards of uncertain species, so I couldn't just run down to the local lumber yard and match it, so once again I need a filler, I had to change to a different wood without it looking like I ran out of wood, It had to be artistic.
Believe it or not, my girlfriend comes into the shop with some 3' 2x2's she pulled out of her chicken coop, left over railings from her porch that was put up years ago. I cut a slice off one of them with my table saw, it was beautiful, dark cedar. So now I have a bunch of 3' long pieces to fill in the bottom. But it has to be artistic to make the transition. Hence, the design in the bottom. These strips were all left with square edges for the ease of making all the angle shapes on the end of every single strip. I used a 18" belt sander, hand held to shape all the ends. After a while, shaping was down to seconds per strip. The white in the very bottom of the boat is pine. I was out of aspen, but figured the pine does not butt up the aspen any place, so the color difference will not be an issue. I think I spent about a week just on the bottom of boat.
Step 4: Sanding and Fiberglassing Outside


Sanding was pretty straight forward. I used a 5" orbital with 80 grit, and 120. The little voids in the strips I filled with epoxy-saw dust mix. I had been saving my saw dust just for this purpose. This can be done before you sand or after. I prefer to do it after I sand, but I protect the surrounding wood with tape, the epoxy will soak into the wood and stain it.
I use Marinpoxy from Duckworth. Its about $170 for a 3gal kit. I have done 2 canoes with it and have had good luck using it. Its seems to really like 60-70 degree temps though, any colder and it takes along time to set up enough to re-coat. I had to wait 24 hours between coats when I used it in my cool shop. For the inside of the canoe, I carried the canoe into the garage at the house where is was 65, and it worked great, I could re-coat in 6-8 hours.
I put a sealer coat of epoxy on first. 1st...it fills any little gaps, staple holes etc.., better to seal them now, you don't want those areas gassing out causing bubbles on the fiberglass coat. 2nd...I don't like the variable of my fiberglass coat getting soaked into the wood, my opinion.
Laying out the glass is straight forward, I use a wide disposable brush to smooth it, fiberglass snags easy, so I dont use my hands. Side note, the disposable brushes I buy in bulk at the big box store. I use a lot of brushes on the build. The disposable ones are all I use on the entire project, I'm a painter by trade, so I know when a $15 Purdy is needed, 10 disposable brushes will do, use them once and chuck 'em. You just have to make sure there are no loose bristles, pull on the bristles before you use them, one or two will still come out into your work, just pick them out, you have to sand between coats anyway, no big deal. The very last coat of varnish I would consider a quality brush, but I paint and varnish for a living, I'm comfortable with disposable.
Applying the epoxy to the glass. I mix my epoxy in small batches and pour it on top of the boat in a pool about 2 or 3' long, and squeegee it the length of canoe slowly working my way down the sides, not much pressure, just trying to wet it out. moving onto the next 2-3 foot section letting the first soak up epoxy and turn the glass clear. I keep a brush in one hand only using it to help wet out problem areas, not for applying or spreading epoxy. Once an area is wet out, I squeegee it to remove excess. I start at the top and pull it down towards the floor letting the excess run off the boat. As long as the glass has turned clear, epoxy that is to thick is more of a problem too thin. Fiberglass can float if you don't pull off the excess. I want the glass clear, and stuck to the wood, that's all. Don't go for build up on this step, You have two more coats to do that.
The next 2 coats I apply with a 9" foam roller, applied about as thin as possible, then tipped off with a brush, lightly brushed to knock off the roller stipple and any tinny little bubbles the roller creates. I say as "thin as possible" because the nature of epoxy is that it is THICK, and wants to sag, and by the time it starts to sag, its too late to go back and smooth it out, you will make a mess..and then you will have to sand out those sags. Personally, if it takes an extra coat to cover weave, I would rather another coat of epoxy instead of sanding, believe me, there is already enough sanding on this project.
Tip...when the epoxy is dry, sand the epoxy smooth while its still on the strong back, once it's removed its pretty flimsy. Sanding the epoxy, I used the orbital again, 80, then 120, and then getting ready for the varnish, I used 220 on my 1/4 sheet palm sander. I didnt get crazy with the 220, the boat is gona get moved around and worked on before the varnish goes on, so I will fine tune the sanding just before I varnish.
Step 5: Sanding and Glassing Inside


Sanding and glassing the inside is about the same as the outside. Instead of building carpet slings to hold the canoe while working on the inside, I modified my strong to hold it while sanding. It put it up high and very maneuverable for the many hours of sanding.
The hull wanted to splay open without the support of the strong back, so I had to use a brace across the middle to hold it at the proper width. Once the fiberglass is in, and the epoxy is dried, its going to want to stay where it is when it dried. Also, I first laid the canoe upside down, laid the glass on, and trimmed it to shape at the ends. Flip the canoe over, and lay the glass inside, trimming in the pointy ends should be very minimal now. I also used clothes pins to hold the glass in place along the sides.
Same as the outside for epoxy, I poured it in the bottom and squeegeed up the sides. I could do the whole canoe while working down only one side.
I had some wrinkles, no big deal, when it dried, I sanded them completely out and touched up those areas with epoxy.
Step 6: Fitting Trim


I was originally going to use ash for all the trim, but with the deep reddish colors of the stripes and the bottom, vanity struck me on my scrap wood boat. I bought mahogany. I glad I did.
The decks, I just laid cardboard over the ends and traced it. I wanted the gunnels and decks to tie in very smooth to each other, as if it was all one piece. I cut the round in the deck before installing, but I routed it along with the gunnel after it was installed, so it blend together very nice.
Most strippers hang the seats from posts that hang down from the gunnels, I didn't want that vertical clatter running through my horizontal stripes, so fiberglassed risers to the inside of the hull. I made the seats from ash and they sit on top of the risers. Not only do I like the look, it makes for a stiffer hull. I got away with only the center yoke and no need for extra thwarts for strength.
Varnishing: pretty straight forward. I applied 3 coats outside, and ended up with 5 inside. I wanted a satin inside to show off all design work I did, I thought the high gloss reflections hid a lot. I heard the satin varnish did not have the same UV protection as gloss, and was told to put on 3 gloss for the uv and then go over that with satin for looks..true or not,,thats what I did.
And same as with the epoxy, I applied varnish with a foam roller and tipped it off with a brush. Again, I put it on as thin as possible, it too wants to sag and run. The first 2 coats gave me problems with runs, but once I got it down, I did 5 more coats without a single drip or run.
Step 7: Finished


This canoe was such an enjoyable and rewarding project, I immediately started another one. The next boat is the Northwest Canoe Cruiser. My girlfriend became very involved in that boat, helping strip, sand and fiberglass..she has claimed the boat as hers...that canoe getting finished, I have already start another,,again from Cruiser plans. I hope you got some ideas for your canoe, and hope your build goes well.
Once you get your canoe built, you will need a paddle! I made a few that I give the basics on how to build one here....


