

Introduction: CNC Cutting Rebel Emblem Badge


Hi there,
Just going to show you all a quick easy instructable on using your CNC machine to cut a Rebel Emblem from Star Wars :D.
Go ahead and check it out, its simple and fun.
Step 1: Materials

First off, you just need your materials. Not too much for this one.
1 piece of acrylic, I am using a red piece of 1/8th" acrylic.
1 piece of double sided tape, cut to the length of your material.
1 end mill, I am using a 4 flute .0571" end mill.
Of course you also need your CNC machine, I am using our MyDIYCNC Machine.
Go ahead and move on to the next step.
Step 2: Prepare Your Machine

Now that you have all of your materials, you want to mount your piece of acrylic onto you CNC milling bed. Make sure the acrylic is firmly mounted. Next find your "Home Position" generally this is going to be the corner, depends on your machine, I am setting home position at the bottom right corner with the end mill just above the acrylic.
Move on to the next step.
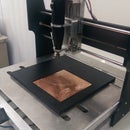
Step 3: Begin the Cutting!


Go ahead and start processing the G-code and watch your CNC machine do its business.
On a side note, be mindful that during its cutting that the end mill does not get a build-up of melting plastic, this will pretty well ruin the project. My advice once again is to use a 4 flute end mill, this will allow for optimal material extraction.
Step 4: Thats No Moon! Its a Rebel

Your Done! The Machine has successfully cut the Rebel Emblem. Why don't you try it? You can find the G-codes all over the internet, I go onto thingaverse.com quite often. Also feel free to check out my other instructables on here and also other projects and machines on MYDIYCNC.com
Thanks for looking guys!


