

Introduction: Cheap & Easy Custom-Fit Sub Box


I personally like when a car customization looks as though it belongs in the car - not out-of-place or gaudy. I also like (when possible) if a customization adds more all-around benefit to the vehicle than takes away. Some custom speaker boxes look amazing, and take up an amazing amount of trunk space. I like my trunk space, and wanted to keep it while adding a subwoofer box.
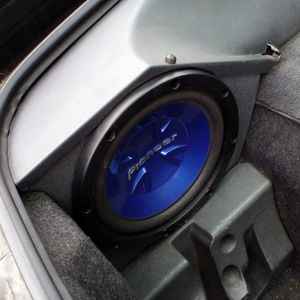
I own a 94 Chevy Camaro, and wanted to make a sub box that filled the empty space left of the t-top storage cavity. The right side of the trunk houses the spare tire, but the left side is empty. There are few commercially made enclosures available, but many of them are designed to fit smaller subwoofers , and are more of a box shape, so they don't utilize all the available volume. Plus I like making stuff, and I had access to all the stuff I needed to make one myself - so that was reason enough for me to make it myself
The cost is largely dependent on what you need to buy - and the size box you intend to make. The materials I used to make mine total around $30 (polyester resin, a few cheap brushes, chopped strand fiberglass, paint)
being that you will only use a small portion of the material in many of the containers, if you are buying all the materials for the first time, it will cost you more, but you will have a bunch of left-overs, so bottom line is, its hard to put a set number on cost
Step 1: Materials Needed


Materials Needed: [the consumable stuff]
Cardboard - [could be corrugated or non]
Packaging Tape - [the wide clear stuff - 2" -4" preferred]
Fiberglass - Chopped-Strand Mat is easier to contour, but fabric is fine too
Polyester Resin - AKA fiberglass resin
Cheap Brushes - sometimes called "chip brushes" (used for removing chips from machining parts in a shop)
Paper Cups - multiple sizes are preferable (i prefer paper because they don't have ridges to catch material, but plastic is ok too)
Stir sticks - popsicle sticks, tongue depressors, scraps, whatever is accessible
Speaker Wire
A Speaker - or at least knowing what size hole for a speaker you don't have yet
Optional Materials: [more consumable stuff that makes it "more betterer" - yes betterer]
Body filler - bondo, or other brand
Paint - textured paint can hide a lot of flaws and will be your friend - if you are more meticulous and ambitious, go for high gloss :)
Tools Required: [the bare-minimum non-consumable stuff]
Scissors - heavy duty enough to cut cardboard
Hand Saw - hack saw or other relatively fine tooth type
Drill and drill bit - size dependent upon your project specifics
Sand paper - Rough /coarse to medium [50 grit - 200grit should be sufficient]
Tools Preferred: [the "makes the job easier" non-consumable stuff]
Dremel (or other type of rotary tool) with cut-off wheel
Grinder
Power Sander
Step 2: Where to Put It - and How BIG to Make It

People have been very creative with finding spaces to put speaker boxes in cars. One of the nice things about building a subwoofer box (vs building a loudspeaker, or higher-frequency speaker box) is that the shape of the box isn't very critical - You want the overall volume to come close to the speaker manufacturers recommendations, but in the end, bass is pretty forgiving of precision [at least as far as most non-audiophiles are concerned]
For my build, I wanted to use the space in the left side of the trunk. The right side houses the spare tire, and I prefer to keep my spare just in case. Some people have made boxes that fit directly inside of full-size spare tires in the trunk well.
For my build, I wanted to use the space in the left side of the trunk. The right side houses the spare tire, and I prefer to keep my spare just in case. Some people have made boxes that fit directly inside of full-size spare tires in the trunk well.
Step 3: Cut and Tape


Here is where you get out your safety scissors and put on your safety goggles - ok I guess its just cardboard
Start cutting pieces of cardboard to fit the cavity you are filling, and taping them together with the packaging tape.
As the complete volume comes together, the mishmash of tape and cardboard should start to become somewhat structurally sound.
Make sure intermittently as you are assembling the shape that you can still remover the box from the space you are forming it into, and that it doesn't become trapped.
Once the shape is complete, cover the entire outside of the box with packaging tape. This will prevent the polyester resin from sticking to the cardboard so that you can later remove it.
Step 4: Time to Get Glassy


Fiberglass application with chopped strand mat is pretty easy, but it can get kinda messy if you aren't at least a little bit careful
For now, we will just apply a relatively thin shell of fiberglass to the outside. We'll then remove the cardboard from the inside, and build up thickness on the inside of the box [so that it still fits where you intended it to go]
A few suggestions -
1. Don't touch the resin with bare hands [if you do you can remove it with acetone, but best to avoid touching it] some people will wear gloves. I prefer the dexterity of glove-less hands, and think that rubber gloves are wasteful, so I just avoid touching the resin - if you use a chip brush, it isnt that difficult to keep your hands clean of the sticky stuff.
2. Take your time - mix up small batches of resin until you have a better idea of how much you'll need [there is nothing worse in my opinion that having a half cup of resin harden in the cup - haste makes waste, and I hate wasting stuff]
3. Put down some cardboard or newspaper to catch drips
4. Read the directions on the resin for mix ratios - if you have a scale capable of weighing ounces, it will help your proportions be more accurate
Step 5: Making Holes


Mark out the hole size for your speaker cut-out, and remove the material inside the mark.
A Dremel tool with a cut-off wheel works great for this task, but a drill and hand saw will work fine as well.
Once the hole is cut, you should be able to easily peel the card board and tape out of the inside [some cutting may be necessary]
If anything sticks to the first layer of glass [ex: any areas that you didn't fully cover with packaging tape] no need to fret. Just pull/cut/scrape off everything you can. Ideally you simply don't want big voids or pockets of air between the outer and inner layers of glass.
If you have a wire terminal - you can also cut the hole for that at this point - same way as you cut the speaker hole
Quickly sand the outer surfaces and knock off any sharp fiberglass spikeys or messed up spots
Now is a good time to double -check the fit. Stick it in and if needed mark any spots that need correcting
Step 6: Glassing - Round 2 and Likely 3, Maybe 4, If You Need to 5, But Possibly Even 6.....

Start building up rigidity and strength by reinforcing the whole volume from the inside. In theory, the more rigid the box the better the sub-woofer will work [the box wont be flexing and changing shape or volume as the cone moves]
If you rip off chunks of chopped strand and position them where you want them before mixing up the resin, you can be more productive with the pot life [amount of time before resin starts to harden in the mixing container] of the resin
If you rip off chunks of chopped strand and position them where you want them before mixing up the resin, you can be more productive with the pot life [amount of time before resin starts to harden in the mixing container] of the resin
Step 7: Prep and Paint


If you are good at applying fiberglass, or just not very particular about looks, you could simply paint, assemble and you are done
Otherwise, a bit of body filler to smooth out some low spots and a sand job can drastically improve the look.
Textured paint will hide many flaws in the surface, and make it look nice without too much extra work.
Carpet is another option, if you can find a color that matches your interior closely. It will hide a LOT of flaws, but then again, if your speaker box has surfaces with a lot of curves, it may be difficult to cover with carpet.
Leather or Fabric is yet another option which can look very nice, and will contour a bit easier than carpet.
Be creative and I'm sure you can make it look nice
Step 8: Assembly and Wiring


Time to put it all together - If you are using a terminal block/plate - attach and seal it to the box with some sealant. [I used silicone]
If you are not using a terminal block/plate - you can simply drill a hole close in size to the wire you are hooking up to the speaker in the box, and seal it up to the wire with some silicone or other sealant.
Before installing the speaker, if the volume of your box is less than the speaker manufacturer's recommended volume, adding fiberglass or or other fibrous poly fill type material can effectively simulate a larger speaker box - it seems counter-intuitive, but I guess it slows the movement of air through the volume of the box making it seem as though it is a larger volume
A foam or rubber material can be used around the mating surface of the speaker and box to create a better seal if desired
Step 9: Put It in and Pump It Up!

Time to secure it in place and button everything back up. You certainly don't want the box moving or vibrating around, so there are a number of options for securing it if needed.
-Screw it - remove the speaker, and use a sheet metal screw or two to securely attach the box to the trunk
-Tape it - there are some amazing foam cored double back tapes, or there is the tacky tape they use for vacuum bagging composites to hold it in place and prevent rattles
-Glue it - Hot glue could work - try and avoid permanent methods (construction glue, etc), you may want to or need to remove it at some point
-Be creative- I'm sure there are tons of ways to keep it in place (magnets, chewing gum, you name it!)
Thanks for reading, and I hope you enjoyed it! Please post some pictures for me to see if you make one yourself.
