

Introduction: Coil Ropes and Cords Perfectly With the Two-peg System


Gather round, neat freaks. Here's a way to coil your climbing ropes, extension cords, paracord so neatly, they look factory-fresh! And who doesn't want that? Ok, sane people mostly. But now that the sane people have lost interest, read on! We didn't need them anyway.
Materials:
Two 8" wooden dowels
A drill bit slightly larger than the dowels
Scrap 2x4 lumber (?)
This project uses two pegs (the dowels) to make neat identical-size coils. The pegs can then be removed when not in use.
Drill your holes into some kind of sturdy wood. I have these shelves in my garage made of 2x4 lumber which are perfect. If you don't have something like this, you can build an I-shape out of 2x4's and use that. In that case, you'll drill vertically down into the wood, and your pegs will stick straight up as your I-shape lies on a table. The reason to make an I-shape is that if you just use a 2x4, it will tip over. The crosspieces will keep it from tipping.
Drilling the holes:
I chose to drill three holes for my pegs, but only two pegs are used at a time. The distance between the most distant two is about 20 inches. See the yardstick in the photo. I then cut that distance in thirds and put one more hole at 1/3 between the two. This is so you have some choices about how large your coils can be. I use the longest (20") distance for climbing rope or long extension cords, the shortest distance for paracord, and the middle distance for shorter lengths of thick rope.
If you are drilling the holes into a horizontal object, like my shelf, drilling at a 20 degree downward angle assures the rope stays on and gives the pegs more weight-bearing strength.
Main Coiling:
First, insert two pegs. I used the two most distant pegs, as I am coiling a light weight climbing rope.
Tie a little starter knot around the left peg. This will be important at the end. Foreshadowing keeps the Film majors interested.
Start wrapping around the two pegs in a figure eight fashion. The X's of the figure eight discourage one loop from falling into another, keeping coils from slipping through each other, causing snarls. After a dozen times around, it works well to pile new layers atop older layers. In other words, don't try to wrap each loop directly around the dowel.
When you have about 2 meters of rope left, go to the next step.
The crosswrap:
Ok, this is the hard part.
You must execute the crosswrap when the rope is heading back toward the peg where you tied it, so toward the left.
Pull all the rope coils toward you a little bit, so you can reach behind them.
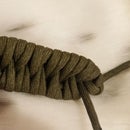
Halfway between the pegs, turn the rope 90 degrees and wrap it around the middle of the coil. Continue wrapping it, placing each to wrap to the right of the former, so you are doubling the rope back on itself. Pull nice and tight. The goal is to get around 8 wraps.
The cinch:
Now we're at the cool part. Untie the starter knot and pull on that end, the starting end, of the rope a little bit. One of the loops will shrink in response. Take the finishing end, and poke it through the shrinking loop. Pull the starting end until the loop shrinks entirely, binding down the finishing end.
You can take your rope off the pegs during this step, or after you've finished. If your rope is stuck, you can always just pull one of the pegs out. Some people say you can do this same technique around the legs of chair, but the legs on all my chairs flare out a little, so at the end, you can't get the coils off! With removable pegs, you'll never get stuck.
Uncoiling:
Pull the finishing end out of the loop.
Unwind the eight or so winds. While you are doing this, treat the rope coils like a deck of carefully arranged cards that you do not want to accidentally shuffle. If you mash the rope loops through each other, or throw the whole works end over end, you can probably get it to tangle.
Set the coils down on the ground. The loops should be piled up nicely, in the order you need them, tangle free.


